background image


Hansa C65RX O&M Manual 

 OM-029 First Release 4/05/2021 

© Hansa Chippers 2021 

Winch operation safety 

Winch operation safety:


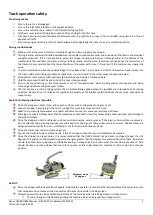
Be careful when retracting the winch. 

Do NOT 

retract the winch hook in past the rollers at the end of the winch boom 


The winch does not automatically stop once it reaches the rollers. Retracting the winch too far may damage the 
hook or rollers 


Do NOT

 attempt to lift/pull objects that weigh more than 1400 kg. 


Ensure you are familiar with the capabilities and weight of the machine before winching particularly heavy objects 


Ensure the winch rope is fully retracted and attached to the keeper hook before feeding material into the chipper 


This is to ensure the feed roller/cutting rotor does not pull in the winch rope. The rotor is rotating at high speed 
and if it does pull the winch rope in, it will do so rapidly and has the potential to cause serious injury or death to 
operators and/or result in damage to the machine 


Ensure both stabiliser feet are lowered while operating the winch 


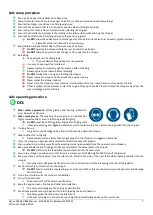
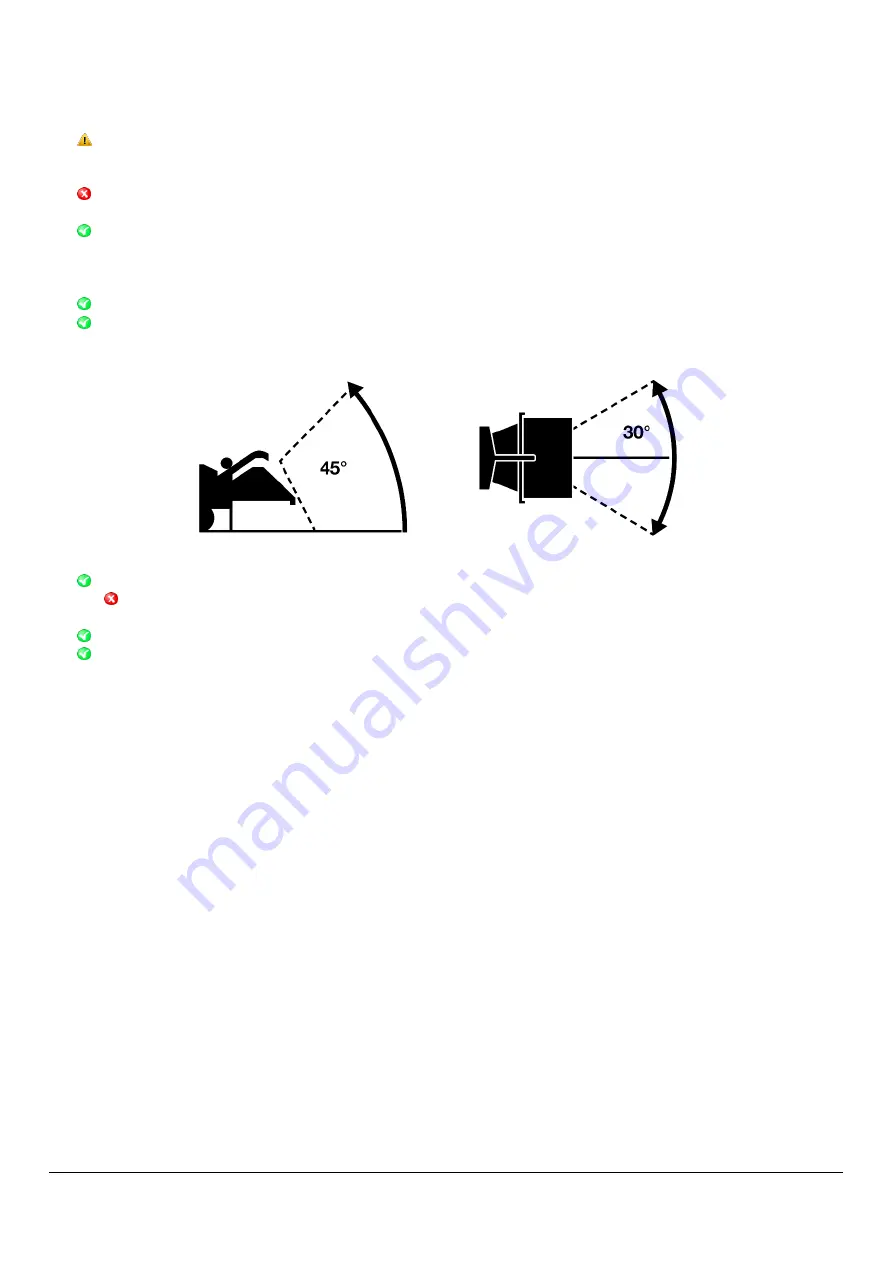
Ensure the pull angle of the winch is within the safe operating envelope. This is outlined below: 


Ensure the rope wraps around the drum at least five times 


Do NOT

 extend the rope past this point 


Winches operate on the friction principle; with less than five wraps, the rope will separate from the drum 


Ensure both stabiliser feet are lowered while operating the winch 


If a replacement winch rope is required, the rope must be of equal or greater strength than what is specified (see the 

‘Operation –


Hydraulic Winch’ section of this manual). Contact Hansa fo

r more information 

Chipping safety 

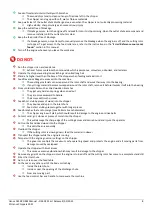
Checklist before operation 

Engine: 


Check oil level in engine  


Check condition of air cleaner 


Refer to engine manual for more details 

Check Hydraulics:


Check level of hydraulic fluid 


Check all hydraulic components for leaks 

General:


Check drive belt and pump belt for proper tension 


Check machine for proper lubrication 


Check nuts and bolts to ensure they are tight 


Check diesel level 


Check that the fuel cap is secured and there is no fuel leaking from the tank 


Check the tracks are tight and in good condition 


Check direction of the discharge chute 


Check guards are all in place and in good condition 


Check all labels are legible. Replace if necessary (contact Hansa for replacements) 


Refer to maintenance section for more details 

Safe operating envelope (vertical) 

Safe operating envelope (horizontal) 

Summary of Contents for C65

Page 1: ... info hansaproducts com au www hansaproducts com au HANSA C65RX Operation maintenance and safety manual All operators must fully read and understand this operator s manual before using the chipper Keep this manual for future reference Register your Hansa chipper to qualify www hansaproducts com registration ...

Page 2: ...NE FEATURE 13 STARTING PROCEDURE 14 SHUTDOWN PROCEDURE 15 RUBBER TRACK DRIVE 16 MANUAL MODE 16 TRACK CONTROL REMOTE PAIRING UNPAIRING PROCEDURE 17 TROUBLESHOOTING 18 MAINTENANCE SERVICE 19 WARNINGS 19 LIFTING THE SWING ARM FOR ACCESS 19 OPENING THE ROTOR COVER FOR ACCESS TO CUTTING ROTOR 20 KNIFE RE SHARPENING AND KNIFE REPLACEMENT 21 ANVIL ADJUSTMENT 23 BELT TENSION 24 CHECKING AND SETTING BELT T...

Page 3: ...signed to be used on by commercial arborists tree contractors and hire rental companies Do NOT use the chipper for any other purpose Organic wastes include Prunings stalks roots vegetable matter hay grass bark Branches Palm fronds Dead and hard timbers Note these will dull the knives faster Paper or cardboard Do NOT process Flax root balls Soil bones sand grit stones metal If you have any question...

Page 4: ...Hansa C65RX O M Manual OM 029 First Release 4 05 2021 Hansa Chippers 2021 2 Chipper overview ...

Page 5: ... cut materials and or wear a dust mask Exhaust Fumes Respiratory irritation Place the chipper in a manner that the operator or onlookers are not exposed to direct exhaust fumes Hot Exhaust Heat burns Keep bare hands and other body parts a safe distance away from hot exhaust Fire Heat burns Clear any build up of chipping debris around the engine and exhaust regularly Belt Drive Skin pinching and or...

Page 6: ... or other guard it is recommended to use the handles provided Petrol oil grease Poisoning skin irritation harmful vapours Take care when handling petrol oil and grease Wash skin if contaminated with petrol oil or grease Do NOT refuel the chipper in enclosed areas Tracks Crushing Ensure area is clear of bystanders while moving the machine Ensure the operator is controlling the machine from a point ...

Page 7: ...en the joysticks are returned to their resting positions Be careful not to release the joysticks too quickly as the brakes could destabilise the machine especially on steep terrain Avoid the following situations if possible Drive the chipper on hard stony and uneven surfaces such as streambed rock gravel etc Leave the rubber tracks lying in the direct sun light for more than three months time Make...

Page 8: ...utlined below Ensure the rope wraps around the drum at least five times Do NOT extend the rope past this point Winches operate on the friction principle with less than five wraps the rope will separate from the drum Ensure both stabiliser feet are lowered while operating the winch If a replacement winch rope is required the rope must be of equal or greater strength than what is specified see the O...

Page 9: ...y glasses and hearing protection must be worn at all times Wear work gloves The wearing of work gloves is optional but highly recommended ensure that the gloves fit tightly Do NOT wear loose fitting gloves or gloves with long cuffs Loose gloves may get snagged by branches which could result in the operator being pulled into the chipper Tie long hair up Long hair could be snagged by a branch and ma...

Page 10: ...ecomes wrapped around the rotor shaft remove it before it works itself into the bearing Process old materials such as dried wooden branches They get very hard and springy when dried out They are more awkward to handle The knives dull much quicker Feed short stubby pieces of wood into the chipper They bounce and spin in the inlet chute Feed short stubby pieces together with longer pieces Feed branc...

Page 11: ...he machine Adjust outlet rotation direction disengage the lock pin down loosen the rotation crank handle change outlet direction then tighten the rotation crank handle to lock into position Adjust outlet height turn outlet height crank handle clockwise higher or anticlockwise lower Adjust deflector angle loosen wingnut adjust angle tighten wingnut Lock for towing rotate the discharge chute to face...

Page 12: ...per A sensor detects the speed of the cutting rotor once this speed drops to a pre set level the feed roller stops the material feeding into the machine The engine then recovers to higher RPM and once it reaches a pre set speed the feed roller will start feeding again The feed roller will also reverse back slightly after stopping reducing the friction between the wood and knives resulting in quick...

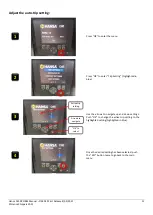
Page 13: ... OK to enter Trip Setting highlighted in blue Use the arrows to navigate up and down settings Push OK to change the active trip setting to the highlighted setting highlighted in blue Once the desired setting has been selected push the ESC button twice to go back to the main menu 1 2 3 Arrows to navigate OK to select Active trip setting 4 ...

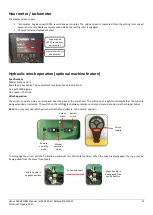
Page 14: ...n The winch is operated via a control panel near the base of the winch unit The switch on the right controls whether the winch is being extended or retracted The switch on the left toggles between remote control and manual control via the chipper body Note You may only operate the winch while the feed roller is in the neutral position To disengage the winch pull the T handle up and twist to a hori...

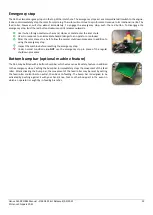
Page 15: ...hazard danger to an operator or onlooker After the rotor comes to a halt follow the normal shutdown procedure in addition to using the emergency stop Inspect the machine before resetting the emergency stop Under normal conditions do NOT use the emergency stop in place of the regular shutdown procedure Bottom bump bar optional machine feature The C65 may be fitted with a bottom bump bar which acts ...

Page 16: ...ey must be turned back to the off position before attempting to start again At this point you can use the track control remote to move the machine follow the procedure outlined in the rubber track drive section of this manual Once the machine is in position for chipping ensure the track control remote is disconnected the feed roller will not operate until the remote is disconnected Increase the th...

Page 17: ...belt friction may cause damage Allow the engine to cool down by running at idle for at least 1 2 minutes before shutting down Turn the ignition key anti clockwise into the off position to shut the chipper down WARNING The heavy rotor will continue to turn for some time after the engine has been shut down Do not open the rotor housing cover until the engine and cutting disk have completely stopped ...

Page 18: ...le switch with two settings full speed hare symbol and reduced speed tortoise symbol It is recommended to keep the speed setting at reduced speed until the operator becomes familiar with the controls The speed setting should always be set to reduced speed when making precise manoeuvres and when loading on and off trailers Manual mode In the case that the remote control system cannot be operated su...

Page 19: ... indicating that it is paired to the remote Drive the C65RX to the desired position using the left and right track controls on the remote For safety reasons the feed roller is disabled while the tracks are active To reactivate the feed roller the remote must be disconnected from the machine To disconnect the remote without causing the safety system to shut the engine down the operator can acknowle...

Page 20: ...ris then close and lock the outlet chute Outlet chute is blocked Outlet is pasted with wet leafy material Feed hard dry material in with softer material Turn the engine off and ensure rotor has completely stopped Open the outlet chute and clear blockage The material is ejected in long strips The knives and or anvil might be blunt Turn the engine off and ensure rotor has completely stopped Inspect ...

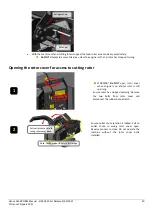
Page 21: ...nd cutting rotor stopped the feed roller area can be accessed safely Do NOT attempt to access this area unless the engine is off and rotor has stopped turning If your machine is not fitted with the Lift Crush feature Turn the engine off and wait for rotor to stop spinning Do NOT open the rotor cover or attempt to access this area unless the engine is off and rotor has stopped turning Open the roto...

Page 22: ... cutting rotor WARNING Do NOT open rotor cover when engine is on and or rotor is still spinning Ensure rotor has stopped spinning Remove the two bolts from rotor cover and disconnect the rubber bonnet latch Ensure outlet chute rotation is locked Pull on outlet chute to swing rotor cover open Reverse process to close Do not operate the machine without the rotor cover bolts installed 1 2 Pull outlet...

Page 23: ... key Torque wrench with a 24 mm socket and 16mm crows foot wrench A stick magnet optional Surface grinder Coolant Remove the knives for sharpening Open the rotor housing cover by removing the two housing cover locking bolts with a 19 mm spanner then lift the rotor housing cover to access the cutting rotor Rotate the cutting rotor to gain access to the knives then insert the rotor pin normally loca...

Page 24: ...edure Torque the knife clamping nuts up to 190 Nm Note Torque the nuts while holding the bolt head stationary to ensure correct torque After sharpening the width of the knives will have been reduced therefore the gap between the knives and anvil may require adjustment There should be 3 mm of clearance between the knife and the anvil If there is not enough clearance the knife edge may touch the anv...

Page 25: ... in this manual To remove the anvil you must remove the four countersink clamping bolts using an 18 mm socket and extension If the bolt head turns hold it with a 6 mm Allen key Note Do NOT use the Allen key to turn the bolt turn only the nut Inspect the condition of the Anvil If the other side of the anvil hasn t been used yet rotate the anvil 180 degrees and place it back on the feed roller housi...

Page 26: ... Checking and setting belt tension With the engine off fully engage the cutting rotor Check the angle of the blue tensioner device When the engagement handle is fully engaged this should be bent 20 as shown The angle can be checked by placing a ruler on the square base and checking that it lines up with the top cut out not the lower cut out in the metal plate as shown This is the best way to set t...

Page 27: ...less 3 Tighten the locknuts against each other 4 Turn the engagement handle fully clockwise and check tension again 5 Reinstall the guard Belt replacement If the belts in your chipper look similar to any of the following images or are clearly worn then they need to be replaced To remove the belts open the bonnet and fully disengage the belts The C65RX requires four SPB1360 belts 3 Remove 3 guard b...

Page 28: ...ct the belt about 3 to 5 mm when pushing firmly in the middle of the belt span The belt can be adjusted by loosening the four mounting bolts on the pump bracket bracket shown in blue below and moving the pump pulley up or down the slotted holes as per the image below A lever bar can be helpful for pushing the bracket up and down into the right position The bolts are best accessed from beneath the ...

Page 29: ...below must be greased every 50 operating hours with bearing grease or all purpose grease 1 Two bearings on the cutting rotor shaft one on the front side of the housing and one on the rear 2 One bearing on the right hand side of the feed roller 3 Two bearings on either side of the feed roller pivot also referred to as swing arm 1 2 3 4 5 6 ...

Page 30: ...e outlet chute two underneath the front edge 5 One grease nipple on the engine engagement screw thread Remove the Engagement Guard to reach the grease nipple by removing the 3 mounting bolts 6 One grease nipple for the feed roller spline connection 2 nipples one on each side Engagement guard Grease nipple ...

Page 31: ...r to the engine manual Change oil oil filter fuel filter and air filter as recommended in the manual Ensure the correct engine oil is used C65RX Track maintenance and rubber track tension Please refer to the Hinowa Tracked Undercarriage Operating and Maintenance Manual for full maintenance details Key maintenance points Each drive motor contains a reduction gearbox The oil in this gearbox needs to...

Page 32: ...pulley is tightened evenly 6 The gap between the end of the sensor and the sensing plate should be approximately 4 mm Adjust the sensor accordingly If it is set further away then the sensor may not work properly and therefore the AFC will not work Replacing rotor bearing on inlet chute side of rotor It is recommended to have this bearing replaced by a specialist Hansa dealer Bolt torque When servi...

Page 33: ...l initial change Initial Hydraulic system check Engine fan belt check Engine oil filter change Hydraulic oil filter replace Battery electrolyte level terminals check Engine fuel filter replace Outlet chute remove clean swivel Feed roller tension springs replace Anvil check knife clearance and bolt torque Hydraulic filter replace Grease engine output shaft Hayes coupling Air cleaner element replace...

Page 34: ...mm Tracked Undercarriage Speed 5 km hr max fully proportional Track drive Remote control Track material Rubber Cutting System Disc speed 1700 RPM Disc diameter 800 x 40 mm Shaft diameter 60 mm Knives Four Feed System Feed opening 457 x 254 mm 18 x 10 Chipping capacity 254 mm 10 Feed table height 610 mm Feed table length 1590 mm Inlet chute opening 1050 x 630 mm Roller Style Single roller spring mo...

Page 35: ...ppers 2021 33 Decals Decal Description Location General machine safety and inlet chute safety Side of inlet chute both sides Inlet chute safety Inside of inlet table Rotor engagement control Belt guard next to engagement arm Throttle control Side of throttle lever ...

Page 36: ...al OM 029 First Release 4 05 2021 Hansa Chippers 2021 34 Weekly service checks Rotor cover RH side Start procedure Under display screen Stop procedure Under start procedure Remote Start Stop procedure Under stop procedure ...

Page 37: ...sa C65RX O M Manual OM 029 First Release 4 05 2021 Hansa Chippers 2021 35 Outlet chute safety Outlet chute Service schedule Electrical box lid Diesel tank Diesel tank Hydraulic oil tank Hydraulic oil tank ...

Page 38: ...d roller cover and guard safety keep clear Feed roller cover RH side Feed roller guard safety keep clear Feed roller guard RH side Feed roller guard safety keep clear Feed roller guard LH side Bonnet do not open Top face of engine bonnet both sides Feed control bar Feed control bar ...

Page 39: ... Note This label is only applicable to C65RX models fitted with a winch Winch boom control panel side Rotor cover safety Rotor cover LH side near throttle Hydraulic oil fill level On hydraulic tank Label arrow aligned with 80 degree temperature mark to the left of the hydraulic level gauge ...

Page 40: ...rranty is available to domestic non commercial and commercial customers excluding commercial customers in the business of plant equipment hire All HANSA products that have not complied with the Extended Warranty registration and maintenance requirements are entitled to the Non Registered warranty period set out below Any authorised HANSA dealer is further authorised to repair or replace any part w...

Page 41: ... you purchased your HANSA product Conditional Warranty This is a HANSA extended warranty period for products that are Purchased from an authorised HANSA Dealer Registered at the time of sale through the Hansa Chippers website www hansaproducts com registration Serviced by a HANSA Dealer in accordance with the Hansa service schedule using genuine HANSA parts Meeting all other warranty requirements ...

Page 42: ...Operation Instruct the owner operator on operating procedures and techniques Safety Instruct owner operator on safety procedures Maintenance Explain the maintenance requirements and the importance of following the maintenance schedule to the owner operator Manual Emphasise the importance of reading and understanding the manual in full before initial operation of the chipper It is the retailers res...

Reviews: