background image

Safety

Page EN-6

for protection against potential sourc-
es of danger. Only parts correspond-
ing to the original appliance specifi -
cations may be used for repairs. 

In the event of a fault, as well as be-
fore extensive cleaning, pull out the 
mains plug or isolate/unscrew the 
fuse. 

Do not put any objects in or through 
the housing openings, and also en-
sure that children cannot insert any 
objects into them.

Do not remove the covers from the in-
terior lighting. Do not attempt to re-
place the interior lighting. If in doubt, 
contact our service department (see 
page EN-26).

Check the appliance regularly for 
damage.

Fire hazard!
Improper handling of the appliance can 
lead to fi re and damage to property.

Do not connect to a timer or a sepa-
rate remote-controlled system for dis-
tance monitoring and control.

Do not locate multiple portable sock-
et-outlets or portable power supplies 
at the rear of the appliance.

Risks associated with using 
refrigerants

 WARNING

Risk of fi re and explosion!
Your appliance’s refrigeration circuit 
contains the environmentally friend-
ly, but fl ammable refrigerant R600a 
(isobutane). 

Do not use mechanical devices or 
other means to accelerate the de-

frosting process, other than those 
recommended by the manufacturer. 
For example, do not use any electric 
heating equipment, knives or devices 
with an open fl ame such as a candle. 
The thermal insulation and the interi-
or are scratch and heat-sensitive and 
can melt.

Do not use electrical appliances in-
side the food storage compartments 
of the appliance, unless they are of 
the type recommended by the man-
ufacturer.

Keep the appliance away from open 
fl ames and hot surfaces.

Mechanical intervention in the refrig-
eration system must only be carried 
out by authorised specialists.

Do not damage the refrigerant cir-
cuit, e.g. by puncturing the refrigerant 
channels of the condensate evapora-
tor with sharp objects, bending the 
piping, or cutting open the insulation.

Ensure that none of the cooling fi ns 
or tubes on a refrigerator are dam-
aged prior to the point of proper dis-
posal.

Refrigerant is fl ammable when spurt-
ing out and can damage the eyes. In 
this case, rinse your eyes in clean wa-
ter and seek medical assistance im-
mediately.

To prevent the formation of a fl am-
mable gas-air mixture in the event 
of a leakage in the refrigeration cir-
cuit, the installation space must have 
a minimum size of 1 m

3

 per 8 g of 

refrigerant in compliance with the 
EN 378 standard. The amount of re-
frigerant contained in your appliance 
can be found on the type plate.

Summary of Contents for 30013847

Page 1: ...Getränkekühlschrank Gebrauchsanleitung Anleitung Version 2001 01228_DE_20201016 Bestell Nr 30013847 Nachdruck auch auszugsweise nicht gestattet HBC68FCBH ...

Page 2: ... Raumbedarf nach Gerätemaßen DE 18 Gerät aufstellen und ausrichten DE 19 Grundreinigung DE 20 Gerät anschließen DE 20 Türanschlag wechseln DE 21 Fehlersuchtabelle DE 24 Service DE 26 Beratung Reklamation und Bestellung DE 26 Reparaturen und Ersatzteile DE 26 Umweltschutz DE 27 Elektro Altgeräte umweltgerecht entsorgen DE 27 Unser Beitrag zum Schutz der Ozonschicht DE 27 Produktdatenblatt VO EU Nr ...

Page 3: ...iebnahme auf Seite DE 17 2 Entfernen Sie alle Verpackungsteile Kunststoffprofile Klebestreifen und Schaumpolster 3 Prüfen Sie ob die Lieferung vollständig ist 4 Kontrollieren Sie ob das Gerät Transport schäden aufweist 5 Sollte die Lieferung unvollständig sein oder das Gerät einen Transportschaden aufweisen nehmen Sie bitte Kontakt mit unserem Service auf siehe Seite DE 26 WARNUNG Stromschlaggefah...

Page 4: ...en Veränderun gen am Gerät vor Verwenden Sie das Gerät ausschließlich wie in dieser Gebrauchsanleitung beschrieben Jede andere Verwendung gilt als nicht be stimmungsgemäß und kann zu Sachschäden oder sogar zu Personenschäden führen Der Hersteller übernimmt keine Haftung für Schä den die durch nicht bestimmungsgemäßen Gebrauch entstanden sind Begriffs Symbolerklärung Folgende Signalbegriffe finden ...

Page 5: ...em Typschild Die vollständige Trennung vom Stromnetz erfolgt bei diesem Gerät nur durch Ziehen des Netzsteckers aus der Steckdose Gerät daher nur an eine gut zugängliche Steckdo se anschließen damit es im Störfall schnell vom Stromnetz getrennt wer den kann Falls der Netzstecker nach dem Auf stellen nicht mehr zugänglich ist muss eine allpolige Trennvorrichtung gemäß Überspannungskategorie III in ...

Page 6: ... an unseren Service siehe Seite DE 26 Gerät regelmäßig auf Schäden prü fen Brandgefahr Unsachgemäßer Umgang mit dem Gerät kann zu einem Brand zu Verlet zungen und zu Sachschäden führen Der Anschluss an eine Zeitschaltuhr oder ein separates Fernwirksystem zur Fernüberwachung und steuerung ist unzulässig Ortsveränderliche Mehrfachsteckdo sen oder Netzteile nicht an der Rück seite des Geräts platzier...

Page 7: ...r ziehen Elektro Altgeräte an einer zugelas senen Sammel oder Rücknahme stelle abgeben Nur Originalzubehörteile verwenden Risiken durch chemische Stoffe VORSICHT Explosionsgefahr Unsachgemäßer Umgang mit che mischen Stoffen kann zu Explosionen führen In diesem Gerät keine explosionsfä higen Stoffe wie zum Beispiel Aero solbehälter mit brennbarem Treib gas lagern Keine explosiven Stoffe oder Sprüh ...

Page 8: ...ätege häuse oder im Einbaugehäuse nicht verschließen VORSICHT Gesundheitsgefahr Verunreinigte Lebensmittel können ge sundheitliche Schäden verursachen Wenn die Tür für eine längere Zeit ge öffnet wird kann es zu einem erheb lichen Temperaturanstieg in den Fä chern des Gerätes kommen Die Tür nicht über längere Zeit geöffnet las sen Die Flächen die mit Lebensmitteln und zugänglichen Ablaufsystemen i...

Page 9: ...ewicht des gefüllten Gerätes tragen kann Beim Auspacken keine scharfen oder spitzen Gegenstände verwenden Beim Auspacken auf keinen Fall das Isoliermaterial an der Geräterücksei te beschädigen Innenraumbeleuchtung ausschließ lich zur Beleuchtung des Geräteinne ren verwenden Sie ist nicht zur Be leuchtung eines Raumes geeignet Beim Reinigen beachten Auf keinen Fall aggressive kör nige soda säure lö...

Page 10: ... Geräteteile Vorderansicht 1 LED Beleuchtung 2 Glastür 3 Temperatursensor 4 Tauwasserablauf 5 2 Schraubfüße 6 1 Ablagerost klein 7 2 Ablagerost groß 8 Temperaturregler 9 Ein Ausschalter 1 5 2 3 4 6 7 1 2 4 5 3 Rückansicht 8 9 ...

Page 11: ...ger 2 Räumen Sie das Gerät aus und reinigen Sie es siehe Pflege und Wartung auf Seite DE 15 3 Lassen Sie die Glastür 2 leicht geöffnet damit sich kein Schimmel bildet Warten Sie nach dem Ausschalten ca 5 Minuten bevor Sie das Gerät wieder einschalten Der Kompressor benö tigt diese Zeit zum Neustarten Temperatur einstellen WARNUNG Gesundheitsgefahr Das Gerät arbeitet eventuell nicht ein wandfrei we...

Page 12: ...eratur einstellen benötigen Sie mehr Kühl leistung Das erhöht den Energiever brauch Um die Temperatur im Geräteinnenraum kontrollieren zu können benötigen Sie ein Kühlthermometer Platzieren Sie das Kühlthermometer mittig auf das untere große Ablagerost 7 LED Beleuchtung ein und ausschalten Mithilfe des Ein Ausschalters 9 können Sie die LED Beleuchtung 1 ein und ausschal ten Den Ein Ausschalter fin...

Page 13: ...Lebensmittelabfälle Stellen Sie die Temperatur im Kühlbereich auf 6 C und befüllen Sie den Innenraum so dass die Temperaturverhältnisse im Inneren optimal ausgenutzt und die optimale Aufbe wahrung der Lebensmittel gewährleistet wer den kann Entfernen Sie vor dem Kühlen die Umver packungen wie z B Folien Kartons etc Legen Sie die Flaschen gut verschlossen auf die Ablageroste 6 und 7 Der Verschluss ...

Page 14: ...Geschmack beeinflussen Getränkedosen Stellen Sie Getränkedosen auf die Ablage roste 6 und 7 oder auf den Geräteboden Kleine Flaschen Legen Sie kleine Flaschen auf die Ablage roste 6 und 7 oder stellen Sie sie auf den Geräteboden Setzen Sie ggf das Ablagerost um Große Flaschen Legen Sie große Flaschen auf die großen Ablageroste 7 mit dem Verschluss in Richtung Glastür 2 zeigend Setzen Sie das klein...

Page 15: ...nem neutralen pH Wert Türdichtungen und Geräteteile aus Kunststoff sind empfindlich gegen Öl und Fett Verunreinigungen mög lichst schnell entfernen Nur weiche Tücher verwenden Türdichtungen kontrollieren und reinigen Die Türdichtungen müssen regelmäßig kon trolliert werden damit keine warme Luft in das Gerät eindringt 1 Klemmen Sie zur Prüfung ein dünnes Stück Papier an verschiedenen Stellen ein Da...

Page 16: ...ocken und lassen Sie die Glastür 2 zum Lüften noch einige Zeit offen 4 7 Säubern Sie die Öffnung des Tauwasser ablaufs 4 mithilfe eines Reinigungsstäb chens 8 Reinigen Sie die Türdichtung nur mit kla rem Wasser sie ist empfindlich gegen Öl und Fett 9 Setzen Sie die Ablageroste wieder ein 10 Legen bzw stellen Sie die Getränke zu rück in das Gerät 11 Stecken Sie den Netzstecker wieder ein LED Beleuc...

Page 17: ...rät möglichst nur vertikal transportieren Vor Inbetriebnahme das Kühlgerät 2 Stunden aufrecht stehen lassen Währenddessen fließt das Schmier mittel in den Kompressor zurück Über Klimaklassen Halten Sie immer die vorgeschriebene Umgebungstemperatur ein siehe Bestimmungsge mäßer Gebrauch auf Seite DE 4 Klimaklasse bedeutet dass das Gerät für den Betrieb bei der unten genannten Umgebungstem peratur be...

Page 18: ... brennbare Kältemittel R600a Iso butan Gerät von offenem Feuer und heißen Flächen fernhalten Gefahren durch Kältemittel Den Kältekreislauf nicht beschädi gen z B durch Aufstechen der Kälte mittelkanäle des Verdampfers mit scharfen Gegenständen Abknicken von Rohrleitungen usw Herausspritzendes Kältemittel ist brennbar und kann zu Augenschäden führen Spülen Sie in diesem Fall die Augen unter klarem ...

Page 19: ...leherden 30 cm zu anderen Kühlgeräten 5 cm zu Wasch Geschirrspülmaschinen 5 cm Möchten Sie diese Abstände verringern können Sie eine Isolierplatte zwischen den Geräten anbringen Stellen Sie das Gerät nicht direkt auf den Boden wenn im Boden eine Fußboden heizung installiert ist Stellen Sie in diesem Fall das Gerät auf eine Isolierplatte aus fes tem Material Gerät aufstellen und ausrichten 1 Stelle...

Page 20: ...he Seite DE 26 Der Anschluss an eine Zeitschaltuhr oder ein separates Fernwirksystem zur Fernüberwachung und steuerung ist unzulässig Netzkabelnichtknickenoderklemmen und nicht über scharfe Kanten legen Die Folge kann ein Kabelbruch sein VORSICHT Brandgefahr Unsachgemäßer Umgang mit dem Ge rät kann zu einem Brand und zu Sach schäden führen Gerät nur an eine ordnungsgemäß installierte Schutzkontakt...

Page 21: ...lagwechsel benötigen Sie folgendes Werkzeug mittelgroßer Kreuzschlitz Schraubendreher mittelgroßer Schlitz Schraubendreher Glastür abmontieren 1 Stellen Sie sicher dass das Gerät nicht ans Stromnetz angeschlossen ist 2 Nehmen Sie die Ablageroste 6 und 7 heraus 10 11 3 Drücken Sie die Blindplatte 10 und die Scharnierabdeckung 11 vorsichtig mit ei nem Schlitz Schraubendreher nach oben und heben Sie ...

Page 22: ...bfuß nun auf der gegenüberlie genden Seite wieder ein Glastür montieren 15 15 16 1 Schrauben Sie das untere Scharnier 15 auf der anderen Seite mithilfe der Schrau ben 16 wieder fest 2 Setzen Sie die Unterlegscheiben 14 auf das untere Scharnier 3 Drehen Sie die Glastür 2 um 180 und setzen Sie sie vorsichtig auf dem unteren Scharnier ein Halten Sie die Glastür fest Sie ist noch lose 4 Überprüfen Sie...

Page 23: ...hrauben 12 6 Setzen Sie die Scharnierabdeckung 11 auf das obere Scharnier und drücken Sie sie fest 7 Setzen Sie die Blindplatte 10 auf der ge genüberliegenden Seite oben ein 8 Kontrollieren Sie ob die Türdichtung gut anliegt siehe Seite DE 15 9 Setzen Sie die Ablageroste 6 und 7 wieder ein ...

Page 24: ...schaltet sich der Kompressor selbsttätig ein Gerät kühlt zu stark Temperaturregler zu hoch eingestellt Niedrigere Einstellung wählen siehe Tem peratur einstellen auf Seite DE 11 Gerät kühlt nicht ausreichend Temperaturregler zu niedrig eingestellt Höhere Einstellung wählen siehe Tempe ratur einstellen auf Seite DE 11 Tür nicht fest verschlossen oder Türdichtung liegt nicht voll auf Siehe Türdichtu...

Page 25: ...hen Kälteaggregat läuft Fließgeräusche Kältemittel fließt durch die Rohre Klicken Kompressor schaltet ein oder aus Störende Geräusche Festen Stand überprüfen Gegenstände vom Gerät entfernen Fremdkörper von der Geräterückseite entfernen Im Gerät hat sich Wasser gesam melt Tauwasserablauf ist ver stopft Verstopfung des Tauwasserablaufs mithilfe eines Reinigungsstäbchens beseitigen ...

Page 26: ...em Inverkehrbringen des letzten Exemplars des Modells zur Ver fügung Türdichtungen stehen für einen Zeit raum von zehn Jahren zur Verfügung Kunden in Deutschland Wenden Sie sich bitte an unseren Technik Service Telefon 040 36 03 31 50 Kunden in Österreich Wenden Sie sich bitte an das Kunden center oder die Produktberatung Ihres Versandhauses Bitte beachten Sie sind für den einwandfreien Zustand de...

Page 27: ...ei Austritt von Kältemittel besteht Brandgefahr Achten Sie darauf dass an einem Kühlgerät bis zur fachgerechten Ent sorgung keine Kühlrippen oder Rohre beschädigt werden Unser Beitrag zum Schutz der Ozonschicht IndiesemGerätwurden100 FCKW und FKW freie Kälte und Aufschäum mittel verwendet Dadurch wird die Ozonschicht geschützt und der Treibhaus effekt reduziert Unsere Verpackungen werden aus umwel...

Page 28: ...ufen Die Modellkennung Ihres Geräts finden Sie unter Technische Daten Bestellnummer 30013847 Gerätebezeichnung Getränkekühlschrank Modellkennung HBC68FCBH Gerätemaße Höhe Breite Tiefe 690 mm 430 mm 475 mm Leergewicht 22 kg Kältemittel R600a Kältemittel Füllmenge 17 g Schaummittel Zyklopentan Leistungsaufnahme 85 W Versorgungsspannung Frequenz Nennstrom 220 240 V 50 Hz 0 5 A Schutzklasse I Klimakla...

Page 29: ...Beverage refrigerator User manual Manual version 2001 01228_EN_20201016 Article no 30013847 Reproduction even of excerpts is not permitted HBC68FCBH ...

Page 30: ...he appliance dimensions EN 19 Setting up and aligning the appliance EN 19 Cleaning before use EN 20 Connecting the appliance EN 20 Changing the door hinges EN 22 Troubleshooting table EN 24 Service EN 26 Advice complaints and orders EN 26 Repairs and spare parts EN 26 Environmental protection EN 27 Disposing of old electrical devices in an environmentally friendly manner EN 27 Our contribution to ...

Page 31: ...it see Start up on page EN 17 2 Remove all parts of the packaging plastic profiles tape and foam padding 3 Check that the delivery is complete 4 Check whether the appliance was dam aged during transit 5 If the delivery is incomplete or the appli ance has been damaged during transport please contact our service department see page EN 26 WARNING Risk of electric shock Never use a damaged appliance ...

Page 32: ... supervised during use Do not make any technical changes to the appliance Use the appliance exclusively as described in this user manual Any other use is deemed improper and may result in damage to prop erty or even personal injury The manufactur er accepts no liability for damage caused by improper use Explanation of terms symbols The following symbols can be found in this user manual WARNING Thi...

Page 33: ...nnected to an easi ly accessible socket so that it can be quickly disconnected from the power supply in the event of a breakdown If the mains plug is no longer acces sible after connecting it an all pole disconnecting device complying with overvoltage category III must be con nected into the house wiring with a contact gap of at least 3 mm consult a qualified professional if necessary see Service o...

Page 34: ...e the de frosting process other than those recommended by the manufacturer For example do not use any electric heating equipment knives or devices with an open flame such as a candle The thermal insulation and the interi or are scratch and heat sensitive and can melt Do not use electrical appliances in side the food storage compartments of the appliance unless they are of the type recommended by th...

Page 35: ...m in their mouths When disposing of the appliance en sure that children cannot suffocate inside the appliance e g do not re move the fridge and freezer drawers unscrew the door cover Risks for certain groups of people CAUTION Dangers for children and people with limited physical sensory or mental ca pacity This appliance can be used by chil dren aged from 8 years and above and persons with reduced...

Page 36: ...ide the appliance Always ensure the prescribed ambi ent temperature is maintained see Intended use on page EN 4 Risk of damage NOTICE Risk of damage to property If the cooling unit has been transport ed horizontally lubricant from the com pressor may get into the cooling circuit If possible only transport the appli ance in a vertical position Allow the cooling unit to stand up right for two hours ...

Page 37: ... purpose cleaners with a neutral pH are recommended Door seals and plastic parts are sensitive to oil and grease Remove contaminants as quickly as possi ble Use only soft cloths for cleaning Wait 5 minutes after switching off Only then switch the appliance on again ...

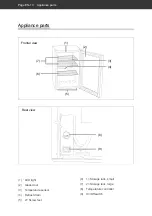
Page 38: ...ppliance parts Frontal view 1 LED light 2 Glass door 3 Temperature sensor 4 Defrost drain 5 2 Screw feet 6 1 Storage rack small 7 2 Storage rack large 8 Temperature controller 9 On Off switch 1 5 2 3 4 6 7 1 2 4 5 3 Rear view 8 9 ...

Page 39: ... and clean it see Care and maintenance on page EN 15 3 Leave the glass door 2 slightly ajar to prevent mould from forming After switching off wait for approx 5 minutes before switching the appli ance back on The compressor requires this amount of time to re start Operation Setting the temperature WARNING Health hazard The appliance may not operate proper ly if exposed to low ambient tempera tures f...

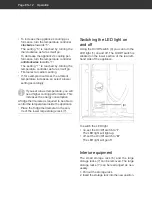
Page 40: ...ance This increases the energy consumption A fridge thermometer is required to be able to control the temperature inside the appliance Place the fridge thermometer in the cen tre of the lower large storage rack 7 Switching the LED light on and off Using the On Off switch 9 you can turn the LED light 1 on and off The On Off switch is situated on the lower section of the rear left hand side of the a...

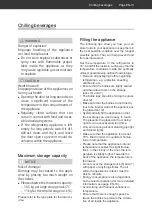
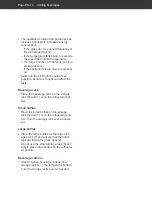
Page 41: ... in the refrigerator to 6 C and fill the inside in such a way that the temperature conditions inside are optimally utilised guaranteeing optimal food storage Remove all packaging before beginning refrigeration e g protective sheeting cardboard etc Ensure that the bottles are tightly sealed and then place them on the storage racks 6 and 7 The bottle tops should be facing the glass door 2 Make sure ...

Page 42: ...e to light can affect the taste Beverage cans Place the beverage cans on the storage rack 6 and 7 or on the refrigerator bot tom Small bottles Place the small bottles on the storage rack 6 and 7 or on the refrigerator bot tom Turn the storage rack over as need ed Large bottles Place the large bottles on the large stor age racks 7 and ensure that the bottle tops are facing the glass door 2 Do not u...

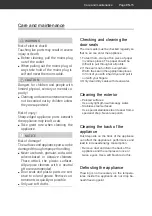
Page 43: ... sitive to oil and grease Remove con taminants as quickly as possible Only use soft cloths Checking and cleaning the door seals The door seals must be checked regularly so that no air can enter the appliance 1 To test them clamp a thin piece of paper in various places The paper should be difficult to pull through at all points 2 If the seal is not uniform everywhere Warm the seal in the appropriat...

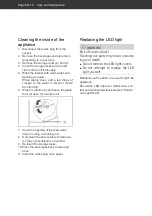
Page 44: ...leave the glass door 2 open for a while to air 4 7 Clean the opening of the thaw water drain 4 using a cleaning rod 8 Only clean the door seals with clean wa ter they are sensitive to oil and fat 9 Re insert the storage racks 10 Place the beverages back in the appli ance 11 Insert the mains plug once again Replacing the LED light WARNING Risk of electric shock Touching live parts may result in sev...

Page 45: ... when moving the appliance Do not use the door to pull or lift the appliance Bases doors etc must not be used as steps or for support purposes NOTICE Risk of damage Improper handling of the appliance may result in damage Only transport the appliance in a ver tical position where possible Allow the cooling unit to stand up right for two hours before start up The lubricant will flow back into the com...

Page 46: ... an increase in temper ature inside the appliance Always ensure the prescribed ambi ent temperature is maintained see Intended use on page EN 4 About climate categories Always ensure the prescribed ambient temperature is maintained see Intended use on page EN 4 Climate category means that the appliance is intended for operation at the specified ambient temperature Zone description Code Definition ...

Page 47: ...xt to an oven hob or radiator The following minimum distances must be maintained from electrical hobs 5 cm from oil and coal burning stoves 30 cm from other cooling appliances 5 cm from washing machines dishwashers 5 cm If you would like to reduce these distances you can fit an insulation plate between the appliances Do not place the appliance directly on the floor if underfloor heating has been i...

Page 48: ...ching live parts may result in severe injury or death Do not operate or continue to oper ate the appliance if it shows visible signs of damage e g the power cord is defective starts smoking or there is a smell of burning makes unfamiliar noises In such cases remove the mains plug from the socket and contact our Ser vice department see page EN 26 Do not connect to a timer or a sepa rate remote cont...

Page 49: ... hours after transport and before connecting This allows the lubricant enough time to flow back into the compressor Insert the mains plug into an easily ac cessible and properly installed socket 220 240 V 50 Hz The compressor starts to work the refrig erant flows through the pipes and a quiet humming sound can be heard The appli ance is switched on You will find all important information about oper...

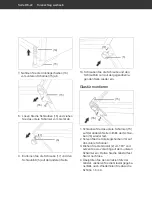
Page 50: ...ge the door hinges medium size cross tip screwdriver medium size flat headed screwdriver Removing the glass door 1 Ensure that the appliance is not connect ed to the power supply 2 Remove the storage racks 6 and 7 10 11 3 Gently push the blanking plate 10 and hinge cover 11 upwards with a slotted screwdriver and remove them Hold onto the blanking plate and hinge cov er 13 12 4 Ensure that the glas...

Page 51: ...the lower hinge 3 Rotate the glass door 2 180 and care fully insert it on the lower hinge Firmly hold onto the glass door It is still loose 4 Ensure that the glass door is positioned properly Adjust the door if necessary Re peat steps 1 to 4 12 13 5 Tighten the upper hinge 13 with the screws 12 6 Place the hinge cover 11 on the upper hinge and firmly press it down 7 Insert the blanking plate 10 on...

Page 52: ...matically switches on Appliance cools too quickly The temperature controller is set at too high a level Select a lower setting see Setting the temperature on page EN 11 The appliance does not cool suffi ciently The temperature setting is set too low Select a higher setting see Setting the temperature on page EN 11 Door not tightly closed or door seal is not completely tight See Checking and cleani...

Page 53: ...ration unit is running Flowing noise Refrigerant is flowing through the pipes Clicking Compressor is switching on or off Disturbing noises Check that it is stable Remove any objects from the appliance Remove any foreign matter from the back of the appliance Water has accu mulated in the ap pliance Defrost drain is blocked Unblock the thaw water drain with the help of the supplied cleaning swab ...

Page 54: ... for a minimum peri od of seven years after the final version of the model has been placed on the market Door seals are available for a period of ten years Customers in Germany Please contact our technical service Phone 49 0 40 36 03 31 50 Customers in Austria Please contact your mail order company s customer service centre or product advice centre Please note You are responsible for the condition...

Page 55: ...d insulation must be proper ly disposed of Refrigerant leakage may cause a fire hazard Until the point of proper disposal en sure that none of the cooling fins or tubes on a refrigerating appliance are damaged Our contribution to protecting the ozone layer 100 CFC and HFC free refriger ants and foaming agents were used in this appliance This protects the ozone layer and reduces the greenhouse ef fec...

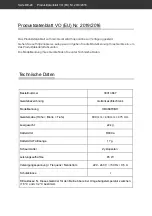
Page 56: ...ntifier of your device can be found under Technical specifications Item number 30013847 Name of appliance Beverage Refrigarator Model identifier HBC68FCBH Device measurements Height Width Depth 690 mm 430 mm 475 mm Unloaded weight 22 kg Refrigerant R600a Filling capacity refrigerant 17 g Foaming agent cyclopentane Rated power 85 W Supply voltage frequency rated current 220 240 V 50 Hz 0 5 A Protec...

Reviews: