background image

 NOTICE

Risk of damage

If the appliance has been transported 
horizontally, lubricant from the com-
pressor may make its way into the cool-
ing circuit.


Only transport the appliance in a ver-
tical position.


Allow the cooling unit to stand up-
right for 2 hours before start-up. The 
lubricant will fl ow back into the com-
pressor during this time.

Improper handling of the appliance 
can lead to property damage.


Do not pull or lift the appliance by 
the doors or door handles.


The appliance must only be placed 
on a level and fi rm surface. The sur-
face must be strong enough to sup-
port the appliance’s weight when ful-
ly laden.


Do not use sharp or pointed objects 
to unpack it. 


When unpacking the appliance, nev-
er damage the insulation material on 
the back of the appliance.


Do not use any electrical parts inside 
the appliance’s cooling chamber that 
do not conform to the manufactur-
er’s recommended design.


Do not put any objects in the ventila-
tor and also make sure that children 
cannot insert any objects into them.


Keep ventilation openings, in the ap-
pliance enclosure or in the built-in 
structure, clear of obstruction.


The interior light must only be used 
to illuminate the interior of the appli-
ance. It is not suitable for lighting a 
room.


Do not store glass or metal containers 
containing water, carbonated drinks, 
beer, etc. Water expands when frozen 
and can burst the container.


Do not store explosive substances 
such as aerosol cans with a fl amma-
ble propellant in this appliance.


Defrost the appliance in a time-
ly manner, before it forms a layer of 
ice and frost of more than 5 mm. Ex-
cessive ice formation increases pow-
er consumption, the drawers become 
diffi cult to open and the door may 
not close completely.


Do not use any means other than 
those recommended by the manufac-
turer to speed up defrosting. 


Do not use mechanical devices or oth-
er means to accelerate the defrost-
ing process, other than those recom-
mended by the manufacturer.


Do notuse electrical appliances inside 
the food storage compartment of the 
appliance, unless they are of the type 
recommended by the manufacturer.


Do notdamage the refrigerant circuit.


When cleaning, please note: 


Never use harsh, granular, soda, 
acid, solvent-based or abrasive 
cleaners. These attack the plastic 
surfaces. All-purpose cleaners with 
a neutral pH are recommended.


Door seals and plastic parts are 
sensitive to oil and grease. Remove 
contaminants as quickly as possi-
ble.


Use only soft cloths for cleaning.

Appliance parts / control elements

Page GB-10

Summary of Contents for 4912 1660

Page 1: ...r Kombination Gebrauchsanleitung Anleitung Version 196667 DE 20190826 Bestell Nr 4948 5830 9812 0642 4912 1660 9277 8750 Nachdruck auch auszugswei se nicht gestattet HKT17560A2W HKT17560A2B HKT17560A2R HKT17560A2I ...

Page 2: ...E 25 Inbetriebnahme DE 27 Bevor Sie das Gerät in Betrieb nehmen DE 27 Auspacken und Aufstellen DE 27 Abstandhalter montieren DE 29 Gerät aufstellen und ausrichten DE 29 Grundreinigung DE 30 Gerät in Betrieb nehmen DE 30 Fehlersuchtabelle DE 31 Service DE 33 Beratung Bestellung und Reklamation DE 33 Reparaturen und Ersatzteile DE 33 Umweltschutz DE 34 Elektro Altgeräte umweltgerecht entsorgen DE 34...

Page 3: ...betriebnahme auf Seite DE 27 2 Entfernen Sie alle Verpackungsteile Kunststoffprofile Klebestreifen und Schaumpolster 3 Prüfen Sie ob die Lieferung vollständig ist 4 Kontrollieren Sie ob das Gerät Transport schäden aufweist 5 Sollte die Lieferung unvollständig sein oder das Gerät einen Transportschaden aufweisen nehmen Sie bitte Kontakt mit unserem Service auf siehe Seite DE 33 WARNUNG Stromschlagg...

Page 4: ...r Kühlbereich 5 3 Türablagen 6 1 Flaschenablage 7 2 Schraubfüße 9 10 8 11 12 2 3 4 5 13 1 8 Gemüseschublade 9 Glasablage als Abdeckung für die Gemüseschublade 10 Tauwasserablauf 11 3 Glasablagen im Kühlbereich 12 Temperaturregler 13 Innenraumbeleuchtung 6 7 Geräteteile Bedienelemente Seite DE 4 ...

Page 5: ...ne Haftung für Schäden die durch nicht bestimmungsgemäßen Gebrauch entstanden sind Begriffserklärung Folgende Signalbegriffe finden Sie in dieser Gebrauchsanleitung WARNUNG Dieser Signalbegriff bezeichnet eine Gefährdung mit einem mittleren Risi kograd die wenn sie nicht vermieden wird den Tod oder eine schwere Verlet zung zur Folge haben kann VORSICHT Dieser Signalbegriff bezeichnet eine Gefährdun...

Page 6: ... an eine Zeitschaltuhr oder ein separates Fernwirksystem zur Fernüberwachung und steuerung ist unzulässig Die vollständige Trennung vom Stromnetz erfolgt bei diesem Gerät nur durch Ziehen des Netzsteckers Gerät daher nur an eine gut zugäng liche Steckdose anschließen damit es im Störfall schnell vom Stromnetz ge trennt werden kann Falls der Netzstecker nach dem Auf stellen nicht mehr zugänglich is...

Page 7: ... Schäden prüfen Dieses Gerät ist entsprechend der Gebrauchsanweisung zu befestigen um Gefahren durch mangelhafte Standfestigkeit auszuschließen Risiken für Kinder Erstickungsgefahr Kinder können sich in der Verpackungsfolie verfangen oder Kleinteile verschlucken und ersticken Kinder nicht mit der Verpackungsfolie spielen lassen Kinder daran hindern Kleinteile vom Gerät abzuziehen oder aus dem Zu b...

Page 8: ...ahren durch Kältemittel Im Kältemittel Kreislauf Ihres Gerätes befindet sich das umweltfreundliche aber brennbare Kältemittel R600a Isobutan Mechanische Eingriffe in das Kältesystem sind nur autorisierten Fachkräften erlaubt Den Kältekreislauf nicht beschädi gen z B durch Aufstechen der Käl temittelkanäle des Verdampfers mit scharfen Gegenständen Abknicken von Rohrleitungen Aufschneiden der Isolier...

Page 9: ...n abtauen reinigen und die Tür offen lassen um Schimmelbildung zu ver meiden Gesundheitsgefahr Durch falsche Handhabung unzureichende Kühlung oder Überlagerung können die eingelagerten Lebensmittel verderben Bei Verzehr besteht die Gefahr einer Lebensmittelvergiftung Insbesondere rohes Fleisch und Fisch ausreichend verpacken damit danebenliegende Lebensmittel nicht durch Salmonellen o Ä kontaminie...

Page 10: ... Gerät nicht an den Türen oder Tür griffen ziehen oder heben Gerät nur auf einem ebenen und festen Untergrund abstellen Der Un tergrund muss das Gewicht des ge füllten Gerätes tragen können Beim Auspacken keine scharfen oder spitzen Gegenstände verwenden Beim Auspacken auf keinen Fall das IsoliermaterialanderGeräterückseite beschädigen Keine elektrischen Geräte innerhalb des Kühlraums betreiben di...

Page 11: ...alzubehörteile verwenden Weitere Hinweise Wenn Ihr Gerät eine LED Beleuch tung hat kontaktieren Sie den Ser vice da diese Beleuchtung nur durch autorisierte Fachkräfte ausgetauscht werden darf WenndieSteckdosenichtzumStecker des Gefriergeräts passt muss dieser durch den Hersteller seinen Kunden dienst oder eine ähnliche autorisierte Fachkraft ausgetauscht werden um Gefahren zu vermeiden An die Net...

Page 12: ...ellen Sie den Temperaturregler 12 auf Der Kompressor ist ausgeschaltet Das Ge rät kühlt nicht Die Innenraumbeleuchtung funktioniert weiterhin 2 Um das Gerät ganz auszuschalten ziehen Sie den Netzstecker aus der Steckdose 3 Wenn das Gerät ausgeschaltet ist lassen Sie die Tür leicht geöffnet damit sich kein Schimmel bildet Temperatur einstellen WARNUNG Gesundheitsgefahr Das Gerät arbeitet eventuell ...

Page 13: ...alerweise 2 Kühl Ge frierthermometer Platzieren Sie eins im Kühlbereich oberhalb der Gemüseschublade 8 und eins im Ge frierbereich Die richtige Temperatur im Kühl bereich beträgt 6 C Im Gefrierbereich be trägt die ideale Lagertemperatur 18 C Bedienung Seite DE 13 ...

Page 14: ...n von fri schen Lebensmitteln geeignet Wenn das Kühl Gefriergerät längere Zeit leer steht das Gerät ausschalten abtauen reinigen und die Tür offen lassen um Schimmelbildung zu ver meiden Kühlbereich bestücken 11 11 11 8 8 5 6 6 6 6 6 5 5 5 5 5 5 5 Bestücken Sie den Kühlbereich so dass er die Temperaturverhältnisse im Inneren optimal ausnutzt Legen Sie streichfähige Butter und Käse in die oberste T...

Page 15: ...ig vom gewählten Standort nähere Informa tionen siehe Seite DE 27 Qualität erhalten Damit Aroma und Frische der Nahrungs mittel im Kühlbereich erhalten bleiben legen oder stellen Sie alle zu kühlenden Lebensmittel nur verpackt in den Kühlbe reich Verwenden Sie spezielle Kunststoff behälter für Lebensmittel oder handelsüb liche Folien Legen Sie die Lebensmittel so in den Kühlbereich dass die Luft f...

Page 16: ...ll oder einer Störung am Gerät das eingelagerte Gefriergut aus dem Gerät nehmen und in einem ausreichend kühlen Raum oder einem anderen Kühlgerät lagern max Lagerzeit bei Störung 34 Stunden Nach einer Störung überprüfen ob die eingelagerten Lebensmittel noch genießbar sind Auf oder angetaute Lebensmittel nicht wieder einfrieren sondern sofort verbrauchen Verletzungsgefahr Unsachgemäßer Umgang mit ...

Page 17: ...lebebänder Das Portionieren Verwenden Sie möglichst flache Porti onen diese frieren schneller bis in den Kern durch Streichen Sie die Luft aus dem Gefrier beutel heraus denn sie begünstigt das Austrocknen und nimmt Platz weg Füllen Sie Flüssigkeitsbehälter max zu denn beim Frieren dehnt sich Flüssigkeit aus Lagern Sie keine Glas oder Metallgefäße mit Flüssigkeit wie Wasser Limonade Bier etc Wasser...

Page 18: ...eit liegt Um Lebensmittel schnell aufzutauen nut zen Sie z B die Auftaufunktion Ihrer Mi krowelle Beachten Sie dabei die Herstel lerangaben und beachten Sie dass sich so vermehrt Bakterien und Keime bilden können Wenn Sie nur einen Teil einer Packung auftauen möchten entnehmen Sie diesen und schließen Sie die Packung sofort wie der Dadurch beugen Sie Gefrierbrand vor und vermindern die Eisbildung ...

Page 19: ... Sie sicher dass das Gerät nicht ans Stromnetz angeschlossen ist 2 Öffnen Sie die Gefrierbereichstür 3 und schließen Sie die Kühlbereichstür 4 19 3 18 3 Lösen Sie mit einem Kreuzschlitz Schrau bendreher die beiden Schrauben 18 des oberen Scharniers 19 und nehmen Sie das Scharnier 19 sowie die Gefrierbe reichstür 3 ab Türanschlag wechseln 20 21 4 4 Lösen Sie mit einem Kreuzschlitz Schrau bendreher ...

Page 20: ...en Scharnier 23 mit einem Schlitz schraubendreher und setzen Sie ihn um 23 22 7 2 Schrauben Sie das untere Scharnier 23 mit den Schrauben 22 und dem Schraubfuß 7 auf der gegenüberliegenden Seite fest 26 25 3 Lösen Sie die Schraube 25 mit einem Kreuzschlitz Schraubendreher und neh men Sie außerdem mithilfe des Messers den Blilndstopfen 26 gegenüber ab 4 Vertauschen Sie die Positionen der Schraube 2...

Page 21: ...schlitz Schrau bendreher die Schrauben 32 der Schar niereinsatzverstärkung 33 und nehmen Sie die Scharniereinsatzverstärkung 33 sowie den Scharniereinsatz 34 ab 32 33 34 2 Setzen Sie den Scharniereinsatz 34 auf der gegenüberliegenden Seite ein und schrauben Sie ihn und die Scharnie reinsatzverstärkung 33 mit den beiden Schrauben 32 wieder fest 3 Vertauschen Sie den Blindstopfen und den Einsatz für...

Page 22: ...ft 40 am oberen Scharnier 19 mit einem Schlitz schraubendreher und setzen Sie ihn um Türen einsetzen 1 Setzen Sie die Kühlbereichstür 4 wieder ein 21 22 2 Schrauben Sie das mittlere Scharnier 21 mit den Schrauben 20 wieder an 3 19 18 3 Setzen Sie die Gefrierbereichstür 3 in den Scharnierstift 35 des mittleren Scharniers 21 und schrauben Sie das obere Scharnier 19 mit den Schrau ben 18 wieder an Ne...

Page 23: ...s Kunststoff sind empfindlich gegen Öl und Fett Verunreinigungen mög lichst schnell entfernen Nur weiche Tücher verwenden Türdichtungen kontrollieren und reinigen Die Türdichtungen müssen regelmäßig kont rolliert werden damit keine warme Luft in das Gerät eindringt 1 Klemmen Sie zur Prüfung ein dünnes Stück Papier an verschiedenen Stellen ein Das Papier muss sich an allen Stellen gleich schwer durc...

Page 24: ...eichend gekühlt bleiben Wenn Sie keine Möglichkeit haben das Gefrier gut in einem anderen Gefrierschrank zwischenzulagern wickeln Sie es dick in Zeitungspapier ein und lagern Sie es während der Abtauzeit in einem kühlen Raum oder in einer Isoliertasche 5 Nehmen Sie die Ablage 2 aus dem Gefrierbereich heraus Waschen Sie sie in warmem Wasser mit Spülmittel und trocknen Sie sie gründlich ab 6 Stellen...

Page 25: ...euchtung HINWEIS Unsachgemäßer Umgang mit dem Ge rät kann zu Sachschäden führen Innenraumbeleuchtung ausschließ lich zur Beleuchtung des Geräte In nenraums verwenden Sie ist nicht zur Beleuchtung eines Raumes geeignet Die Innenraumbeleuchtung schaltet sich beim Öffnen der Tür automatisch ein und erlischt beim Schließen Innenraumbeleuchtung auswechseln WARNUNG Stromschlaggefahr Das Berühren von unt...

Page 26: ...nehmen Sie sie ab 4 Drehen Sie die defekte Glühlampe aus der Fassung und ersetzen Sie sie durch eine neue 5 Setzen Sie die Abdeckung wieder ein und drücken Sie sie dann vorsichtig fest 6 Setzen Sie die Halteschraube 15 wieder ein und schrauben Sie sie fest Pflege und Wartung Seite DE 26 ...

Page 27: ...n Spülen Sie in diesem Fall die Augen unter klarem Wasser und rufen Sie sofort einen Arzt HINWEIS Beschädigungsgefahr Unsachgemäßer Umgang mit dem Ge rät kann zu Beschädigungen führen Das Kühlgerät möglichst nicht in die Horizontale kippen Zum Auspacken keine scharfen oder spitzen Gegenstände verwenden Beim Auspacken auf keinen Fall das Isoliermaterial an der Geräterücksei te beschädigen Das Gerät...

Page 28: ...n Gerätes tragen können Gut geeignet sind Standorte die trocken gut belüftet und möglichst kühl sind Ungünstig sind Standorte mit direkter Son neneinstrahlung oder unmittelbar neben einem Ofen Herd oder Heizkörper WARNUNG Ihr Gerät sollte sich mindes tens 50 cm von Öfen Gasöfen und Heiz körpern und mindestens 5 cm von Elektroö fen entfernt befinden Wenn Ihr Kühlschrank neben einer Kühltruhe stehen...

Page 29: ...n kann zur Überhitzung führen und Schä den am Gerät verursachen Der gesamte Raum oberhalb des Ge rätes muss frei bleiben Das Gerät darf nicht direkt an der Wand stehen min 5 cm Abstand las sen 1 Stellen Sie das Gerät auf einen möglichst ebenen festen Untergrund 2 Überprüfen Sie den Stand mit einer Was serwaage 7 3 Gleichen Sie Unebenheiten des Un tergrunds mithilfe der beiden vorderen Schraubfüße ...

Page 30: ...senleiste oder eine Mehrfach steckdose ist unzulässig HINWEIS Beschädigungsgefahr Wenn das Kühlgerät liegend transpor tiert wurde kann Schmiermittel aus dem Kompressor in den Kühlkreislauf gelangt sein Nach dem Transport und vor dem An schließen das Gerät ca 2 Stunden aufrecht stehen lassen Dadurch hat das Schmiermittel genügend Zeit um in den Kompressor zurückzufließen Stecken Sie den Netzstecker ...

Page 31: ...Innenraumtemperatur steigt schaltet sich der Kompressor selbsttätig ein Gerät kühlt zu stark Temperaturregler zu hoch eingestellt Niedrigere Einstellung wählen siehe Tem peratur einstellen auf Seite 25 Gerät kühlt nicht ausreichend Temperaturregler zu niedrig eingestellt Höhere Einstellung wählen siehe Tempera tur einstellen auf Seite 25 Tür nicht fest verschlossen oder Türdichtung liegt nicht vol...

Page 32: ...ie Rohre Klicken Kompressor schaltet ein oder aus Störende Geräusche Festen Stand überprüfen Gegenstände vom Gerät entfernen Fremdkörper von der Geräterückseite ent fernen Unten im Kühlbe reich hat sich Was ser gesammelt Tauwasserablauf unterhalb der unteren Gemüseschubla de ist verstopft Verstopfung des Tauwasserablaufs mithilfe eines des mitgelieferten Reinigungsstäb chens beseitigen Fehlersucht...

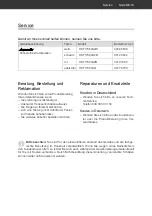
Page 33: ... 0642 rot HKT17560A2R 4912 1660 edelstahl HKT17560A2I 9277 8750 Service Reparaturen und Ersatzteile Kunden in Deutschland Wenden Sie sich bitte an unseren Tech nik Service Telefon 040 36 03 31 50 Kunden in Österreich Wenden Sie sich bitte an das Kundencen ter oder die Produktberatung Ihres Ver sandhauses Bitte beachten Sie sind für den einwandfreien Zustand des Gerätes und die fachge rechte Benutz...

Page 34: ...l besteht Brandgefahr Achten Sie darauf dass an einem Kühlgerät bis zur fachgerechten Ent sorgung keine Kühlrippen oder Rohre beschädigt werden Unser Beitrag zum Schutz der Ozonschicht In diesem Gerät wurden 100 FCKW und FKW freie Kälte und Aufschäummittel verwendet Da durch wird die Ozonschicht ge schützt und der Treibhauseffekt reduziert Unsere Verpackungen werden aus umwelt freundlichen wiederv...

Page 35: ...gieverbrauch 206 kWh Jahr auf der Grundlage von Ergebnissen der Normprüfung über 24 Stunden Der tatsächliche Verbrauch hängt von der Nutzung und vom Standort des Geräts ab Nutzinhalt Kühlbereich 242 L Nutzinhalt Gefrierbereich Sterne Einstufung 63 L 4 Sterne Lagerzeit bei Störung 19 h Gefriervermögen 3 5 kg 24 h Klimaklasse ST N Dieses Gerät ist für den Betrieb bei einer Umgebungstemperatur zwisch...

Page 36: ...g Kühl Gefrier Kombination Modell HKT17560A2W HKT17560A2B HKT17560A2R HKT17560A2I Gerätemaße Höhe Breite Tiefe mit Anschlüssen 170 5 cm 59 5 cm 59 8 cm Leergewicht 56 kg Kältemittel R600a Kältemittel Füllmenge 70 g Schaummittel Zyklopentan Leistungsaufnahme 186 W Versorgungsspannung Frequenz Nennstrom 220 240 V 50 Hz 1 17 A Schutzklasse I ...

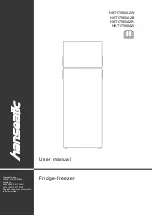
Page 37: ...idge freezer User manual Manual version 196667 GB 20190826 Article no 4948 5830 9812 0642 4912 1660 9277 8750 Reproduction even of excerpts is not permitted HKT17560A2W HKT17560A2B HKT17560A2R HKT17560A2I ...

Page 38: ...Before starting to use the appliance GB 26 Unpacking and setup GB 26 Assembling the spacers GB 28 Setting up and aligning the appliance GB 28 Basic cleaning GB 29 Commissioning the appliance GB 29 Troubleshooting table GB 30 Service GB 32 Advice order and complaint GB 32 Repairs and spare parts GB 32 Environmental protection GB 33 Disposing of old electrical devices in an environmentally friendly ...

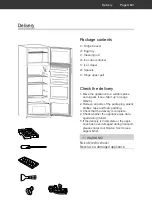
Page 39: ...ee Start up on page GB 26 2 Remove all parts of the packaging plastic profiles tape and foam padding 3 Check that the delivery is complete 4 Check whether the appliance was dam aged during transit 5 If the delivery is incomplete or the appli ance has been damaged during transport please contact our Service Centre see page GB 32 WARNING Risk of electric shock Never use a damaged appliance Delivery ...

Page 40: ...e compartment door 5 3 door shelves 6 1 bottle rack 7 2 Screw feet 9 10 8 11 12 2 3 4 5 13 1 8 Vegetable drawers 9 Glass shelf as a cover for the vege table drawer 10 Defrost drain 11 3 x glass shelves in fridge compart ment 12 Temperature controller 13 Interior lighting 6 7 Appliance parts control elements Page GB 4 ...

Page 41: ...y or even personal injury The manufacturer accepts no li ability for damage caused by improper use Explanation of terms The following symbols can be found in this user manual WARNING This symbol indicates a hazard with a medium level of risk which if not avoid ed could result in death or serious inju ry CAUTION This symbol indicates a hazard with a low level of risk which if not avoided could resu...

Page 42: ...tted The appliance can only be complete ly disconnected from the power sup ply by pulling out the mains plug The appliance must therefore be connect ed to an easily accessible socket so that it can be quickly disconnected from the power supply in the event of breakdown If the mains plug is no longer acces sible after installation an all pole dis connecting device complying with overvoltage categor...

Page 43: ... Prevent children from pulling small parts from the device or taking them out of the accessory bag and putting them in their mouths Risks when dealing with chemical substances Danger of explosion Improper handling of chemical sub stances can lead to explosions Do not store explosive substances or spray cans with flammable propel lants inside the appliance as they may cause ignitable gas air mixture...

Page 44: ...ssistance im mediately To prevent the formation of a flam mable gas air mixture in the event of a leakage in the refrigeration circuit the installation space must have a minimum size of 1 m3 per 8 g of re frigerant in compliance with the EN 378 standard The amount of refrig erant contained in your appliance can be found in the data sheet at the end of this user manual Risk of injury Improper handli...

Page 45: ...move stored frozen food from the appli ance and store it in a sufficiently cool place or in another refrigerating ap pliance maximum storage time in case of malfunction 34 hours After a malfunction check wheth er the stored food is still edible Con sume thawed and defrosted foods immediately do not refreeze Use only drinking water to make ice cubes The appliance may not operate proper ly if exposed...

Page 46: ...e used to illuminate the interior of the appli ance It is not suitable for lighting a room Do not store glass or metal containers containing water carbonated drinks beer etc Water expands when frozen and can burst the container Do not store explosive substances such as aerosol cans with a flamma ble propellant in this appliance Defrost the appliance in a time ly manner before it forms a layer of ic...

Page 47: ...vice agent or similar persons in order to avoid a hazard A specially grounded plug has been connected to the power cable of your refrigerator This plug should be used with a specially grounded socket of 16 amperes If there is no such socket in your house please have it installed by an authorized electrician The refrigerator should be placed against a wall with a free distance not exceeding 75 mm T...

Page 48: ...1 Set the temperature controller 12 to The compressor is switched off The appli ance doesn t refrigerate The interior light continues to function 2 To switch the appliance off completely pull out the mains plug 3 If the appliance is switched off leave the door open slightly to avoid mould forma tion Setting the temperature WARNING Health hazard The appliance may not operate proper ly if exposed to...

Page 49: ...trol the refrigera tion output Place one in the fridge compartment above the vegetable drawer 8 and one in the freez er compartment The correct temperature in the fridge compartment is 6 C The ideal storage temperature in the freezer compart ment is 18 C Operation Page GB 13 ...

Page 50: ...ting appliance is left empty for long periods switch off defrost clean dry and leave the door open to prevent mould developing within the appliance Filling the fridge compartment 11 11 11 8 8 5 6 6 6 6 6 5 5 5 5 5 5 5 Fill the fridge compartment in such a way that the temperature conditions inside are used to their full potential Place spreadable butter and cheese on the highest door shelf 5 in th...

Page 51: ... consumption is also dependent on the selected location for more detailed information see page GB 26 Maintaining quality To maintain the flavour and freshness of food in the fridge compartment only place packaged food in the fridge compartment Use special plastic containers for food or customary films Place the food in the fridge in a way that allows the air to circulate freely Do not cover the sh...

Page 52: ...k of injury Improper handling of the appliance mayresultininjury Riskofburnscaused by low temperatures The food and the inside walls of the freezer compartment have a very low temperature Never touch them with wet hands This can cause injury to the skin Skin damage can occur even with dry skin Let ice cubes or ice lollies thaw a lit tle before eating do not put into your mouth straight from the fr...

Page 53: ...ca pacity in kg 24h in the data sheet at the end of this user manual Keep fresh goods out of contact with existing frozen foods as they could start to thaw If contact with stored food can not be avoided we recommend that you create a cold reserve in the freezer before freezing the fresh goods The temperature in the freezer briefly rises af ter placing fresh goods inside After 24 hours the goods ar...

Page 54: ...rd The consumption of ice cubes that have been prepared using contaminat ed or standing water can be harmful to health Incorrect handling can lead to a risk of food poisoning Use only fresh drinking water to make ice cubes Fill the supplied ice cube container to the level with fresh drinking water and place it horizontally in the freezer com partment The ice cubes are best removed by bending the i...

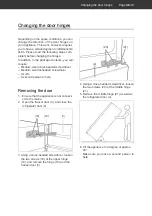
Page 55: ...person to help Removing the door 1 Ensure that the appliance is not connect ed to the mains 2 Open the freezer door 3 and close the refrigerator door 4 19 3 18 3 Using a cross headed screwdriver loosen the two screws 18 of the upper hinge 19 and remove the hinge 19 and the freezer door 3 Changing the door hinges 20 21 4 4 Using a cross headed screwdriver loosen the two screws 20 of the middle hing...

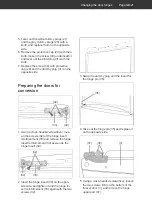
Page 56: ... Loosen the hinge pin 24 on the lower hinge 23 with a flat headed screwdriver and set it aside 23 22 7 2 Tighten the lower hinge 23 with the screws 7 and the screw foot 22 on the opposite side 26 25 3 Loosen the screw 25 with a cross head ed screwdriver and remove the dummy plug 26 with the knife 4 Swap the positions of the screw 25 and the dummy plug 26 31 29 28 27 Changing the door hinges Page G...

Page 57: ...headed screwdriver loos en the screws 32 of the hinge insert reinforcement 33 and remove the hinge insert reinforcement 33 as well as the hinge insert 34 32 33 34 2 Insert the hinge insert 34 on the oppo site side and tighten it and the hinge in sert reinforcement 33 again with the two screws 32 3 Swap the dummy plug and the insert for the hinge pin 35 35 4 Take out the hinge pin 35 and replace it...

Page 58: ...nge pin 40 on the upper hinge 19 with a flat headed screwdriver and set it aside Attaching the doors 1 Replace the refrigerator door 4 21 22 2 Re tighten the middle hinge 21 with the screws 20 3 19 18 3 Place the refrigerator door 3 into the hinge pin 35 of the middle hinge 21 and re tighten the upper hinge 19 with the screws 18 Make sure you have a second person to help Changing the door hinges P...

Page 59: ...als must be checked regularly so that no air can enter the appliance 1 To test them clamp a thin piece of paper in various places The paper should be difficult to pull through at all points 2 If the seal is not uniform everywhere Warm the seal in the appropriate places in front of you with a hair dryer and pull it out with your fingers 3 Only clean dirty seals with clean water Clean exterior Paint...

Page 60: ... in an insulated bag while it is defrosting 5 Remove the shelf 2 from the freezer compartment Wash them in warm water with washing up liquid and dry thorough ly 6 Place a bowl of hot but not boiling wa ter in the freezer compartment This will accelerate the defrosting process 7 Leave the door open during defrosting and place a cloth in front of the appli ance to catch any defrost water which comes...

Page 61: ...oom The interior light switches on automatically when you open the door and switches off when you close it Replacing the interior light WARNING Risk of electric shock Touching live parts may result in severe injury or death Unplugthemainscablebeforechang ing the light bulb Only use light bulbs with an output of max 10 W 230 volts and an E14 base ILCOS IBB C 28 220 240 E14 35 1 Pull the mains plug ...

Page 62: ...eyes If this happens rinse eyes with clean water and seek medical assistance immediately NOTICE Risk of damage Improper handling of the appliance may result in damage If possible do not tilt the cooling ap pliance horizontally Do not use sharp or pointed objects to unpack it When unpacking the appliance nev er damage the insulation material on the back of the appliance The appliance may not operat...

Page 63: ...t only be placed on a level and firm surface The surface must be strong enough to support the appliance s weight when fully laden Suitable locations are dry well ventilated areas that are cool if possible Unsuitable locations are ones with direct sunlight or which are directly next to an oven hob or radiator WARNING Your appliance should be at least 50 cm away from stoves gas ovens and heater core...

Page 64: ...p and aligning the appliance NOTICE Risk of damage Insufficient air circulation may lead to overheating and cause damage to the appliance The entire space above the appliance must remain clear The appliance should not stand di rectly against the wall leave a mini mum clearance of 5 cm 1 Place the appliance on as flat and as firm a base as possible 2 Check the position with a spirit level 7 3 Level ...

Page 65: ...cket extension cable or a mul ti socket plug NOTICE Risk of damage If the appliance has been transported horizontally lubricant from the com pressor may make its way into the cool ing circuit Allow the appliance to stand upright for approx 2 hours after transport and before connecting This allows the lubricant enough time to flow back into the compressor Insert the mains plug into an easily acces s...

Page 66: ...mperature rises the compressor au tomatically switches on Appliance cools too quickly The temperature controller is set at too high a level Select a lower setting see Setting the tem perature on page 25 The appliance doesn t cool suffi ciently The temperature setting is set too low Select a higher setting see Setting the tem perature on page 25 Door not tightly closed or door seal is not completel...

Page 67: ...rough the pipes Clicking Compressor is switching on or off Disturbing noises Check that it is stable Remove any objects from the appliance Remove any foreign matter from the back of the appliance Water has accumu lated in the fridge compartment at the bottom The defrost water drain below the lower vegetable drawer is blocked Unblock the defrost water drain using the enclosed cleaning rod s Trouble...

Page 68: ...ack HKT17560A2B 9812 0642 red HKT17560A2R 4912 1660 stainless steel HKT17560A2I 9277 8750 Service Repairs and spare parts Customers in Germany Please contact our technical service Telephone 040 36 03 31 50 Customers in Austria Please contact your mail order company s customer service centre or product advice centre Please note You are responsible for the condition of the appliance and its proper u...

Page 69: ...sed of Refrigerant leakage may cause a fire hazard Until the point of proper disposal ensure that none of the cooling fins or tubes on a cooling appliance are damaged Our contribution to the protection of the ozone layer 100 CFC and HFC free refriger ants and foaming agents were used in this appliance This protects the ozone layer and reduces the green house effect Our packaging is made of environme...

Page 70: ...nt A Energy consumption 206 kWh per year based on standard test results for 24 hours Actual energy consumption will depend on how the appliance is used and where it is located Storage volume Refrigerator 242 L Storage volume Freezer Star rating 63 L 4 star Power cut safe 19 h Freezing capacity 3 5 kg 24 h Climate class ST N This appliance is intended to be used at an ambient temperature between 16...

Page 71: ...ator freezer Model identifier HKT17560A2W HKT17560A2B HKT17560A2R HKT17560A2I Device measurements Height Width Depth with connections 170 5 cm 59 5 cm 59 8 cm Unloaded weight 56 kg Refrigerant R600a Filling capacity refrigerant 70 g Foaming agent Cyclopentane Rated power 186 W Supply voltage frequency rated current 220 240 V 50 Hz 1 17 A Protection class I ...

Page 72: ......

Reviews: