background image

Page EN-14

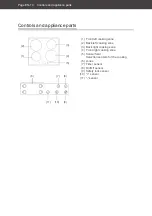
Cooking zones and sensors

Cooking zones and sensors

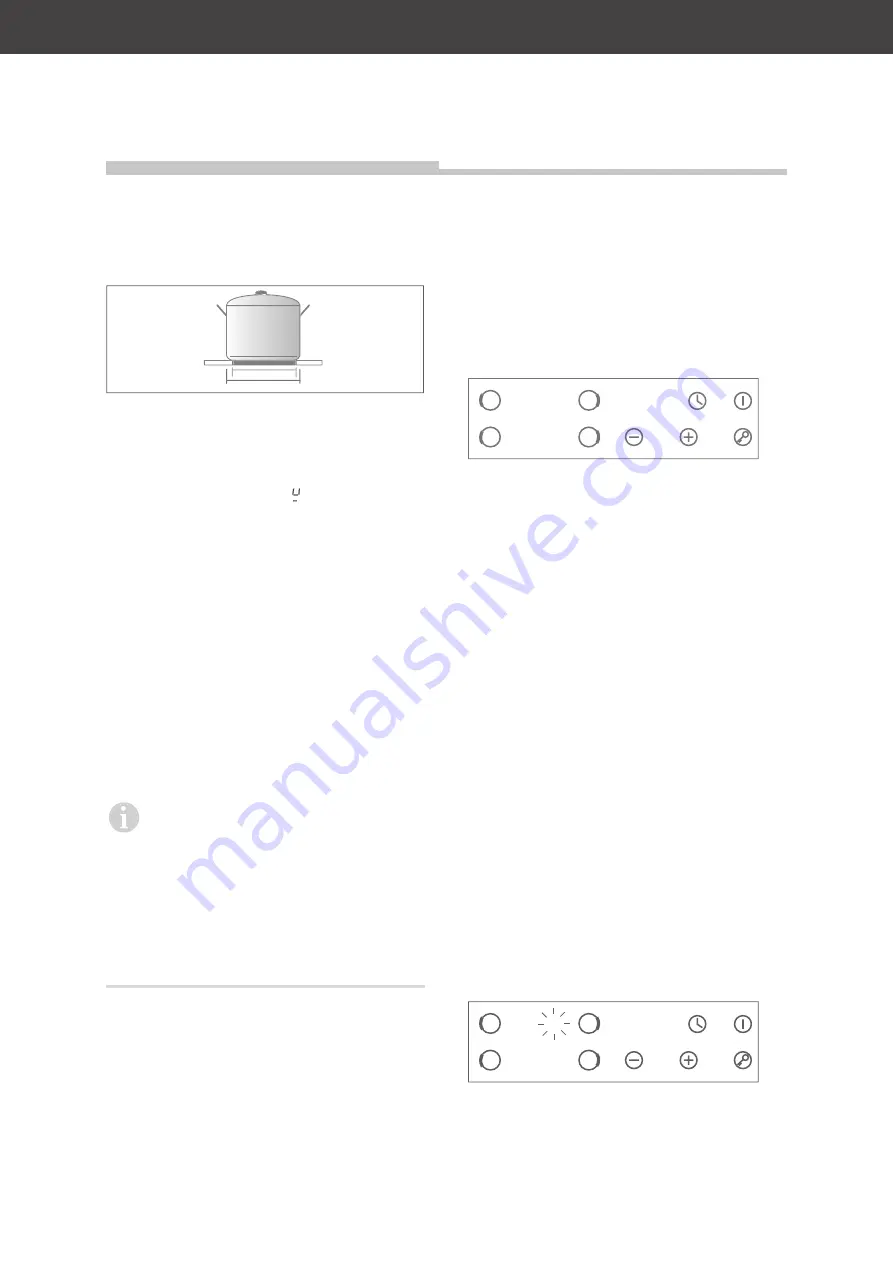
Using a pot that is slightly larger than the 
cooking zone will allow you to achieve the 
most efficient use of energy.

d2

d1

– The diameter d1 is always given as the 

size of the pot or pan. Base diameter d2 is 
always around 2 cm smaller.

– As soon as the pot is removed, the cooking 

zone shuts off and the “ ” symbol appears 
on the display instead of the heat setting.

The appliance has four cooking zones. A sen-
sor in the control panel is assigned to each 
cooking zone.

•  You can use the “+” sensor (10) to in-

crease the heat of the respective cooking 
zone.

•  You can use the “-” sensor (11) to reduce

the heat of the respective cooking zone.

Each time a sensor is touched, an acoustic 
signal can be heard.

The sensors must be clean and may 
not be covered by objects.
When activating the sensors, always 

use the entire fingertip and not just the very 
end of the finger. Your finger must be clean 
and dry for the sensors to react appropriate-
ly.
Each time the sensor registers a touch, you 
will hear an acoustic signal.

Switching on the appliance

• To switch the appliance on, press the

On/Off sensor (8) for approximately three
seconds.
You will hear an acoustic signal. The “

-

” or 

“--”

 indicator will light up beside the sen-

sors of all cooking zones.

-

-

-

-

--

Pot recognition

Pot recognition is installed in the cooking 
zones. Pot recognition ensures that the cook-
ing zone will heat up only if there is a pot with 
a  ferromagnetic bottom or another object 
made of the same kind of metal located on 
that zone. The cooking zone becomes inac-
tive as soon as the pot or the magnetic object 
is removed.

Setting the cooking zone

1. Place a suitable pot or pan on the desired

cooking zone. 

2. Make sure that the bottom of the cook-

ware and the cooking zone are clean and 
dry.

3. Press the sensor for the cooking zone

that you wish to use.
The “

0

“ ” indicator beside the selected sen-

sor will light up and blink.

0

4. Press the “

+

” sensor (10) (multiple times 

in a row if necessary) or press and hold it
down with your finger longer to increase

Summary of Contents for 517773

Page 1: ...Induktives Glaskeramik Kochfeld Gebrauchsanleitung Anleitung_Version 93225 DE 20210916 Bestell Nr 517773 Nachdruck auch auszugs weise nicht gestattet MC IF6417B1 A ...

Page 2: ...elung DE 19 Heizstufentabelle DE 20 Gerät reinigen DE 21 Einbau DE 23 Wichtige Benutzer Information DE 23 Arbeitsplatte vorbereiten DE 23 Gerät einsetzen DE 24 Netzanschluss Hinweise für den Installateur DE 26 Anschlussbedingungen DE 26 Fehlersuche DE 27 Fehlersuchtabelle DE 27 Fehleranzeige im Display DE 28 Service DE 29 Beratung Bestellung und Reklamation DE 29 Reparaturen und Ersatzteile DE 29 ...

Page 3: ...ermieden wird den Tod oder eine schwere Verletzung zur Folge haben kann VORSICHT Dieser Signalbegriff bezeichnet eine Gefähr dung mit einem niedrigen Risikograd die wenn sie nicht vermieden wird eine geringfü gige oder mäßige Verletzung zur Folge haben kann HINWEIS Dieser Signalbegriff warnt vor möglichen Sachschäden Symbolerklärung Tipps zusätzliche Informatio nen Dieses Symbol zeigt an dass Sie ...

Page 4: ...ür das Trennen vom Stromnetz und den Ausbau des Altgeräts Bestimmungsgemäßer Gebrauch Das Gerät ist zum Kochen und Frittieren von Speisen bestimmt Es eignet sich nicht für andere Zwecke z B zum Be heizen eines Raumes Das Gerät ist zur Verwendung im priva ten Haushalt konzipiert und ist nicht für eine gewerbliche Nutzung oder Mehr fachnutzung z B Verwendung durch mehrere Parteien in einem Mehrfamil...

Page 5: ... Die Netzanschlussleitung nicht ver längern oder verändern Niemals das Gehäuse öffnen Das defekte oder vermeintlich defek te Gerät niemals selbst reparieren Sie können sich und spätere Benutzer in Gefahr bringen Nur autorisierte Fachkräfte dürfen diese Reparaturen ausführen Das Gerät ist nicht für den Betrieb mit einem externen Zeitschalter oder einem separaten Fernwirksystem be stimmt Niemals Geg...

Page 6: ...nd Benutzer Wartung dürfen nicht von Kindern ohne Beauf sichtigung durchgeführt werden Während des Gebrauchs werden das Gerät und seine berührbaren Teile heiß Vorsicht ist geboten um das Be rühren von Heizelementen zu vermei den Kinder jünger als 8 Jahre müssen ferngehalten werden es sei denn sie werden ständig beaufsichtigt Risiken im Umgang mit dem Gerät WARNUNG Brandgefahr Unbeaufsichtigtes Koc...

Page 7: ...ne Rest wärme wird dann nicht mehr ange zeigt Vorsicht ist geboten um das Berüh ren von Heizelementen zu vermeiden Die Hände bei allen Arbeiten am hei ßen Gerät mit Küchenhandschuhen oder Topflappen schützen Nur tro ckene Handschuhe oder Topflappen verwenden Nasse Textilien leiten die Wärme besser und können Verbren nungen durch Dampf verursachen Nach dem Gebrauch ist die Kochplat te durch ihre Rege...

Page 8: ...bauen Beschädigungsgefahr durch Fehlge brauch Unsachgemäßer Umgang mit dem Ge rät kann zu Beschädigungen führen Die Kochzonen fläche nicht mit lee rem bzw falschem Kochgeschirr be treiben Keine Gegenstände auf die Glaskera mik fallen lassen Auch kleine Gegen stände können große Schäden verur sachen wenn sie punktförmig auf die Glaskeramik treffen Gerät und Topfboden vor dem Benut zen abwischen um e...

Page 9: ...rüfen Sie ob die Lieferung vollständig ist 3 Kontrollieren Sie ob das Gerät Transport schäden aufweist 4 Sollte die Lieferung unvollständig sein oder das Gerät einen Transportschaden aufweisen nehmen Sie bitte Kontakt mit unserem Service auf siehe Service auf Seite DE 29 WARNUNG Stromschlaggefahr Das Berühren spannungsführender Tei le kann zu schweren Verletzungen oder zum Tod führen Nehmen Sie ni...

Page 10: ...Geräteteile 9 10 11 7 6 8 3 2 1 4 5 1 Kochzone vorne links 2 Kochzone hinten links 3 Kochzone hinten rechts 4 Kochzone vorne rechts 5 Sensorfeld 6 Auswahlsensoren für die Kochzonen 7 Timer Sensor 8 Ein Aus Sensor 9 Sensor Sicherungsverriegelung 10 Sensor 11 Sensor ...

Page 11: ...uktion zusammen Sie haben auch keine negativen Auswirkungen auf Töpfe oder Kochfeld Mögliche Geräusche Tiefes Brummen wie bei einem Trafo Dieses Geräusch kann auftreten wenn eine hohe Heizstufe eingestellt ist Ursache hierfür ist dass eine hohe Energiemenge vom Kochfeld auf das Kochgerät übertra gen wird Das Geräusch verschwindet oder wird schwächer sobald die Heizstufe ver ringert wird Leises Pfe...

Page 12: ...sgeschirr aus rost freiem Edelstahl Ihr Geschirr ist geeignet wenn der Topf oder Pfannenboden einen Magneten anzieht Ungeeignet ist Geschirr aus Edelstahl Glas Keramik Kupfer oder Aluminium das ferromagnetisch ist Diese Materialien erkennt das Kochfeld nicht Das Kochgeschirr ist geeignet wenn bei ein geschalteter Kochzone nicht blinkt sondern neben dem Kochzonen Sensor die Heizstufe angezeigt wird...

Page 13: ...ergieleitfähigkeit als Kochgeschirr mit verzogenem oder verbeultem Boden beach ten Sie auch das Kapitel Das richtige Koch geschirr auf Seite DE 12 Schalten Sie die Kochstufe rechtzeitig zurück und kochen Sie mit einer möglichst niedrigen Einstellung weiter Kochen Sie wann immer es möglich ist mit Schnellkochtöpfen Dadurch halbiert sich der Garvorgang und Sie sparen eine Menge Energie Nehmen Sie zu...

Page 14: ...n die Sensoren und Ihre Finger sauber und trocken sein Bei jeder registrierten Berührung der Senso ren ertönt ein akustisches Signal Gerät einschalten Um das Gerät einzuschalten berühren Sie ca drei Sekunden lang den Ein Aus Sensor 8 Es ertönt ein akustisches Signal Neben den Sensoren aller Kochzonen leuchtet die Anzeige bzw auf Topferkennung In den Kochzonen ist eine Topferkennung in stalliert Di...

Page 15: ...n kann es vorkommen dass diese Anzeige auch bei einem ge eigneten Topf erscheint Nach einigen Se kunden wird jedoch wieder die eingestellte Heizstufe angezeigt Heizstufe einer Kochzone erhöhen oder verringern Auch wenn der Kochvorgang bereits begon nen hat können Sie die Heizstufe einer Koch zone erhöhen oder verringern 1 Berühren Sie den Sensor der gewünsch ten Kochzone Die Anzeige neben der Koch...

Page 16: ...alten H H H H H H H H Berühren Sie den Ein Aus Sensor 8 um das gesamte Gerät auszuschalten Ein akustisches Signal ertönt und sämtliche Leuchtanzeigen bis auf die Restwärmesym bole H erlöschen Die Restwärmesymbo le H blinken solange die Kochzonen heiß sind Automatische Schutzeinrichtungen Das Gerät verfügt über eine Reihe von Schut zeinrichtungen die verhindern sollen dass es beim Betrieb beschädig...

Page 17: ...or oder den Sensor um die gewünschte Minuten zahl einzustellen Kurz nach der letzten Sensorberührung be ginnt der Countdown Im Display wird die verbleibende Zeit angezeigt und blinkt für 5 Sekunden Wenn die Zeit abgelaufen ist ertönt für 30 Sekunden ein Signalton Im Display erscheint die Anzeige neben dem Ti mer Symbol Jede Berührung des Sensors oder des Sensors erhöht oder verringert die Zeit in ...

Page 18: ...e eine der Sensortasten oder Die maximale Timer Einstellung be trägt 99 Minuten Sie können alle Kochzonen per Timer ab schalten lassen Neben der Heizstufenanzeige der gewähl ten Kochzone leuchtet dauerhaft ein roter Punkt um zu signalisieren dass der Timer für diese Kochzone aktiv ist Zeit im Garzeitbegrenzer ändern Sie können eine bereits eingestellte Abschalt zeit jederzeit ändern 1 Berühren Sie...

Page 19: ...Aus Sensor sind nun gesperrt Dies wird durch ein blin kendes Lo neben dem Timer Sensor 7 an gezeigt Bei eingeschalteter Sicherungsverrie gelung sind alle Sensoren außer dem Ein Aus Sensor gesperrt Das Gerät lässt sich auch bei eingeschalteter Sicherungs verriegelung ausschalten Vor der nächsten Benutzung müssen Sie dann jedoch die Si cherungsverriegelung deaktivieren Sicherungsverriegelung deaktiv...

Page 20: ...Art und Menge der Speisen abhängig Deshalb sind Abweichungen möglich Heizstufe geeigneter Kochvorgang 1 2 vorsichtiges Erwärmen von kleinen Speisemengen Schmelzen von Schokolade Butter und leicht brennbaren Speisen leichtes Köcheln langsames Erwärmen 3 4 Wiederaufwärmen von Speisen schnelles Köcheln Reis kochen 5 6 Pfannkuchen 7 8 Dünsten Nudeln kochen 9 Frittieren scharf anbraten Suppe zum Kochen...

Page 21: ...n die Oberfläche beschädigen Das Gerät regelmäßig mit einem spe ziellen Pflegemittel reinigen und pfle gen das ein spezielles Imprägnieröl für Glaskeramik Kochfelder enthält Solche Pflegemittel sind über den Fachhandel zu beziehen Leichte nicht fest eingebrannte Verschmutzungen 1 Schalten Sie das Gerät ab 2 Wischen Sie leichte Verschmutzungen nach dem Abkühlen mit einem feuchten Lappen ab 3 Verwenden ...

Page 22: ... der heißen Kochzo nenoberfläche 2 Wenn das Gerät abgekühlt ist können Sie hartnäckige Verschmutzungsreste mit einem speziell dafür geeigneten im Fachhandel erhältlichen Reinigungsmittel entfernen 3 Behandeln Sie das Gerät nach dem Reini gen mit einem speziellen Pflegemittel Übergekochtes auf den Sensoren 1 Schalten Sie das Gerät aus 2 Wischen Sie Übergekochtes mit einem weichen Lappen auf 3 Wisch...

Page 23: ...gen ein Stellen Sie den Herd nicht direkt neben ei nem Kühl oder Gefrierschrank auf Durch die Wärmeabgabe steigt dessen Energie verbrauch unnötig Unterhalb des gesamten Ausschnitts müs sen Sie zur Kühlung mindestens 50 mm Freiraum lassen In diesem Bereich dürfen sich keine wärmeempfindlichen Gegen stände Unterschrank Schublade etc be finden Eventuell vorhandene Seitenwände oder Schubladenkästen mü...

Page 24: ...0 mm 520 mm 590 mm 50 mm 50 mm 50 mm 50 mm 1 Sägen Sie einen Ausschnitt in die Arbeits platte 560 490 mm B T Wenn bereits ein Kochfeld eingebaut war muss dessen Ausschnitt dieselben Abma ße haben Gerät einsetzen 1 Nehmen Sie das Gerät aus der Verpa ckung 2 Entfernen Sie alle Schutz und Verpa ckungsmaterialien 3 Drehen Sie das Gerät um und legen Sie es mit der Unterseite nach oben auf eine weiche s...

Page 25: ...25 Einbau Kochfeld Arbeitsplatte 12 Durch die beiden Halteklammern 12 wird das Gerät fixiert 7 Führen Sie vor der ersten Benutzung des Geräts eine gründliche Reinigung durch siehe Gerät reinigen auf Seite DE 21 ...

Page 26: ...eparate Stromversorgung er forderlich Das Gerät darf nur mit der vorinstallierten Netzanschlussleitung vom Typ H07RN F mit einem Leiterquerschnitt von mindes tens 4 2 5 mm2 angeschlossen werden Beim Anschluss müssen die VDE Be stimmungen sowie die Technischen An schlussbedingungen beachtet werden Berührungsschutz muss gewährleistet sein Netzanschlussleitung anschließen 1 Schalten Sie vor dem Zugan...

Page 27: ... Sie unseren Service an siehe Service auf Sei te DE 29 Das Kochgeschirr macht ein prasselndes oder surrendes Geräusch Diese Geräusche sind der Konstruktion von Induktionskochgeschirr geschuldet und stellen keinen Defekt dar Bei hoher Heizstufe erzeugt das Kochgeschirr Pfeiftöne Diese Geräusche sind der Konstruktion von Induktionskochgeschirr geschuldet und stellen keinen Defekt dar Bei Reduktion d...

Page 28: ...terkochen Wasser das durch Ris se ins Innere des Glaskeramikfelds läuft kann unter Spannung stehen Wenn Ihr Glaskeramikfeld Risse aufweist trennen Sie das Gerät vom Stromnetz Sicherung herausnehmen um einen möglichen elektrischen Schlag zu vermeiden und rufen Sie unseren Service an siehe Service auf Seite DE 29 Fehleranzeige im Display Fehlercode Mögliche Lösungen Tipps F3 F8 Der Temperatursensor ...

Page 29: ...ng verursachte Schäden können leider nicht anerkannt werden Beratung Bestellung und Reklamation Wenden Sie sich bitte an die Produktberatung Ihres Versandhauses wenn die Lieferung unvollständig ist das Gerät Transportschäden aufweist Sie Fragen zu Ihrem Gerät haben sich eine Störung nicht mithilfe der Fehler suchtabelle beheben lässt Sie weiteres Zubehör bestellen möchten Reparaturen und Ersatztei...

Page 30: ...hergestellt Außenverpackung aus Pappe Formteile aus geschäumtem FCKW frei em Polystyrol PS Folien und Beutel aus Polyäthylen PE Spannbänder aus Polypropylen PP Wenn Sie sich von der Verpackung trennen möchten entsorgen Sie diese bitte umwelt freundlich Abfallvermeidung Maßnahmen der Abfallvermeidung haben nach den Vorschriften der Richtlinie 2008 98 EG grundsätzlich Vorrang vor Maßnahmen der Abfal...

Page 31: ...Wh kg Energieverbrauch der Kochmulde je kg EC electric hob 184 9 Wh kg Netzspannung Absicherung 220 240 V 380 415V 3N 50Hz Leistungsaufnahme max 6400 W Gerätemaße B T H 590 mm 520 mm 60 mm max Ausschnittsmaße B T 560 mm 490 mm Gewicht 9 kg Dicke der Arbeitsplatte min 30 mm Ermittelt gemäß Verordnung EU Nr 66 2014 Die angewandten Mess und Berechnungsme thoden entsprechen der Norm EN 60350 2 Die hie...

Page 32: ......

Page 33: ...Inductive glass ceramic hob User manual Manual_version 93225 EN 20210916 Article no 517773 Reproduction even of ex cerpts is not permitted MC IF6417B1 A ...

Page 34: ...s table EN 20 Cleaning the appliance EN 21 Type of fitting EN 23 Important user information EN 23 Preparing food EN 23 Installing the appliance EN 24 Connection to the power supply Notes for the installer EN 26 Connection conditions EN 26 Troubleshooting EN 27 Troubleshooting table EN 27 Error message in the display EN 28 Service EN 29 Advice order and complaint EN 29 Repairs and spare parts EN 29...

Page 35: ...level of risk which if not avoided could result in death or serious injury CAUTION This term indicates a hazard with a low level of risk which if not avoided could result in minor or moderate injury NOTICE This term warns against possible damage to property Explanation of symbols Tips additional information This symbol indicates that you will be provided with useful additional information Hot surf...

Page 36: ...u can endanger your life and that of subsequent us ers This also applies to disconnection from the power supply and disman tling the old appliance Intended use The appliance is suitable for cooking and frying foods It is not suitable for other purposes e g for heating rooms The appliance is designed for use in private households and is not designed for commercial use or multiple use e g use by sev...

Page 37: ...spected defective appliance yourself You can put your own and future users lives in danger Only authorised specialists are allowed to carry out this repair work The appliance is not intended to be operated by means of an external timer or a separate remote control system Do not put any objects in or through the housing openings and also make sure that children cannot insert any objects in them If ...

Page 38: ...usly supervised Risks when handling the appliance WARNING Fire hazard Unattended cooking on a hob with fat or oil can be dangerous and may result in fire NEVER try to extinguish a fire with water but switch off the appliance and the cover flame e g with an lid or a fire blanket If you are preparing food with alco hol do not leave the cooker unat tended Food may ignite own its own In the event of a...

Page 39: ...ng time limit does not end the cook ing process itself Do not leave the appliance unattend ed during use Keep children less than 8 years of age away from the appliance unless they are under constant supervision Metallic objects such as knives forks spoons and lids should not be placed on the hob surface since they can get hot Never sit on the appliance Allow the appliance to cool complete ly befor...

Page 40: ...n a punctiform manner Wipe the appliance and the bottom of the pots before use to remove any dirt that may cause scratches Do not push heavy pans across the appliance this may scratch the glass ceramic Do not place hot pots or pans on the sensor field Otherwise the electronics underneath may be damaged Do not place any magnetisable ob jects e g credit cards near or on the appliance as they may be d...

Page 41: ...e out of the packaging 2 Check that the delivery is complete 3 Check whether the appliance was dam aged during transit 4 If the delivery is incomplete or the appli ance has been damaged during transit please contact our service center see Service on page EN 29 WARNING Risk of electric shock Touching live parts may result in severe injury or death Never use a damaged appliance ...

Page 42: ... parts 9 10 11 7 6 8 3 2 1 4 5 1 Front left cooking zone 2 Back left cooking zone 3 Back right cooking zone 4 Front right cooking zone 5 Sensor field 6 Selection sensors for the cooking zones 7 Timer sensor 8 On Off sensor 9 Safety lock sensor 10 sensor 11 sensor ...

Page 43: ... the cooking device The sound will disappear or be re duced as soon as the heat setting is re duced Quiet whistling Loud whistling can occur when empty cookware is placed on a cooking zone It disappears as soon as water or food is placed in the cooking device Crackling This noise can occur when cooking appli ances have layers made of different mate rials The noise is caused by vibrations at the jo...

Page 44: ...is switched on the indicator does not blink but instead displays the heat setting beside the cooking zone sensor and the con tents of the pot are heated Use vessels with with sufficient base thickness e g enam elled steel pans with a thickness of 2 3 mm and stainless steel pans with a thickness of 4 6 mm energy and time saving steam pressure cookers The relatively high purchase costs are quickly r...

Page 45: ...ob and there fore conduct energy more easily than cook ware with a warped or dented base please note the chapter The right cookware on page EN 12 Turn the level down quickly and continue to cook at the lowest possible setting Always use pressure cooking saucepans whenever possible This will halve the cook ing process and you will save a lot of energy Only use as much water as you really need to co...

Page 46: ...r must be clean and dry for the sensors to react appropriate ly Each time the sensor registers a touch you will hear an acoustic signal Switching on the appliance To switch the appliance on press the On Off sensor 8 for approximately three seconds You will hear an acoustic signal The or indicator will light up beside the sen sors of all cooking zones Pot recognition Pot recognition is installed in...

Page 47: ...ndicator may also appear when there is a suitable pot After a few sec onds however the selected heat setting will be displayed again Increasing or reducing the heat setting of a cooking zone Even if the cooking process has already be gun you can increase or decrease the heat setting of a cooking zone 1 Press the sensor for the required cooking zone The indicator beside the cooking zone will blink ...

Page 48: ...itch off the entire appliance You will hear an acoustic signal and all of the indicator lights with the exception of the residual heat symbols H will go out The residual heat symbols H will continue to flash as long as the cooking zones are hot Automatic protection settings The appliance has a number of safety fea tures to prevent it from being damaged during operation If the hob is properly insta...

Page 49: ...nd sensor 11 at the same time The 00 indicator beside the timer sensor will blink 00 00 4 Press the sensor or the sensor to set the desired number of minutes The countdown will start shortly after the last time the sensor was pressed The re maining time will be shown in the display and will blink for 5 seconds When the time is up you will hear a sig nal tone for 30 seconds The indicator will appea...

Page 50: ...se switched on these will remain active 6 To shut off a signal tone early press ei ther the sensor button or the sen sor button The maximum timer setting is 99 min utes You can switch off all cooking zones using a timer A red dot will light up continuously beside the heat setting display for the selected cooking zone to indicate that the timer for this cooking zone is active Change the time in the...

Page 51: ...or are now locked This is indicated by a flashing Lo next to the timer sensor 7 When the safety lock is switched on all sensors except the On Off sensor are deactivated The appliance can also be switched off while the safety lock is activat ed You must however deactivate the safe ty lock before the next use Deactivating the safety lock 1 Ensure that the appliance is switched on The LO indicator ne...

Page 52: ...ware and the quantity of food For this reason variations are possible Heat setting suitable cooking process 1 2 careful heating of small amounts of food Melting chocolate butter and foods that burn easily light simmering warming up slowly 3 4 Reheating food fast simmering Boiling rice 5 6 making pancakes 7 8 Steaming Boiling pasta 9 Deep frying rapid searing Bringing soup to a boil Bringing water ...

Page 53: ...r or steel sponges they can damage the surface Clean and maintain the appliance regularly with a special care product containing a special impregnating oil for glass ceramic hobs Such products can be found in specialist shops Slight soiling which is not burnt on 1 Switch the appliance off 2 After it has cooled down wipe light dirt with a damp cloth 3 If necessary use a suitable cleaner and wipe wi...

Page 54: ...the hot cooking zone surface using an appropriate scraper 2 Once the appliance has cooled down you can remove stubborn dirt by using a specially made commercially available detergent 3 Treat the appliance with a special care product after cleaning Something has boiled over on the sensors 1 Switch off the appliance 2 Wipe the material that has boiled over us ing a soft rag 3 Wipe the sensor surface...

Page 55: ...irectly next to a refrigerator or freezer This will increase its energy consumption unnecessarily due to heat emission You must leave at least 50 mm of free space below the recess for ventilation pur poses No heat sensitive objects cabinet drawers etc should be located in this area You may need to saw off or remove side walls or drawers Preparing food To ensure proper operation the following re qu...

Page 56: ... 50 mm 50 mm 50 mm 50 mm 1 Cut a recess in the worktop 560 490 mm W D If a hob was already installed the recess cut for it must have the same dimensions Installing the appliance 1 Take the appliance out of the packaging 2 Remove all protective and packaging ma terials 3 Turn the appliance over and place it up side down on a soft clean surface for example the packaging Otherwise the appliance could...

Page 57: ...Page EN 25 Type of fitting Hob Worktop 12 The appliance is fastened using the two clamps 12 7 Clean the appliance thoroughly before its first use see Cleaning the appliance on page EN 21 ...

Page 58: ...t clearance Connection conditions The appliance is designed for alternating current 220 240 V 380 415 V 3N 50 Hz A separate power supply is required The appliance may be connected only to a pre installed mains cable of type H07RN F with a conductor cross section of at least 4 2 5 mm2 When connecting the appliance the VDE requirements and the Technical connec tion conditions must be considered Cont...

Page 59: ...esign of the induction cookware and do not indicate a defect The cookware emits a whistling sound when on a high heat setting These noises arise due to the design of the induction cookware and do not indicate a defect If you reduce the heat setting these noises should stop Fan noise The appliance is equipped with a fan which switches on automatically when one of the cooking zones is activated and ...

Page 60: ...mic hob disconnect the appliance from the power supply remove the fuse to prevent a possible electric shock and call our service center see Ser vice on page EN 29 Error message in the display Error code Possible solutions tips F3 F8 The temperature sensor is not working Please call our service center see Service on page EN 29 F3 FE The temperature sensor of the IGBT is not working Please call our ...

Page 61: ...cannot be recognised Advice order and complaint Please contact your mail order company s customer service center if the delivery is incomplete the appliance is damaged during transport you have questions about your appliance a malfunction cannot be rectified using the troubleshooting table you would like to order further accessories Repairs and spare parts You can prevent waste by having your defe...

Page 62: ...lly friendly recyclable materi als Outer packaging made of cardboard Moulded parts made of foamed CFC free polystyrene PS Films and bags made of polyethylene PE Tension bands made of polypropylene PP If you would like to dispose of the packag ing please dispose of it in an environmentally friendly way Waste prevention According to the provisions of Directive 2008 98 EC waste prevention measures al...

Page 63: ...one front right EC electric cooking 180 0 Wh kg Energy consumption of the hob per kg EC electric hob 184 9 Wh kg Mains voltage fuse 220 240 V 380 415V 3N 50Hz Power consumption max 6400 W Appliance measurements W D H 590 mm 520 mm 60 mm max cut out dimensions B x D 560 mm 490 mm Weight 9 kg Thickness of the worktop min 30 mm Determined pursuant to EU Regulation No 66 2014 The applied measurement a...

Page 64: ......

Reviews: