background image

Seite DE-14

Reinigung

Backblechträger reinigen

 HINWEIS

Beschädigungsgefahr!
Die Backblechträger sind nicht spülma-
schinenfest.


Reinigen Sie die Backblechträger nur 
von Hand.

 Backblechträger herausnehmen 
und reinigen

1. Nehmen Sie das Backblech (8), den Grill-

rost (7) und die Fettpfanne (9) aus dem 
Backofen heraus.

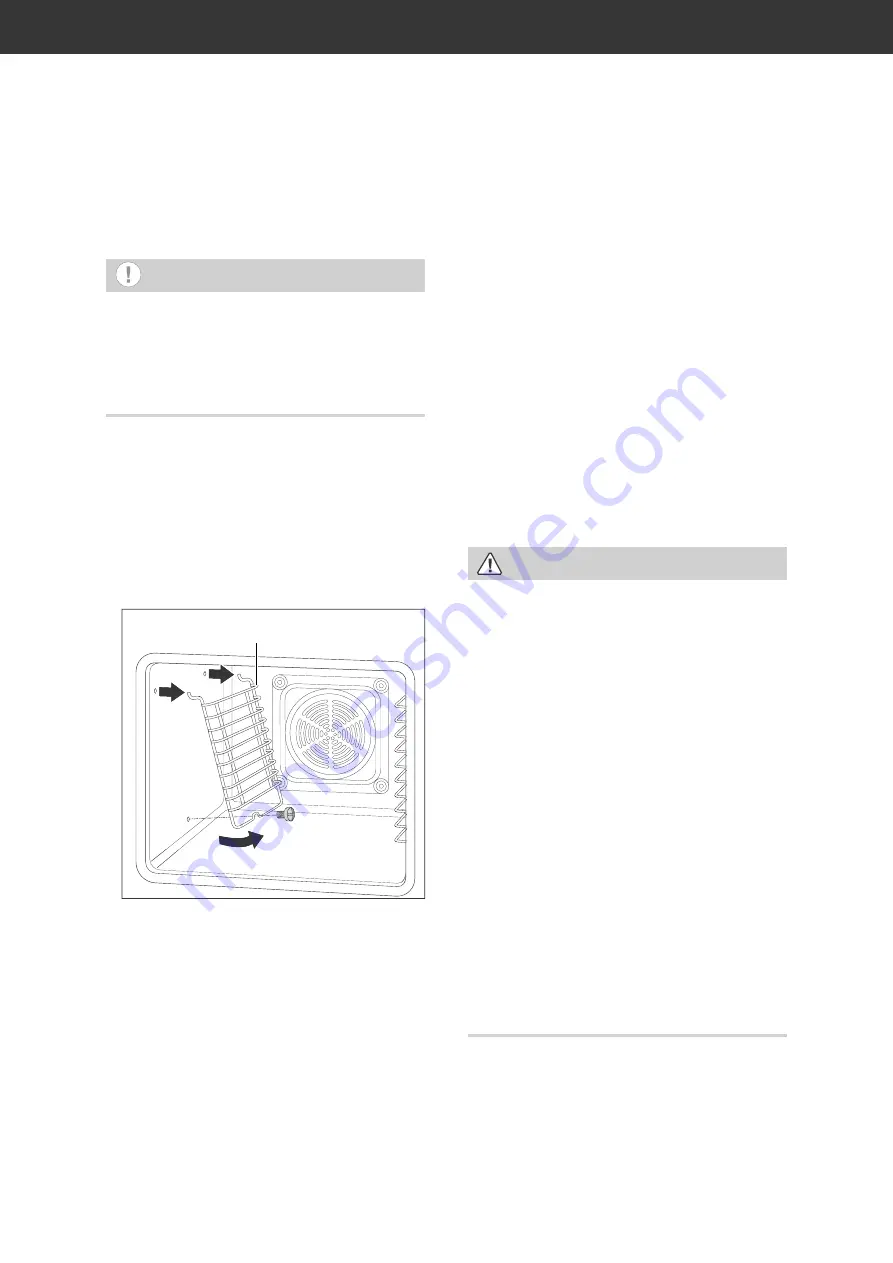
2. Drehen Sie die Schraube (a) unten am 

Backblechträger (6) heraus.

(6)

(a)

(b)

(c)

3. Klappen Sie den Backblechträger von 

unten hoch (b), und ziehen Sie dabei vor-
sichtig die gebogenen Halterungen oben 
aus der Wand heraus (c).

4. Nehmen Sie so auch den zweiten Back-

blechträger heraus.

5. Reinigen Sie die Backblechträger und den 

Garraum mit warmem Wasser und mildem 
Spülmittel oder Allzweckreiniger. Wischen 
Sie danach alles trocken.

Backblechträger einsetzen

1. Setzen Sie den Backblechträger (6) zu-

nächst mit den gebogenen Halterungen 
oben in die Löcher an der Wand ein (c), 
und klappen Sie ihn unten an die Wand (b).

2. Befestigen Sie den Backblechträger mit 

der Schraube (a).

Dann können Sie den Backblechträger wieder 
wie gewohnt benutzen und das Backblech (8), 
den Grillrost (7) und die Fettpfanne (9) einset-
zen. 

Backofentür reinigen

 VORSICHT!

Bruch- und Verletzungsgefahr!
Die Back ofentür enthält schwere Glas-
scheiben, die bei unsachgemäßer Be-
handlung zerbrechen können. Die Glas-
scherben sind scharf und können zu 
Schnittverletzungen führen.


Die Back ofentür oder einzelne Glas-
scheiben nicht fallen lassen. 


Sicherstellen, dass Sie mit der Back-
ofentür und den einzelnen Glasschei-
ben nirgends anstoßen. 


Den Backofen nicht benutzen, wenn 
das Glas beschädigt ist, weil der 
Backofen dann nicht mehr sicher ist. 
Stattdessen unseren Service verstän-
digen (siehe Seite DE-21). 


Wenn eine Glasscheibe gebrochen 
ist, Kinder fernhalten und alle Scher-
ben sorgfältig entsorgen.

Summary of Contents for 65M40M1-E11314A

Page 1: ...Einbaubackofen Gebrauchsanleitung Anleitung Version 93895 DE 20180828 Bestell Nr 219851 Nachdruck auch auszugsweise nicht gestattet 65M40M1 E11314A ...

Page 2: ...E 16 Einbau und Installation DE 17 Transportieren und Auspacken DE 17 Backofen einbauen DE 17 Backofen anschließen DE 18 Backofen einsetzen DE 19 Backofen vorreinigen DE 19 Bevor Sie das Gerät benutzen lesen Sie zuerst die Sicherheits hinweise und die Gebrauchsan leitung aufmerksam durch Nur so können Sie alle Funktionen sicher und zuverlässig nutzen Beachten Sie unbedingt auch die nationa len Vor...

Page 3: ...Sie ob der Backofen Trans portschäden aufweist 4 Sollte die Lieferung unvollständig sein oder der Backofen einen Transportscha den aufweisen nehmen Sie Kontakt mit unserem Service auf siehe Unser Service auf Seite DE 21 WARNUNG Nehmen Sie nie ein beschädigtes Gerät in Betrieb Verpackungs Tipps Sollten es Ihre räumlichen Ver hältnisse zulassen empfehlen wir Ihnen die Verpackung zumindest während de...

Page 4: ...te und Geräteteile Backofen 5 Wrasenabzug Lüftung 6 Backblechträger Bedienblende 1 Funktionsschalter 2 Zeitschaltuhr 3 Temperaturregler 4 Temperaturkontrollleuchte rot 1 2 3 6 5 4 Beleuchtung Ober und Unterhitze Unterhitze Oberhitze Grill Intensivgrill Aus ...

Page 5: ... Backofen ist nur zur Beleuchtung des Garraums vorgesehen und nicht als Raumbeleuchtung Die Backofentür darf nicht als Stütze Sitzfläche oder Trittbrett verwendet werden Begriffserklärung Folgende Signalbegriffe finden Sie in dieser Gebrauchsanleitung WARNUNG Dieser Signalbegriff bezeichnet eine Gefährdung mit einem mittleren Risi kograd die wenn sie nicht vermieden wird den Tod oder eine schwere Ve...

Page 6: ...haltet sein hierzu zählen Sicherun gen LS Schalter und Schütze Netzkabel so verlegen dass es nicht zur Stolperfalle wird Netzstecker und kabel von offenem Feuer und heißen Flächen fernhalten Netzkabel nicht knicken oder klemmen und nicht über scharfe Kanten legen Wenn das Netzkabel des Geräts be schädigt ist muss es durch den Her steller dessen Kundendienst oder eine qualifizierte Fachkraft ausgeta...

Page 7: ... im Umgang mit dem Gerät Brandgefahr Das Gerät grundsätzlich nur mit ge schlossener Backofentür betreiben Braten oder Kuchen im Gerät nicht mit Papier abdecken Gargut Backpa pier und folien nicht mit den Heizkör pern in Berührung kommen lassen Grillgut nicht zu weit nach hinten an das Ende des Heizkörpers legen Dort ist es besonders heiß Fettes Grillgut kann Feuer fangen Temperaturempfindliche bren...

Page 8: ...en bevor Sie mit der Reinigung be ginnen Gesundheitsgefahr Fleisch und Fisch nicht im Gerät auf tauen Das Gefriergut frühzeitig aus dem Gefrierfach nehmen und abge deckt im Kühlschrank auftauen lassen Die Auftauflüssigkeit muss dabei ab fließen können da sich sonst schädli che Mikroorganismen bilden können HINWEIS Beschädigungsgefahr Zum Reinigen keine scharfen abra siven Reinigungs oder Scheuermit ...

Page 9: ...fen die Sicherungen ausschalten herausdrehen die Backofentür nicht öffnen bis das Feuer erloschen ist Brennendes Öl oder Fett nie mit Wasser löschen Zum Löschen eine Löschdecke oder einen geeigneten Feuerlöscher mit Kennzeichnung F verwenden Nach dem Löschen des Feuers das Gerät durch unseren Service überprü fen lassen siehe Unser Service auf Seite DE 21 HINWEIS Aufgestaute Hitze kann die Emaille ...

Page 10: ...ofen aufbewahren Den Backofen nicht unbeaufsichtigt lassen wenn Sie Speisen in Öl in Fett oder mit Alkohol zubereiten Die Spei sen können sich entzünden HINWEIS Beschädigungsgefahr Den Temperaturregler nicht mit Ge walt über die Endposition hinaus dre hen Stellen Sie nach der Wahl der Behei zungsart den Temperaturregler 3 auf die gewünschte Backofentemperatur ein Sie können ihn stufenlos von 50 C ...

Page 11: ...ignet 1 Stellen Sie den Funktionsschalter 1 auf das Beleuchtungssymbol 2 Stellen Sie die Zeitschaltuhr 2 auf den Betriebsmodus Informationen zum Austausch der Back ofenleuchte finden Sie auf Seite DE 16 Backofen ausschalten 1 Drehen Sie den Temperaturregler 3 gegen den Uhrzeigersinn auf die Null Stellung 2 Drehen Sie den Funktionsschalter 1 ebenfalls zurück auf die Null Stellung 3 Drehen Sie die Z...

Page 12: ...gebäck 4 Ober Unterhitze 150 170 20 30 Wasserbiskuit 2 Ober Unterhitze 170 180 25 35 Apfelkuchen mit Streusel 4 Ober Unterhitze 180 190 35 45 Small Cakes 4 Ober Unterhitze 180 190 15 25 Toast 3 Intensivgrill 250 1 3 Burger 4 Intensivgrill 250 12 8 122 Pizza 3 Ober Unterhitze 190 210 15 25 1 2 3 4 5 Einschubebenen 1 Berücksichtigen Sie bei allen Angaben noch eine Vorheizdauer von 5 15 Minuten 2 Ers...

Page 13: ...r die Back ofenbeleuchtung ein Reinigen Sie den Garraum und die Back blechträger nach jedem Gebrauch mit war mem Spülwasser Reinigen Sie die Türdichtung auf die gleiche Weise Seien Sie dabei aber sehr vorsich tig da sie nur an einigen Stellen befestigt ist im Übrigen jedoch lose anliegt Dampfreinigung Bei der Dampfreinigung handelt es sich um ein Nassreinigungsverfahren das mithilfe von Wasserdamp...

Page 14: ...ckblechträger 6 zu nächst mit den gebogenen Halterungen oben in die Löcher an der Wand ein c und klappen Sie ihn unten an die Wand b 2 Befestigen Sie den Backblechträger mit der Schraube a Dann können Sie den Backblechträger wieder wie gewohnt benutzen und das Backblech 8 den Grillrost 7 und die Fettpfanne 9 einset zen Backofentür reinigen VORSICHT Bruch und Verletzungsgefahr Die Backofentür enthä...

Page 15: ...en Sollte sich die Backofentür nicht bündig schließen lassen oder beim Schließen ein Knacken zu hören sein ist sie nicht richtig eingehängt 6 Korrigieren Sie ggf den Sitz der Scharnie re und der Bügel bis sich die Backofentür wieder leichtgängig öffnen und schließen lässt Scheiben reinigen Die Backofentür enthält zwei Scheiben aus Glas die Sie hin und wieder beidseitig reini gen sollten 1 Hängen S...

Page 16: ...rühren der Garraumwän de oder des Heizkörpers Verbrennungs gefahr droht Das Backofen Leuchtmittel erst wech seln wenn der Backofen vollständig abgekühlt ist 1 Schalten Sie die Sicherungen aus bzw drehen Sie sie heraus 2 Legen Sie ein weiches Tuch in den abge kühlten Garraum für den Fall dass die Glasabdeckung oder das Leuchtmittel herunterfällt 3 Schrauben Sie die Glasabdeckung gegen den Uhrzeiger...

Page 17: ... Person Packen Sie den Backofen vorsichtig aus und entfernen Sie alle Verpackungsteile Kunststoffprofile Klebestreifen und Schaumpolster innen außen und auf der Geräterückseite Ziehen Sie alle Schutzfolien ab Backofen einbauen Der Backofen ist für den Einbau in handels übliche Küchen Einbaumöbel vorgesehen Er kann sowohl in einen Hochschrank als auch unter einer Arbeitsplatte eingebaut werden Beac...

Page 18: ...beständig kann sich der Belag verformen und lösen Wenn unterhalb des Backofens eine Schub lade angebracht wird ist ein Zwischen boden erforderlich Die Einbaunische muss folgende Mindest größe besitzen Einbau unter eine Arbeitsplatte Einbau in einen Hochschrank min 570 max 50 560 35 585 Alle Angaben in mm Backofen anschließen Je nach Einbaunische muss der Backofen vor oder nach dem Einbau angeschlo...

Page 19: ...rf die Netzanschlussleitung nicht geknickt eingeklemmt oder auf andere Weise beschädigt werden 2 Halten Sie zwischen dem Backofen und den Möbelseitenwänden einen gleich mäßigen Abstand Verschließen Sie den Spalt über der Backofenblende nicht 3 Wenn der Backofen richtig ausgerichtet ist öffnen Sie die Backofentür und schrauben Sie ihn mit den beiliegenden Montage schrauben am Einbauschrank fest 4 S...

Page 20: ...n fallen nicht unter unsere Garantieleistung Außenkühlgebläse läuft nicht kein Luftaustritt unter der Blende Blende wird sehr heiß Das Außenkühlgebläse schaltet erst bei einer Temperatur von 70 C ein Wenn auch bei ansteigender Temperatur kein Gebläsegeräusch und Luftaustritt erfolgt ist das Gebläse defekt VORSICHT Verbrennungsgefahr Öffnen Sie die Backofentür schalten Sie das Gerät aus und benutze...

Page 21: ...bestellen möchten Reparaturen und Ersatzteile Kunden in Deutschland Wenden Sie sich bitte an unseren Technik Service Telefon 0 18 06 18 05 00 Festnetz 20 Cent Anruf Mobilfunk max 60 Cent Anruf Kunden in Österreich Wenden Sie sich bitte an das Kundencenter oder die Produktberatung Ihres Versand hauses Bitte beachten Sie Sie sind für den einwandfreien Zustand des Geräts und die fachgerechte Benutzun...

Page 22: ...PE Spannbänder aus Polypropylen PP Auch Energie sparen schützt vor zu starker Erwärmung unserer Erde Ihr neues Gerät verbraucht mit seiner modernen Technik wenig Energie Wenn Sie sich von der Verpackung trennen möchten entsorgen Sie diese bitte umwelt freundlich Tipps zum Energiesparen Heizen Sie den Backofen nur dann vor wenn es im Rezept oder in den mitgeliefer ten Gartabellen angegeben ist Verw...

Page 23: ... 50Hz 16 A Leistungsaufnahme Backofen max 3 kW Oberhitze Unterhitze 950 W 1100 W Grill Intensiv Grillen Grill und Oberhitze 2000 W 2950 kW Maximal Temperatur 250 C Beleuchtung 250 V 25 W G9 T 300 C 1 Auf einer Skala von A niedriger Verbrauch bis D hoher Verbrauch 2 Ermittelt gemäß Verordnung EU Nr 65 2014 und Verordnung EU Nr 66 2014 Die angewandten Messmethoden entsprechen der Norm EN 60350 1 Die...

Page 24: ......

Page 25: ...Built in oven User manual Manual version 93895 GB 20180828 Article no 219851 Reproduction even of excerpts is not permitted 65M40M1 E11314A ...

Page 26: ...B 9 The right oven cookware GB 9 Proper oven handling GB 9 Baking tray dripping pan and oven rack GB 9 Function switch GB 10 Temperature controller GB 10 Switching on the oven GB 11 Temperature indicator light GB 11 Oven light GB 11 Switching off the oven GB 11 Special preparation information for yeast dough GB 11 Test report table GB 12 Cleaning the front of the housing GB 13 Cleaning the cooking...

Page 27: ...y is complete 3 Check whether the oven was damaged during transit 4 If the delivery is incomplete or the oven has been damaged during transit contact our service department see Our Service Centre on page GB 21 WARNING Never use a damaged appliance Packaging tips If you have sufficient space we rec ommend keeping the packaging at least during the warranty period If the appliance has to be sent in f...

Page 28: ...pliance parts Oven 5 Extraction hood ventilation 6 Baking tray guides Control panel 1 Function switch 2 Timer 3 Temperature controller 4 Temperature indicator light red 1 2 3 6 5 4 Lighting Top and bottom heat Bottom heat Top heat Grill Intensive grill Off ...

Page 29: ... used for lighting the cooking compartment and not for lighting a room The oven door must not be used as a support prop seat or step Explanation of terms The following symbols can be found in this user manual WARNING This symbol indicates a hazard with a medium level of risk which if not avoid ed could result in death or serious injury CAUTION This symbol indicates a hazard with a low level of ris...

Page 30: ...ntact gap of at least 3 mm this in cludes fuses circuit breakers and con tactors Take care to prevent the risk of trip ping when laying the mains cord Keep the mains plug and cord away from naked flames and hot surfaces Do not kink or pinch the mains cord or lay it over sharp edges If the mains cord of the appliance is damaged it must be replaced by the manufacturer through customer ser vice or by ...

Page 31: ...sks when handling the appliance Fire hazard Only ever operate the appliance with the oven door closed Do not cover cakes or roasts being cooked in the appliance with baking parchment Do not allow food bak ing parchment and aluminium foil to come into contact with the heating elements Do not place food to be grilled at the back of the heating element where it is especially hot there Fatty foods can...

Page 32: ...to cool complete ly before cleaning Health hazard Do not defrost meat and fish in the appliance Take the frozen food out of the freezer ahead of time and let it defrost in the refrigerator The flu id from the frozen food must be able to properly drain otherwise harmful microorganisms can form NOTICE Risk of damage For cleaning purposes do not use any harsh abrasive cleaning agents or scouring agents...

Page 33: ...f the circuit breakers un screw fuses Do not open the oven door until the fire is extinguished Never extinguish burning oil or fat with water To extinguish the fire use a suitable fire extinguisher with the designation F or a fire blanket Once the fire has been extinguished have the appliance checked by our service team see Our Service Cen tre on page GB 21 NOTICE Pent up heat can damage the oven s en...

Page 34: ...to con tact with the heating elements Do not store temperature sensitive combustible or flammable objects in the oven Do not leave the oven unattended while cooking food in oil and grease or with alcohol The food may ignite NOTICE Risk of damage Do not force the temperature control ler past the final position After you have selected the heating meth od set the desired oven temperature using the temp...

Page 35: ...itable for lighting a room 1 Set the function switch 1 to the light symbol 2 Set the timer 2 to operating mode Information on changing the oven bulb is available at page GB 21 Switching off the oven 1 Turn the temperature controller 3 an ti clockwise to zero 2 Turn the function switch 1 back to zero 3 Turn the timer 2 anti clockwise to zero 4 If using the oven in operating mode turn the timer cloc...

Page 36: ...cuits 4 Top bottom heat 150 170 20 30 Water sponge cake 2 Top bottom heat 170 180 25 35 Apple pie with crumble 4 Top bottom heat 180 190 35 45 Small cakes 4 Top bottom heat 180 190 15 25 Toast 3 Intensive grill 250 1 3 Burgers 4 Intensive grill 250 12 8 122 Pizza 3 Top bottom heat 190 210 15 25 1 2 3 4 5 Shelf levels 1 Always preheat the oven for 5 15 minutes regardless of the other cooking instru...

Page 37: ... on the oven light for cleaning Clean the cooking compartment and bak ing trays after every use and rinse with warm water Clean the door seal in the same way But be very careful as it is only attached in cer tain places and is otherwise loose Steam cleaning Steam cleaning is a wet cleaning process that uses steam to remove light stains and dirt That s how you clean the cooking com partment in an e...

Page 38: ...the baking tray guides 1 First insert the baking tray guide 6 using the curved brackets into the holes in the wall c and fold it down against the wall b 2 Then attach the baking tray guide using the screw a You can then use the baking tray guide as normal and insert the baking tray 8 the oven rack 7 and the dripping pan 9 Cleaning the oven door CAUTION Risk of breakage and injury The oven door is ...

Page 39: ...en closed If the door does not sit flush when closed or if there is a crack ing sound when closing it the door is not hung properly 6 Correct the position of the hinges and clips if necessary until the door opens and closes smoothly again Cleaning the glass panes The oven door contains two glass panes that should occasionally be cleaned on both sides 1 Take the oven door off its hinges see chapter...

Page 40: ...d off As a result there is a risk of being burnt when touching the cook ing compartment walls or heating unit Only change the oven light bulb when the oven has cooled off completely 1 Switch off the circuit breakers or unscrew fuses 2 Place a soft cloth in the cooled cooking compartment in the event that the glass cover falls or the bulb falls off 3 Unscrew the glass cover anticlockwise and remove...

Page 41: ...ide and from the back plate of the device Remove all protective films Installing the oven The oven is designed for installation in standard kitchen units It can be installed at eye level and underneath the worktop The following conditions must be observed Do not install the oven directly next to a refrigerator or freezer This will increase its energy consumption unnecessarily due to heat emission ...

Page 42: ...worktop Installation in an upright cabinet min 570 max 50 560 35 585 All dimensions in mm Connecting the oven Depending on the installation recess the oven must be connected before or after in stallation For the electrical connection of the oven a professional must install an earthed power socket with a separate fuse with sufficient protection 230 V 50 Hz 16 A The socket must be installed in way t...

Page 43: ...e an even gap between the oven and the unit walls on both sides Do not seal the gap above the oven fascia 3 Once the oven is correctly positioned open the oven door and screw into the unit using the fitting screws supplied 4 Switch the socket fuse back on 5 Check the functions as described from page GB 10 Pre cleaning the oven The oven must be pre cleaned to remove all grease and oil residues from...

Page 44: ...r ranty The external cooling fan is not working no air re leased from the air locks and they are very hot The external ventilation system will only switch on at a temperature of 70 C If the ventilation system does not make a sound and no air is emitted even when the temperature is increasing the ventilation system is defective CAUTION Risk of burns Open the oven door switch the appliance off and d...

Page 45: ...g table you would like to order further accessories Repairs and spare parts Customers in Germany Please contact our technical service Telephone 0 18 06 18 05 00 landline 20 cents call mobile max 60 cents call Customers in Austria Please contact your mail order company s customer service centre or product advice centre Please note You are responsible for the condition of the appliance and its prope...

Page 46: ...ene PS Films and bags made of polyethylene PE Tension bands made of polypropylene PP Saving energy also protects against exces sive global warming Your new appliance uses little energy due to its modern tech nology If you would like to dispose of the packag ing please dispose of it in an environmentally friendly way Tips for saving energy Preheat the oven only if it is called for in the recipe or ...

Page 47: ...ins voltage fuse 230V 1N 50Hz 16 A Max power consumption oven 3 kW Top heat bottom heat 950 W 1100 W Grill intensive grill grill and top heat 2000 W 2950 kW Maximum temperature 250 C Lighting 250 V 25 W G9 T 300 C 1 On a scale from A low consumption to D high consumption 2 Determined in accordance with Regulation EU No 65 2014 and Regulation EU No 66 2014 The applied measurement methods comply wit...

Page 48: ......

Page 49: ...Built in oven User manual Manual version 93895 GB 20180828 Article no 219851 Reproduction even of excerpts is not permitted 65M40M1 E11314A ...

Page 50: ...B 9 The right oven cookware GB 9 Proper oven handling GB 9 Baking tray dripping pan and oven rack GB 9 Function switch GB 10 Temperature controller GB 10 Switching on the oven GB 11 Temperature indicator light GB 11 Oven light GB 11 Switching off the oven GB 11 Special preparation information for yeast dough GB 11 Test report table GB 12 Cleaning the front of the housing GB 13 Cleaning the cooking...

Page 51: ...y is complete 3 Check whether the oven was damaged during transit 4 If the delivery is incomplete or the oven has been damaged during transit contact our service department see Our Service Centre on page GB 21 WARNING Never use a damaged appliance Packaging tips If you have sufficient space we rec ommend keeping the packaging at least during the warranty period If the appliance has to be sent in f...

Page 52: ...pliance parts Oven 5 Extraction hood ventilation 6 Baking tray guides Control panel 1 Function switch 2 Timer 3 Temperature controller 4 Temperature indicator light red 1 2 3 6 5 4 Lighting Top and bottom heat Bottom heat Top heat Grill Intensive grill Off ...

Page 53: ... used for lighting the cooking compartment and not for lighting a room The oven door must not be used as a support prop seat or step Explanation of terms The following symbols can be found in this user manual WARNING This symbol indicates a hazard with a medium level of risk which if not avoid ed could result in death or serious injury CAUTION This symbol indicates a hazard with a low level of ris...

Page 54: ...ntact gap of at least 3 mm this in cludes fuses circuit breakers and con tactors Take care to prevent the risk of trip ping when laying the mains cord Keep the mains plug and cord away from naked flames and hot surfaces Do not kink or pinch the mains cord or lay it over sharp edges If the mains cord of the appliance is damaged it must be replaced by the manufacturer through customer ser vice or by ...

Page 55: ...sks when handling the appliance Fire hazard Only ever operate the appliance with the oven door closed Do not cover cakes or roasts being cooked in the appliance with baking parchment Do not allow food bak ing parchment and aluminium foil to come into contact with the heating elements Do not place food to be grilled at the back of the heating element where it is especially hot there Fatty foods can...

Page 56: ...to cool complete ly before cleaning Health hazard Do not defrost meat and fish in the appliance Take the frozen food out of the freezer ahead of time and let it defrost in the refrigerator The flu id from the frozen food must be able to properly drain otherwise harmful microorganisms can form NOTICE Risk of damage For cleaning purposes do not use any harsh abrasive cleaning agents or scouring agents...

Page 57: ...f the circuit breakers un screw fuses Do not open the oven door until the fire is extinguished Never extinguish burning oil or fat with water To extinguish the fire use a suitable fire extinguisher with the designation F or a fire blanket Once the fire has been extinguished have the appliance checked by our service team see Our Service Cen tre on page GB 21 NOTICE Pent up heat can damage the oven s en...

Page 58: ...to con tact with the heating elements Do not store temperature sensitive combustible or flammable objects in the oven Do not leave the oven unattended while cooking food in oil and grease or with alcohol The food may ignite NOTICE Risk of damage Do not force the temperature control ler past the final position After you have selected the heating meth od set the desired oven temperature using the temp...

Page 59: ...itable for lighting a room 1 Set the function switch 1 to the light symbol 2 Set the timer 2 to operating mode Information on changing the oven bulb is available at page GB 21 Switching off the oven 1 Turn the temperature controller 3 an ti clockwise to zero 2 Turn the function switch 1 back to zero 3 Turn the timer 2 anti clockwise to zero 4 If using the oven in operating mode turn the timer cloc...

Page 60: ...cuits 4 Top bottom heat 150 170 20 30 Water sponge cake 2 Top bottom heat 170 180 25 35 Apple pie with crumble 4 Top bottom heat 180 190 35 45 Small cakes 4 Top bottom heat 180 190 15 25 Toast 3 Intensive grill 250 1 3 Burgers 4 Intensive grill 250 12 8 122 Pizza 3 Top bottom heat 190 210 15 25 1 2 3 4 5 Shelf levels 1 Always preheat the oven for 5 15 minutes regardless of the other cooking instru...

Page 61: ... on the oven light for cleaning Clean the cooking compartment and bak ing trays after every use and rinse with warm water Clean the door seal in the same way But be very careful as it is only attached in cer tain places and is otherwise loose Steam cleaning Steam cleaning is a wet cleaning process that uses steam to remove light stains and dirt That s how you clean the cooking com partment in an e...

Page 62: ...the baking tray guides 1 First insert the baking tray guide 6 using the curved brackets into the holes in the wall c and fold it down against the wall b 2 Then attach the baking tray guide using the screw a You can then use the baking tray guide as normal and insert the baking tray 8 the oven rack 7 and the dripping pan 9 Cleaning the oven door CAUTION Risk of breakage and injury The oven door is ...

Page 63: ...en closed If the door does not sit flush when closed or if there is a crack ing sound when closing it the door is not hung properly 6 Correct the position of the hinges and clips if necessary until the door opens and closes smoothly again Cleaning the glass panes The oven door contains two glass panes that should occasionally be cleaned on both sides 1 Take the oven door off its hinges see chapter...

Page 64: ...d off As a result there is a risk of being burnt when touching the cook ing compartment walls or heating unit Only change the oven light bulb when the oven has cooled off completely 1 Switch off the circuit breakers or unscrew fuses 2 Place a soft cloth in the cooled cooking compartment in the event that the glass cover falls or the bulb falls off 3 Unscrew the glass cover anticlockwise and remove...

Page 65: ...ide and from the back plate of the device Remove all protective films Installing the oven The oven is designed for installation in standard kitchen units It can be installed at eye level and underneath the worktop The following conditions must be observed Do not install the oven directly next to a refrigerator or freezer This will increase its energy consumption unnecessarily due to heat emission ...

Page 66: ...worktop Installation in an upright cabinet min 570 max 50 560 35 585 All dimensions in mm Connecting the oven Depending on the installation recess the oven must be connected before or after in stallation For the electrical connection of the oven a professional must install an earthed power socket with a separate fuse with sufficient protection 230 V 50 Hz 16 A The socket must be installed in way t...

Page 67: ...e an even gap between the oven and the unit walls on both sides Do not seal the gap above the oven fascia 3 Once the oven is correctly positioned open the oven door and screw into the unit using the fitting screws supplied 4 Switch the socket fuse back on 5 Check the functions as described from page GB 10 Pre cleaning the oven The oven must be pre cleaned to remove all grease and oil residues from...

Page 68: ...r ranty The external cooling fan is not working no air re leased from the air locks and they are very hot The external ventilation system will only switch on at a temperature of 70 C If the ventilation system does not make a sound and no air is emitted even when the temperature is increasing the ventilation system is defective CAUTION Risk of burns Open the oven door switch the appliance off and d...

Page 69: ...g table you would like to order further accessories Repairs and spare parts Customers in Germany Please contact our technical service Telephone 0 18 06 18 05 00 landline 20 cents call mobile max 60 cents call Customers in Austria Please contact your mail order company s customer service centre or product advice centre Please note You are responsible for the condition of the appliance and its prope...

Page 70: ...ene PS Films and bags made of polyethylene PE Tension bands made of polypropylene PP Saving energy also protects against exces sive global warming Your new appliance uses little energy due to its modern tech nology If you would like to dispose of the packag ing please dispose of it in an environmentally friendly way Tips for saving energy Preheat the oven only if it is called for in the recipe or ...

Page 71: ...ins voltage fuse 230V 1N 50Hz 16 A Max power consumption oven 3 kW Top heat bottom heat 950 W 1100 W Grill intensive grill grill and top heat 2000 W 2950 kW Maximum temperature 250 C Lighting 250 V 25 W G9 T 300 C 1 On a scale from A low consumption to D high consumption 2 Determined in accordance with Regulation EU No 65 2014 and Regulation EU No 66 2014 The applied measurement methods comply wit...

Page 72: ......

Reviews: