background image

Explanation of terms and symbols

Page EN-6

have been given supervision or in-

struction concerning use of the ap-

pliance in a safe way and understand 

the hazards involved. 


Children shall not play with the appli-

ance or have access to it without su-

pervision.


Cleaning and user maintenance must 

not be performed by children without 

supervision. 

Electrical safety

 WARNING

Risk of electric shock!

Touching live parts may result in severe 

injury or death.


Only use the appliance indoors. Do 

not use in wet rooms or in the rain.


Connect the appliance only if the 

mains voltage at the socket cor-

responds to that indicated on the 

nameplate.


Do not operate or continue to oper-

ate the appliance, if it


shows visible signs of damage, for 

example, the connection cable is 

defective; 


starts smoking or there is a burning 

smell;


makes unusual sounds.

In such events, remove the mains 

plug from the socket and contact our 

service department.


The appliance corresponds to pro-

tection class I and may be connect-

ed only to a plug with a protective 

conductor that has been properly in-

stalled. Ensure that the voltage is cor-

rect when connecting it. You can find 

more detailed information about this 

on the nameplate.


If the mains plug is no longer accessi-

ble after installation or set-up, an all-

pole disconnecting device complying 

with overvoltage category III must be 

connected to the house wiring with a 

contact gap of at least 3 mm; consult 

a qualified professional if necessary 

(see the chapter on “Service”).


Mains cable / mains plug:


Lay out the supply cord in such a 

way that it does not become a trip 

hazard.


Do not kink or pinch the supply cord 

or lay it over sharp edges. 


Do not extend or modify the mains 

cable.


Keep the mains cable and mains 

plug away from naked flames and 

hot surfaces.


If the supply cord is damaged, it 

must be replaced by the manufac-

turer, its service agent or similarly 

qualified persons in order to avoid 

a hazard.


The appliance is not to be operated 

with an external timer or an external 

remote control system.


Do not put any objects in or through 

the housing openings and also make 

sure that children cannot insert any 

objects through them.


If the surface is cracked, switch off 

the appliance to avoid the possibility 

of electric shock.


Never try to repair a defective or sus-

pected defective appliance yourself. 

You can put your own and future us-

ers’ lives in danger. Only authorised 

specialists are allowed to carry out 

this repair work. 


Never open the housing.

Summary of Contents for 86488918

Page 1: ...Einbaubackofen mit Zeitschaltuhr Gebrauchsanleitung Anleitung Version 196893 DE 20220811 Bestell Nr 86488918 Nachdruck auch auszugsweise nicht gestattet N5M90E2 E11G400 ...

Page 2: ...alle Sicherheitshinweise und Anweisungen an den nachfolgenden Ver wender des Produkts weiter Backofen einschalten DE 13 Wrasenabzug DE 14 Betrieb anhalten beenden DE 15 Backofen ausschalten DE 15 Besonderheiten beim Auftauen DE 16 Besonderheiten beim Ansetzen von Hefeteig DE 16 Kinder sicherung DE 17 Garraumbeleuchtung DE 17 Energiesparmodus DE 17 Die Zeitschaltuhr DE 18 Beispiel für den Zeitschal...

Page 3: ...und Entsorgung DE 30 Abfallvermeidung DE 30 Kostenlose Altgeräte Rücknahme DE 30 Entsorgung DE 30 Verpackung DE 31 Tabelle Prüfgerichte DE 32 Produktdatenblatt gemäß VO EU Nr 65 2014 DE 33 Produktinformation gemäß VO EU Nr 66 2014 DE 33 Technische Daten DE 34 ...

Page 4: ...erletzung zur Folge haben kann VORSICHT Dieser Signalbegriff bezeichnet eine Gefähr dung mit einem niedrigen Risikograd die wenn sie nicht vermieden wird eine gering fügige oder mäßige Verletzung zur Folge ha ben kann HINWEIS Dieser Signalbegriff warnt vor möglichen Sachschäden Symbolerklärung Folgende Symbole finden Sie in dieser Ge brauchsanleitung bzw auf dem Gerät Dieses Symbol verweist auf nü...

Page 5: ...aumbeleuchtung Personen die aufgrund ihrer physischen sen sorischen oder geistigen Fähigkeiten oder Un kenntnis nicht in der Lage sind das Gerät si cher zu bedienen müssen bei der Benutzung beaufsichtigt werden Nehmen Sie keine technischen Veränderun gen am Gerät vor Sicherheitshinweise In diesem Kapitel finden Sie allgemeine Si cherheitshinweise die Sie zu Ihrem eigenen Schutz und zum Schutz Drit...

Page 6: ...ren Ser vice kontaktieren Das Gerät entspricht der Schutzklas se I und darf nur an eine Steckdose mit ordnungsgemäß installiertem Schutzleiter angeschlossen werden Achten Sie beim Anschließen darauf dass die richtige Spannung anliegt Nähere Informationen hierzu finden Sie auf dem Typenschild Falls der Netzstecker nach dem Ein bau bzw der Aufstellung nicht mehr zugänglich ist muss eine allpoli ge T...

Page 7: ... besser und können Verbren nungen durch Dampf verursachen Brandgefahr Unsachgemäßer Umgang beim Betrieb des Geräts kann zu einem Brand führen Der Anschluss an eine Steckdosenleis te oder eine Mehrfachsteckdose ist unzulässig Wenn Sie Speisen mit Alkohol zube reiten lassen Sie den Herd nicht ohne Aufsicht Die Speisen können sich selbst entzünden Das Gerät nicht mit Decken Lappen oder Ähnlichem abde...

Page 8: ...tsgefahr Tauwasser kann speziell bei Fleisch und Geflügel gefährliche Keime enthalten Fleisch Geflügel und Fisch nicht im Backofenbetrieb auftauen Schütten Sie das Tauwasser weg Be nutzen Sie es für nichts anderes Reinigen Sie das benutzte Geschirr sehr gründlich Verbrennungsgefahr Während des Gebrauchs wird der Backo fen heiß Sie können sich an Heizkörpern Garraum Gargut und Zubehör verbren nen B...

Page 9: ...hten darf die Backofentemperatur 50 C nicht überschreiten Vorsicht beim Hantie ren mit dem Geschirr die Emaille kann leicht zerkratzt werden Beim Einkochen nur so viele Gläser auf einmal in die Fettpfanne stellen dass sie sich nicht berühren Die Glä ser können sonst platzen Soll der Backofen mit einer Transport karre gefahren werden muss er so an gehoben werden wie auf der Verpa ckung gezeigt ist ...

Page 10: ... Im Zeitschaltuhrbetrieb niemals un beaufsichtigt grillen Den Back ofen während des Zeitschal tuhrbetriebs überwachen um ein Überlaufen und Anbrennen zu ver hindern Beachten Sie dass sich Fet te Öle und Alkohol beim Erhitzen ent zünden können Nach dem automatischen Ausschal ten den Backofen durch seine Re gel und oder Steuereinrichtungen auszuschalten z B Funktionswähler Temperaturregler auf Aus b...

Page 11: ...symbol Kindersicherung 1 Bedienblende siehe unten 2 Wrasenabzug Lüftung 3 Backblech 4 Gitterrost 5 Fettpfanne 6 Sichtfenster 7 Garraumtür 8 Türgriff 9 Backblechträger 16 Taste Start 17 Taste Pause beenden 18 Taste Uhr anzeigen einstellen 19 Taste Kurzzeitwecker Eieruhr 20 Symbol für Zeitprogramm 21 Symbol für Kurzzeitwecker 22 Funktionsschalter 1 2 3 4 5 1 9 2 3 4 5 6 7 8 10 11 12 13 16 17 18 19 2...

Page 12: ...s ser löschen Zum Löschen eine Lö schdecke oder einen geeigneten Feuerlöscher mit Kennzeichnung F verwenden Nach dem Erlöschen des Feuers das Gerät durch unseren Service überprü fen lassen HINWEIS Aufgestaute Hitze kann die Emaille des Backofens beschädigen Backbleche oder Alufolie nie direkt auf den Garraumboden legen da sonst ein Hitzestau entsteht der die Emaille im Garraum beschädigen kann Wen...

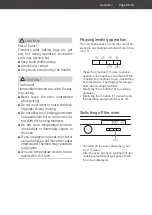
Page 13: ... Ventilator Temperatur 50 240 C ECO Funktion für energiesparen des Backen Diese Beheizungsart wird zur Ermittlung des Energieverbrauchs im konventio nellen Modus verwendet Versenkbare Schalter Zum Schutz vor Fehlbedienung lassen sich die Schalter versenken Zum Versenken Ausfahren kurz auf den Schalter drücken Uhrzeit einstellen Bei der Erstinbetriebnahme und nach einem Stromausfall müssen Sie die ...

Page 14: ...setzen Die Zeitanzeige 12 zeigt eine Gardauer von 9 00 Stunden an 22 16 12 11 4 Zum Verändern der Gardauer den Funkti onsschalter 22 drehen und gleich darauf die Taste 16 drücken Die Fortschrittsanzeige 11 zeigt mit acht Balken die noch verbleibende Garzeit pro zentual an Wenn nur noch vier Balken leuchten ist die Hälfte der Garzeit abge laufen Nach Ablauf der Garzeit schaltet sich der Backofen au...

Page 15: ... im Backofen auf Lassen Sie den Herd nicht unbeauf sichtigt wenn Sie Speisen in Öl in Fett oder mit Alkohol zubereiten Die Spei sen können sich selbst entzünden Nur für diesen Backofen empfohlene Temperaturmessfühler benutzen Betrieb anhalten beenden Mit der Taste 17 können Sie den laufenden Betrieb in jeder Beheizungsart kurz anhalten oder beenden 17 16 Einmal die Taste 17 drücken pausiert den Be...

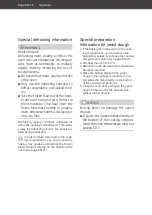
Page 16: ...während des Auftauens nicht in Betrieb Um mehr Platz im Garraum zu erhalten dürfen Sie zum Auftauen das Gefäß mit dem Gefriergut direkt auf den Garraumboden stellen und die Backblechträger herausneh men siehe Seite DE 21 Besonderheiten beim Ansetzen von Hefeteig 1 Wenn die Backschüssel nicht in den Gar raum passt können Sie die Backblechträ ger entfernen um das Garraumvolumen zu vergrößern siehe S...

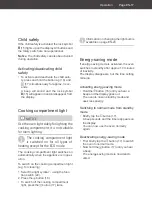
Page 17: ...einigung 1 Mit dem Funktionsschalter 22 das Lam pen Symbol wählen 2 Taste 16 drücken Zum Ausschalten der Garraumbeleuch tung 2 mal die Taste 17 drücken Informationen zum Austausch des Leuchtmittels finden Sie auf Seite DE 23 Energiesparmodus Ist der Energiesparmodus aktiviert schaltet sich der Backofen nach ca 10 Minuten ohne Benutzung in Standby Die Displayanzeige erlischt wobei die Einstel lung ...

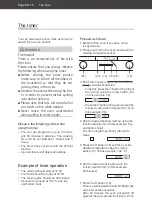
Page 18: ...rbetrieb Ihr Essen soll um 18 30 Uhr fertig sein Der Garvorgang soll um 18 30 Uhr starten Die Gardauer beträgt 40 Minuten Es soll mit Ober und Unterhitze bei 180 C gegart werden So gehen Sie vor 1 Falls nicht bereits geschehen schalten Sie den Backofen aus 2 Stellen Sie Ihr Essen in den Backofen und schließen Sie die Garraumtür 12 18 20 16 14 22 3 Geben Sie die Zeit ein zu der Ihr Essen fertig sei...

Page 19: ... von einer Minute bis 9 59 Stunden einstellen Beachten Sie dass der Kurzzeit wecker den Back ofen nicht ein oder ausschal tet Sie können den Kurzzeitwecker auch nut zen wenn der Backofen nicht eingeschaltet ist 1 Die Taste 19 drücken Die Stundenzahl in der Zeitanzeige 12 blinkt 2 Mit dem Drehschalter 14 die gewünsch ten Stunden einstellen 3 Erneut die Taste 19 drücken Die Minutenzahl in der Zeitan...

Page 20: ...ächen nach dem Abkühlen gründlich mit warmem Spülwas ser oder Allzweck reiniger Für Edelstahloberflächen können Sie auch Spezialpflege mittel für Edelstahl Oberflä chen verwenden Garraum reinigen Schalten Sie zum Reinigen nur die Gar raumbeleuchtung mit dem Funktionsschal ter ein siehe Garraumbeleuchtung auf Seite DE 17 Reinigen Sie den Garraum und die Back blechträger möglichst nach jedem Ge brau...

Page 21: ...kblechträger mit der Schraube 23 Dann können Sie den Backblechträger 9 wieder wie gewohnt benutzen und das Back blech 3 den Gitterrost 4 und die Fettpfan ne 5 einsetzen Garraumtür reinigen HINWEIS Bruch und Verletzungsgefahr Wenn Sie die Garraumtür fallen lassen besteht Bruch und Verletzungsgefahr weil sie aus drei schweren Glasscheiben besteht Sie können sich an den Scher ben schneiden Lassen Sie...

Page 22: ...vorsichtig die Garraumtür Die Garraumtür muss sich bündig schlie ßen lassen Sollte sich die Garraumtür nicht bündig schließen lassen oder beim Schließen ein Knacken zu hören sein ist die Garraumtür nicht richtig eingehängt 6 Korrigieren Sie ggf den Sitz der Scharnie re und der Bügel bis sich die Garraumtür wieder leichtgängig öffnen und schließen lässt Scheiben reinigen Die Garraumtür enthält zwei...

Page 23: ...g der zu schweren Verletzungen oder sogar zum Tode füh ren kann Vor dem Austausch des Back ofen Leuchtmittels unbedingt die Siche rung ausschalten bzw herausdrehen Verbrennungsgefahr Der Garraum kann noch lange Zeit nach dem Ausschalten so heiß sein dass beim Berühren der Garraumwän de oder des Heizkörpers Verbrennungs gefahr droht Das Back ofen Leuchtmittel erst wech seln wenn der Backofen vollst...

Page 24: ...ieferung kontrollieren 1 Prüfen Sie ob die Lieferung vollständig ist 2 Kontrollieren Sie ob das Gerät Transport schäden aufweist 3 Sollte die Lieferung unvollständig sein oder das Gerät einen Transportschaden aufweisen nehmen Sie bitte Kontakt mit unserem Service auf siehe Seite DE 29 WARNUNG Nehmen Sie den Einbaubackofen nicht in Betrieb wenn Sie einen Trans portschaden festgestellt haben 1 2 3 4...

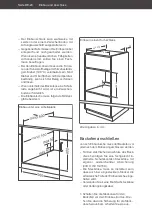
Page 25: ...g auspacken und vor sichtig alle Verpackungsteile Kunststoff profile Klebestreifen und Schaumpolster innen außen und auf der Geräterückseite entfernen Backofen einbauen Der Backofen ist für den Einbau in handels übliche Küchen Einbaumöbel vorgesehen Er kann sowohl in einen Hochschrank als auch unter einer Arbeitsplatte eingebaut werden Beachten Sie in jedem Fall die folgenden Bedingungen Bauen Sie...

Page 26: ...erlich Die Einbaunische muss folgende Mindest größe besitzen Einbau unter eine Arbeitsplatte Einbau in einen Hochschrank min 570 max 50 560 35 585 min 570 max 50 560 35 585 Alle Angaben in mm Backofen anschließen Je nach Einbaunische muss der Backofen vor oder nach dem Einbau angeschlossen werden Für den elektrischen Anschluss des Back ofens benötigen Sie eine fachgerecht in stallierte Schutzkonta...

Page 27: ...hädigt werden 2 Halten Sie zwischen dem Backofen und den Möbelseitenwänden einen gleich mäßigen Abstand Verschließen Sie den Spalt über der Back ofenblende nicht 3 Wenn der Backofen richtig ausgerichtet ist öffnen Sie die Garraumtür und schrauben Sie ihn mit den beiliegenden Montage schrauben am Einbauschrank fest 4 Schalten Sie die Sicherung für die Steck dose wieder ein 5 Überprüfen Sie die Funk...

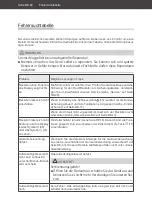
Page 28: ...tiviert und alle Funktionen sind gesperrt siehe Kinder sicherung auf Seite DE 17 Wenn die Uhrzeit nicht eingestellt ist lässt sich der Backofen nicht einschalten siehe Uhrzeit einstellen auf Seite DE 13 Backofen lässt sich nicht bedienen und im Display ist das Symbol 20 oder das Symbol 21 zu sehen Die Zeitschaltuhr ist aktiv siehe Seite DE 18 Dadurch sind alle Funk tionen gesperrt Zum Zurücksetzen...

Page 29: ...möchten Reparaturen und Ersatzteile Durch die Reparatur defekter Geräte können Sie Abfall vermeiden Wenden Sie sich an un seren Service Kunden in Deutschland Wenden Sie sich an unseren Technik Service Telefon 040 36 03 31 50 Kunden in Österreich Wenden Sie sich bitte an das Kundencenter oder die Produktberatung Ihres Versandhau ses Bitte beachten Sie sind für den einwandfreien Zustand des Geräts u...

Page 30: ...eben damit sie einer umwelt Abfallvermeidung Maßnahmen der Abfallvermeidung haben nach den Vorschriften der Richtlinie 2008 98 EG grundsätzlich Vorrang vor Maßnahmen der Abfallbewirtschaftung Als Maßnahmen der Abfallvermeidung kom men bei Elektro und Elektronikgeräten insbe sondere die Verlängerung ihrer Lebensdauer durch Reparatur defekter Geräte und die Ver äußerung funktionstüchtiger gebrauchte...

Page 31: ...Folgen für Mensch und Um welt haben Kleben Sie daher bei lithiumhalti gen Batterien und Akkus vor der Entsorgung die Pole ab um einen äußeren Kurzschluss zu vermeiden Batterien und Akkus die nicht fest im Gerät verbaut sind müssen vor der Entsorgung ent fernt und separat entsorgt werden Batterien und Akkus bitte nur in entladenem Zustand abgeben Verwenden Sie wenn möglich Akkus anstelle von Einweg...

Page 32: ... Unterhitze 185 195 25 40 1 1 Heißluft 165 175 40 50 Small Cakes 1 2 Ober Unterhitze 160 170 15 25 1 1 Heißluft 160 170 20 30 2 2 Fettpfanne 4 Backblech Heißluft 165 170 20 25 Toast 1 3 Grill 240 1 3 Burger 1 4 Intensivgrill 240 15 6 82 Hähnchen 1 2 Intensivgrill mit Umluft 180 195 50 65 Schweinebraten 1 2 Intensivgrill mit Umluft 180 195 140 160 Gans 1 2 Intensivgrill mit Umluft 180 195 75 90 Piz...

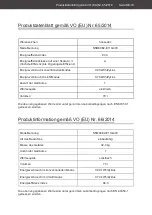
Page 33: ...hl der Garräume 1 Wärmequelle elektrisch Volumen 70 l Die oben angegebenen Werte sind unter genormten Laborbedingungen nach EN 60350 1 gemessen worden Produktinformation gemäß VO EU Nr 66 2014 Produktinformation gemäß VO EU Nr 66 2014 Modellkennung N5M90E2 E11G400 Art des Backofens einbaufähig Masse des Gerätes 32 0 kg Anzahl der Garräume 1 Wärmequelle elektrisch Volumen 70 l Energieverbrauch im k...

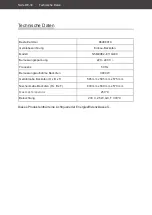
Page 34: ...essungsspannung 220 240 V Frequenz 50 Hz Bemessungsaufnahme Backofen 3000 W Gerätemaße Backofen H x B x T 595 mm x 595 mm x 575 mm Nischenmaße Backofen H x B x T 600 mm x 560 mm x 570 mm Maximal Temperatur 250 C Beleuchtung 230 V 25 W G9 T 300 C Dieses Produkt enthält eine Lichtquelle der Energieeffizienzklasse G Technische Daten ...

Page 35: ...Built in oven with timer User manual Manual version 196893 EN 20220811 Article no 86488918 Reproduction even of excerpts is not permitted N5M90E2 E11G400 ...

Page 36: ...egulations specified in this user manual Keep all safety notices and instructions for future reference Pass all safety notic es and instructions on to the subsequent user of the product Special preparation information for yeast dough EN 16 Child safety EN 17 Cooking compartment light EN 17 Energy saving mode EN 17 The timer EN 18 Example of timer operation EN 18 Timer EN 19 Cleaning the oven EN 20...

Page 37: ...30 Waste prevention EN 30 Free return of old electrical appli ances EN 30 Disposal EN 30 Packaging EN 31 Test reports table EN 32 Product fiche concerning Regula tion EU No 65 2014 EN 33 Product fiche concerning Regula tion EU No 66 2014 EN 33 Technical specifications EN 34 ...

Page 38: ...death or serious injury CAUTION This signal term indicates a hazard with a low level of risk which if not avoided could result in minor or moderate injury NOTICE This signal term warns against possible dam age to property Explanation of symbols The following symbols can be found in this user manual and or on the appliance respec tively This symbol refers to useful additional information Hot surfac...

Page 39: ... due to their physical sensory or mental abilities or lack of knowledge must be supervised during use Do not make any technical changes to the appliance Safety notices In this chapter you will find general safety notices which you must always observe for your own protection and that of third parties Please also observe the warning notices in the following chapters Risks to children and certain gro...

Page 40: ...an find more detailed information about this on the nameplate If the mains plug is no longer accessi ble after installation or set up an all pole disconnecting device complying with overvoltage category III must be connected to the house wiring with a contact gap of at least 3 mm consult a qualified professional if necessary see the chapter on Service Mains cable mains plug Lay out the supply cord...

Page 41: ...off the auto matic circuit breakers and or unscrew the fuses To extinguish the fire use a suitable fire extinguisher with the designation F or a fire blanket Once the fire has been extinguished have the appliance checked by our Service department Protecting food Health hazard Improper use of this appliance can lead to damage to health Clean the appliance regularly and re move any traces of food le...

Page 42: ...e oven and as far away as possible Allow the oven to cool down com pletely before cleaning Never pour water directly into the hot oven The steam can cause scalding and damage the enamel Allow hot water from the oven to cool before pouring it out Fire hazard Insufficient air circulation can lead to overheating Do not install the oven behind a dec orative door or a cabinet door Never cover or obstru...

Page 43: ...o not allow the door to fall open when taking it off its hinges Take particular care to ensure that the door seals are clean If the seal is very dirty the appliance door will no longer close properly Neighbouring furniture fronts may be damaged The door seals are sensitive to oil and grease making the rubber porous and brittle Do not remove the door seals Do not use any harsh abrasive clean ers or...

Page 44: ...rder to prevent spilling and burning Please note that fats oils and alcohol can catch on fire when heated After automatic switch off switch off the oven using the regulating control devices e g set function selector temperature controller to off or 0 Specific risks for units with a cooling fan CAUTION A defective cooling fan can cause fur ther damage to the oven and cause flammable objects in the ...

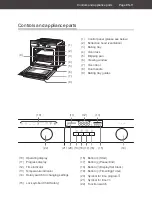
Page 45: ...ol Child Safety 1 Control panel please see below 2 Extraction hood ventilation 3 Baking tray 4 Oven rack 5 Dripping pan 6 Viewing window 7 Oven door 8 Door handle 9 Baking tray guides 16 Button Start 17 Button Pause End 18 Button Display Set Clock 19 Button Timer Egg Timer 20 Symbol for time program 21 Symbol for timer 22 Function switch 1 2 3 4 5 1 9 2 3 4 5 6 7 8 10 11 12 13 16 17 18 19 20 21 15...

Page 46: ...r fat with water To extinguish the fire use a suitable fire extinguisher with the designation F or a fire blanket Once the fire has been extinguished have the appliance checked by our Service team NOTICE Pent up heat can damage the oven s enamel Never place baking trays or alumin ium foil directly on the bottom of the cooking compartment as heat will build up which can damage the enamel in the coo...

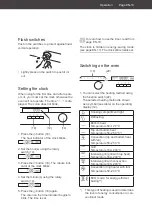
Page 47: ...emperature 180 240 C Convection ring heater with fan Temperature 50 240 C ECO mode for energy efficient baking This type of heating is used to determine the level of energy consumption in con ventional mode Flush switches Push in the switches to protect against inad vertent operation Lightly press on the switch to push it in out Setting the clock When using for the first time and after a pow er cu...

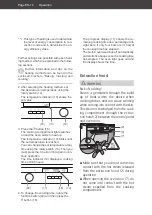
Page 48: ...e operation The time indicator 12 displays a cooking time of 9 00 hours 22 16 12 11 4 To change the cooking time rotate the function switch 22 and then press the button 16 The progress display 11 shows the re maining cooking time as a percentage with eight bars If only four bars are lit half of the cooking time has elapsed The built in oven switches off automatically and emits five beeps once the ...

Page 49: ...u are preparing foods in oil fat or using alcohol do not leave the cooker unattended The food may spontane ously ignite Only use temperature sensors recom mended for this oven Pausing ending operation You can briefly pause or end the current op eration in any heating method with the but ton 17 17 16 Press the button 17 once to pause operation the heating is switched off the coupling fan continues ...

Page 50: ...defrosting In order to make more room in the cook ing compartment you can remove the baking tray guides and defrost the frozen food container directly on the bottom of the oven see page EN 21 Special preparation information for yeast dough 1 If the baking dish does not fit in the cook ing compartment you can remove the baking tray guides to increase the cooking compartment volume see page EN 21 2 ...

Page 51: ...ppliance is in oper ation To switch on the cooking compartment light e g for cleaning 1 Select the light symbol using the func tion switch 22 2 Press the button 16 To switch off the cooking compartment light press the button 17 twice Information on changing the light bulb is available on page EN 23 Energy saving mode If energy saving mode is activated the oven switches to standby after approx 10 m...

Page 52: ...king should start at 18 30 Your food should be ready at 18 30 The cooking time should be 40 minutes It should be cooked at 180 C with top and bottom heat Proceed as follows 1 Switch off the oven if you have not al ready done so 2 Place your food in the oven and close the cooking compartment door 12 18 20 16 14 22 3 Enter the time when your food should be ready cooking should start To do this press...

Page 53: ...o 09 59 hours Please note that the timer does not switch the oven on or off You can also use the timer when the oven is not switched on 1 Press the button 19 The hour s blinks on the display 12 2 Set the desired hours using the rotary switch 14 3 Press the button 19 again The minute s blinks on the display 4 Set the minutes using the rotary switch 5 Press the button 16 to start All oven functions ...

Page 54: ...s with warm rinsing water or all purpose cleaner For stainless steel surfaces you can also use special care products made just for stainless steel surfaces Cleaning the cooking compartment When cleaning use the function switch to switch on only the cooking compartment light see Cooking compartment light on page EN 17 Clean the cooking compartment and bak ing tray guides after every use if possible...

Page 55: ...g the screw 23 Then you can use the baking tray guides 9 again as usual and insert the baking tray 3 the oven rack 4 and the dripping pan 5 Cleaning the oven door NOTICE Risk of breakage and injury Dropping the oven door poses a risk of breakage and injury because it com prises three panes of heavy glass You can cut yourself on the shards Do not allow the oven door or individ ual glass panels to f...

Page 56: ...closed or if there is a cracking sound when closing it the oven door is not hung properly 6 Correct the position of the hinges and clips if necessary until the oven door opens and closes smoothly again Cleaning the glass panes The oven door contains two glass panes that should be cleaned regularly on both sides 1 Remove the oven door see Remov ing the oven door from its hinges on page EN 21 and pl...

Page 57: ...us injury or even death Before replacing the oven bulb be sure to switch off the circuit breaker or unscrew fuses Risk of burns The cooking compartment can re main hot a long time after it has been switched off As a result there is a risk of being burnt when touching the cook ing compartment walls or heating unit Only change the oven light bulb when the oven has cooled off completely 1 Switch off ...

Page 58: ...asting and cooking brochure Check the delivery 1 Check that the delivery is complete 2 Check whether the appliance was dam aged during transit 3 If the delivery is incomplete or the appli ance has been damaged during transport please contact our Service Department see page EN 29 WARNING Do not operate the built in oven if you notice damage caused in transit 1 2 3 4 5 ...

Page 59: ...ps and foam padding from the inside outside and back of the appliance Installing the oven The oven is designed for installation in standard kitchen units It can be installed at eye level and underneath the worktop The following conditions must be observed Do not install the oven directly next to a refrigerator or freezer This will increase its energy consumption unnecessarily due to heat emission ...

Page 60: ...tallation in an upright cabinet min 570 max 50 560 35 585 min 570 max 50 560 35 585 All dimensions in mm Connecting the oven Depending on the installation recess the oven must be connected before or after in stallation For the electrical connection of the oven a professional must install an earthed power socket with a separate fuse with sufficient protection 230 V 50 Hz 16 A The socket must be ins...

Page 61: ...re an even gap between the oven and the unit walls on both sides Do not seal the gap above the oven fascia 3 Once the oven is correctly positioned open the oven door and screw into the unit using the fitting screws supplied 4 Switch the socket fuse back on 5 Check the functions see Operation on page EN 12 Pre cleaning the oven The oven must be pre cleaned to remove all grease and oil residues from...

Page 62: ...vated and all functions are locked see Child safety on page EN 17 If the clock is not set the oven cannot be switched on see Setting the clock on page EN 13 Oven cannot be operat ed and the symbol 20 or the symbol 21 is shown on the display The timer is active see page EN 18 Thus all functions are locked To reset the timer press the button 17 twice The cooking compart ment light is defective Repla...

Page 63: ...her accessories Repairs and spare parts You can prevent waste by having your defec tive appliances repaired Please contact our Service Department regarding this Customers in Germany Please contact our Technical Service Phone 49 0 40 36 03 31 50 Customers in Austria Please contact your mail order company s customer service centre or product advice centre Please note You are responsible for the cond...

Page 64: ... not to a collection point operat Waste prevention According to the provisions of Directive 2008 98 EC waste prevention measures al ways take priority over waste management For electrical and electronic devices waste prevention measures include extending the lifespan of defective devices through repair and reselling used working appliances in stead of disposing of them Please help us reduce waste ...

Page 65: ... the environment It is therefore important to tape off the poles of lithium batteries and rechargeable batteries before disposing of them to prevent an exter nal short circuit Before disposing of the appliance batteries and rechargeable batteries which are not permanently built into the appliance must be removed and disposed of separately Please only dispose of batteries and re chargeable batterie...

Page 66: ...at 185 195 25 40 1 1 Hot air 165 175 40 50 Small cakes 1 2 Top bottom heat 160 170 15 25 1 1 Hot air 160 170 20 30 2 2 Dripping pan 4 Baking tray Hot air 165 170 20 25 Toast 1 3 Grill 240 1 3 Burgers 1 4 Intensive grill 240 15 6 82 Chicken 1 2 Intensive grill with convection 180 195 50 65 Roast pork 1 2 Intensive grill with convection 180 195 140 160 Goose 1 2 Intensive grill with convection 180 1...

Page 67: ...ities 1 Heat source electricity Volume 70 l The values indicated above have been measured under standardised laboratory conditions pursuant to EN 60350 1 Product fiche concerning Regulation EU No 66 2014 Product information concerning Regulation EU No 66 2014 Model identification N5M90E2 E11G400 Type of oven built in Mass of the appliance 32 0 kg Number of cavities 1 Heat source electricity Volume...

Page 68: ...G400 Rated voltage 220 240 V Frequency 50 Hz Rated power input oven 3000 W Oven measurements H x W x D 595 mm x 595 mm x 575 mm Oven recess dimensions H x W x D 600 mm x 560 mm x 570 mm Maximum temperature 250 C Lighting 230 V 25 W G9 T 300 C This product contains a light source of energy efficiency class G Technical specifications ...

Reviews: