background image

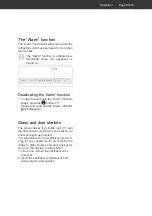
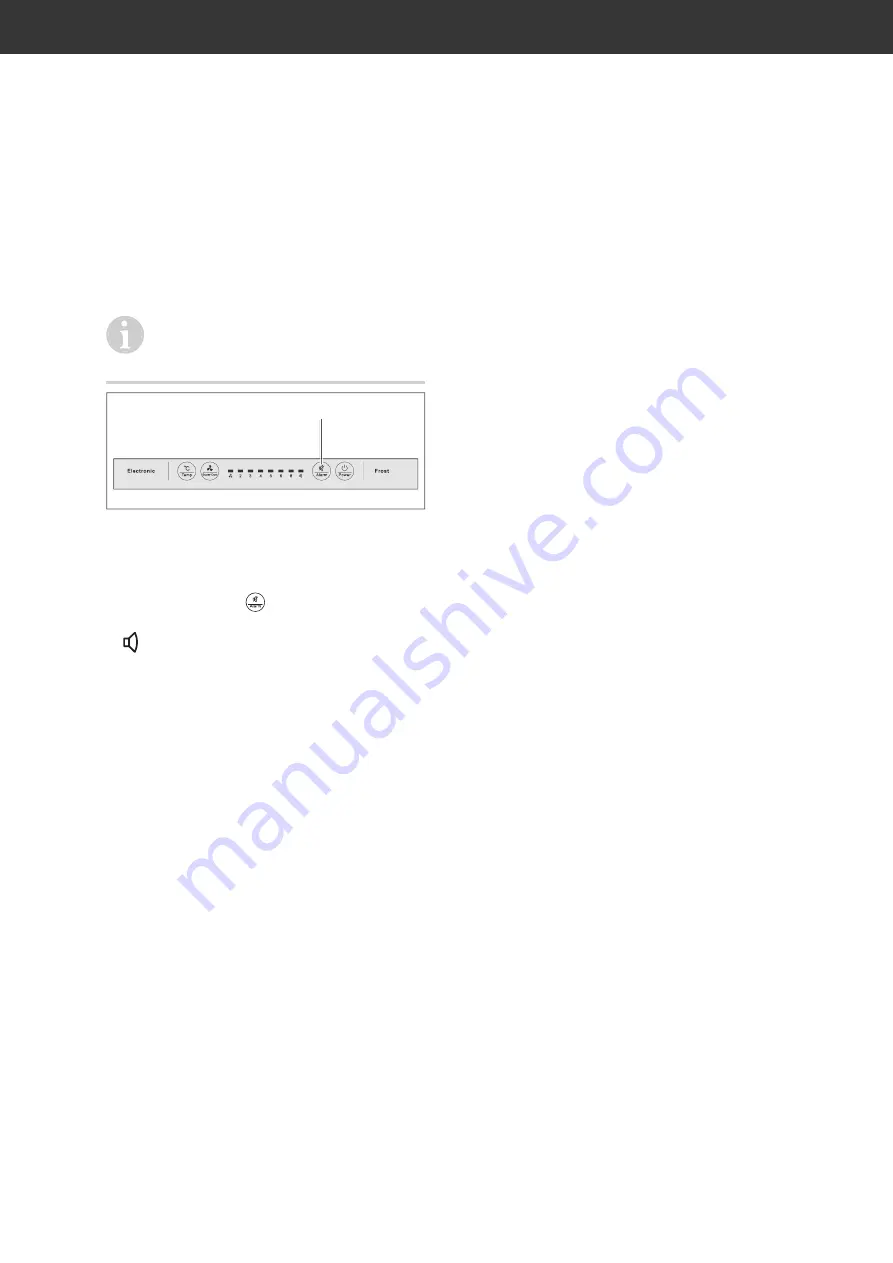
The “Alarm” function

The “Alarm” function will alert you to when the 
refrigerator door has been open for more than 
two minutes.

The “Alarm” function is activated au-
tomatically when the appliance is 
turned on.

Free

(17)

Deactivating the “Alarm” function

•  In order to deactivate the “Alarm” function, 

simply press the 

 button (17).

A beep will sound and the “Alarm” indicator 

 will disappear.

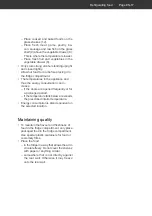
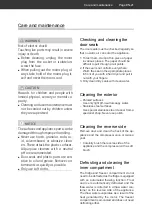
Glass and door shelves

The glass shelves (12), bottle rack (11) and 
the door shelves (3) and (4) can be taken out 
and rearranged as required.
You will achieve the most efficient use of en-
ergy for your appliance if you combine the 
drawers, glass shelves and door shelves as 
shown in the diagram on page EN-11
1. Lift up and remove the shelf/door com-

partment.

2. Insert the shelf/door compartment from 

above into the new position.

Operation

Page EN-15

Summary of Contents for HEKS17754GEW

Page 1: ...K hl Gefrier Kombination Gebrauchsanleitung Anleitung Version 2001 01086 DE 20201019 Bestell Nr 17226661 Nachdruck auch auszugswei se nicht gestattet HEKS17754GEW...

Page 2: ...nehmen DE 25 Transportieren Auspacken und Aufstellen DE 25 Grundreinigung DE 25 Ger t in Betrieb nehmen DE 26 T ranschlag wechseln DE 28 Einbau in eine K chenzeile DE 30 Ger t einbauen DE 31 Fehlersuc...

Page 3: ...eite DE 25 2 Entfernen Sie alle Verpackungsteile Kunststoffprofile Klebestreifen und Schaumpolster 3 Pr fen Sie ob die Lieferung vollst ndig ist 4 Kontrollieren Sie ob das Ger t Transport sch den aufw...

Page 4: ...nischen Ver nderun gen am Ger t vor Verwenden Sie das Ger t ausschlie lich wie in dieser Gebrauchsanleitung beschrieben Jede andere Verwendung gilt als nicht be stimmungsgem und kann zu Sachsch den od...

Page 5: ...geschlossen werden Beim Anschlie en darauf achten dass die richtige Spannung anliegt N here Informationen hierzu nden Sie auf dem Typschild Die vollst ndige Trennung vom Stromnetz erfolgt bei diesem G...

Page 6: ...chtung auszutauschen Wenden Sie sich im Bedarfsfall an unseren Service siehe Seite DE 34 Ger t regelm ig auf Sch den pr fen Brandgefahr Unsachgem er Umgang mit dem Ger t kann zu einem Brand zu Verlet...

Page 7: ...zu verhindern bei einem Gasleck nicht den Netzstecker ziehen Elektro Altger te an einer zugelas senen Sammel oder R cknahme stelle abgeben Risiken durch chemische Stoffe VORSICHT Explosionsgefahr Unsa...

Page 8: ...ne Umge bungstemperatur einhalten siehe Bestimmungsgem er Gebrauch auf Seite DE 4 Durch falsche Handhabung unzurei chende K hlung oder berlagerung k nnen die eingelagerten Lebensmittel verderben Bei V...

Page 9: ...hub laden werden schwerg ngig und die T r schlie t eventuell nicht mehr dicht ab Risiken bei Einbauger ten WARNUNG Brandgefahr Unsachgem er Umgang mit dem Ge r t kann zu einem Brand und zu Sach sch de...

Page 10: ...der nicht mit der Verpackungsfolie spielen lassen Kinder daran hindern Kleinteile vom Ger t abzuziehen oder aus dem Zu beh rbeutel zu nehmen und in den Mund zu stecken Bei der Entsorgung des Ger tes d...

Page 11: ...rierbereichst r 6 Glasablage Gefrierbereich 7 Gefrierschubladen 1 12 9 11 10 3 2 13 4 5 8 Gem seschublade 9 Glasablage als Abdeckung f r die Gem seschublade 10 Tauwasserabfluss 11 Flaschenablage 12 Gl...

Page 12: ...r zum Aktivieren des schnellen K hlens 16 Temperaturanzeige 17 Taster Alarm zum Deaktivieren des Alarms wenn z B die Ger tet r l nger als 2 Minuten ge ffnet ist 18 Taster zum Ein bzw Ausschalten des G...

Page 13: ...n Die Innenraumbe leuchtung schaltet sich ein sobald die T r ge ffnet wird und schaltet sich aus wenn die T r geschlossen wird 3 Macht das Ger t st rende Ger usche berpr fen Sie den festen Stand und e...

Page 14: ...h Die ideale Temperatur im K hlbereich liegt bei 6 C Die ideale Temperatur im Gefrierbereich liegt bei 18 C Die Funktion Super Cool Mit der Funktion Super Cool k nnen Sie Ihr K hlgut schneller herunte...

Page 15: ...n Taster 17 Ein Signalton ert nt und die Anzeige Alarm erlischt Glas und T rablagen Die Glasablagen 12 die Flaschenablage 11 sowie die T rablage 3 und 4 lassen sich herausnehmen und bei Bedarf anders...

Page 16: ...Kombinieren Sie die Schubladen Glas und T rablagen wie in der Abbildung auf Seite DE 16 gezeigt um die effizienteste Energienutzung f r Ihr Ger t zu erzielen Eine zu hohe oder zu niedrige Tempera ture...

Page 17: ...n Die Temperaturen im Ger t und damit der Energieverbrauch k nnen ansteigen wenn die T ren h ufig oder lange ge ff net werden wenn die vorgeschriebene Raumtempe ratur ber oder unterschritten wird Der...

Page 18: ...em ausreichend k hlen Raum oder einem anderen K hlger t lagern Nach einer St rung berpr fen ob die eingelagerten Lebensmittel noch genie bar sind Auf oder angetaute Lebensmittel nicht wieder einfriere...

Page 19: ...en bevor Sie sie einfrieren Das spart nicht nur Energie sondern vermeidet auch berm ige Reifbildung im Gefrierbereich Kohlens urehaltige Getr nke eignen sich nicht zum Einfrieren da die Kohlens ure be...

Page 20: ...iften stark vereisten Truhen liegt oberhalb der vorgeschriebenen Markie rungsmarke gestapelt ist teilweise verklumpt ist vor allem bei Beeren und Gem se leicht festzustellen Schnee und Saftspuren aufw...

Page 21: ...hr einer Lebensmittelvergiftung Zur Bereitung von Eisw rfeln nur fri sches Trinkwasser verwenden F llen Sie einen den mitgelieferten Eis w rfelbeh lter zu mit frischem Trink wasser und legen Sie ihn w...

Page 22: ...Nur weiche T cher verwenden T rdichtungen kontrollieren und reinigen Die T rdichtungen m ssen regelm ig kon trolliert werden damit keine warme Luft in das Ger t eindringt 1 Klemmen Sie zur Pr fung ei...

Page 23: ...us dem Gefrierbereich heraus Waschen Sie sie in warmem Wasser mit Sp lmittel und trocknen Sie sie gr ndlich ab 5 Nehmen Sie die Gem seschublade 8 und die Glasablagen 12 aus dem K hl bereich heraus Um...

Page 24: ...ng ausschlie lich zur Beleuchtung des Ger te In nenraums verwenden Sie ist nicht zur Beleuchtung eines Raumes geeignet Wenn das Ger t eingeschatet ist schaltet sich die Innenraumbeleuchtung beim ffnen...

Page 25: ...die Augen unter klarem Wasser und rufen Sie sofort einen Arzt HINWEIS Besch digungsgefahr Unsachgem er Umgang mit dem Ge r t kann zu Besch digungen f hren Das K hlger t m glichst nicht in die Horizon...

Page 26: ...Schalter und Sch tze Netzkabel nicht knicken oder klem men und nicht ber scharfe Kanten legen Die Folge kann ein Kabelbruch sein ber Klimaklassen Halten Sie immer die vorgeschriebene Umgebungstemperat...

Page 27: ...ehrfach steckdose ist unzul ssig HINWEIS Besch digungsgefahr Wenn das K hlger t liegend transpor tiert wurde kann Schmiermittel aus dem Kompressor in den K hlkreislauf gelangt sein Nach dem Transport...

Page 28: ...ndfaden m glichst eine zweite Person T ranschlag der K hlbereichst r wechseln 1 Stellen Sie sicher dass das Ger t nicht ans Stromnetz angeschlossen ist 20 21 2 L sen Sie die beiden Schrauben 20 am obe...

Page 29: ...re Scharnier 21 der K hlbereichst r um und schrauben Sie es unten dort an wo sich fr her die un teren Blindstopfen 26 befunden haben Setzen Sie die Unterlegscheibe 24 auf 10 Setzen Sie die K hlbereich...

Page 30: ...ei ter 27 29 4 Schleppschiene zur Befestigung an der M belt r 30 4 Abdeckung f r Schleppschie ne 29 31 2 Abdeckung f r seit liche Befestigungs winkel 32 2 Abdeckungen f r die Befestigung der Abschluss...

Page 31: ...ffnen Sie die Ger te und die M belt ren gleichzeitig Markieren Sie dabei die optimalen Positionen der Schleppschie nen auf den Innenseiten der M belt ren 34 29 6 Nehmen Sie die Schleppschienen wieder...

Page 32: ...n Sie das K hlger t mit dem Einbauschrank Verwenden Sie daf r oben 4 kurze Schrauben 34 und unten 2 lange Schrauben 33 Setzen Sie die Blindstopfen 35 auf die langen Schrauben 33 32 16 Bringen Sie die...

Page 33: ...ichtfestverschlossenoder T rdichtung liegt nicht voll auf Siehe T rdichtungen kontrollieren und reini gen auf Seite DE 22 Ger t steht in der N he einer W rmequelle Isolierplatte zwischen die Ger te st...

Page 34: ...bringen des letzten Exemplars des Modells zur Ver f gung T rdichtungen stehen f r einen Zeit raum von zehn Jahren zur Verf gung Kunden in Deutschland Wenden Sie sich bitte an unseren Technik Service T...

Page 35: ...l besteht Brandgefahr Achten Sie darauf dass an einem K hlger t bis zur fachgerechten Ent sorgung keine K hlrippen oder Rohre besch digt werden Unser Beitrag zum Schutz der Ozonschicht In diesem Ger t...

Page 36: ...61 Ger tebezeichnung K hl Gefrier Kombination Modellkennung HEKS17754GEW Ger tema e H he Breite Tiefe 1768 mm 540 mm 540 mm Leergewicht 53 kg K ltemittel R600a K ltemittel F llmenge 40 g Schaummittel...

Page 37: ...Refrigerator freezer User manual Manual version 2001 01086 EN 20201019 Article no 17226661 Reproduction even of excerpts is not permitted HEKS17754GEW...

Page 38: ...and setup EN 24 Cleaning before use EN 24 Commissioning the appliance EN 25 Changing the opening direction of the door EN 27 Installation in a kitchen unit EN 29 Installing the appliance EN 30 Trouble...

Page 39: ...on page EN 24 2 Remove all parts of the packaging plastic profiles tape and foam padding 3 Check that the delivery is complete 4 Check whether the appliance was dam aged during transit 5 If the deliv...

Page 40: ...s to the appliance Use the appliance exclusively as described in this user manual Any other use is deemed im proper and may result in damage to property or even personal injury The manufacturer accept...

Page 41: ...i ly accessible socket so that it can be quickly disconnected from the power supply in the event of a breakdown If the mains plug is no longer acces sible after installation an all pole dis connecting...

Page 42: ...ure or in the built in structure clear of obstruction Risks associated with using refrigerants WARNING Risk of re and explosion Your appliance s refrigeration circuit contains the environmentally frie...

Page 43: ...Never use defrosting sprays to de frost They can generate explosive gases Risks when dealing with fridge and freezer appliances WARNING Fire hazard Improper handling of the appliance can lead to re an...

Page 44: ...a suf ciently cool place or in another re frigerating appliance The maximum storage time in the event of a fault is shown on the appliance s type plate After a malfunction check wheth er the stored f...

Page 45: ...iance can lead to damage to property Do not pull or lift the appliance by its doors or door handles Place the appliance only on a lev el and rm surface that can support the weight of the appliance whe...

Page 46: ...rning use of the ap pliance in a safe way and understand the hazards involved Children aged from 3 to 8 years are allowed to load and unload refrigerating appliances Children shall not play with the a...

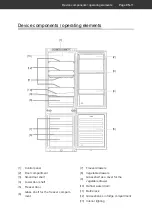
Page 47: ...zer door 6 Glass shelf for the freezer compart ment 1 12 9 11 10 3 2 13 4 5 7 Freezer drawers 8 Vegetable drawers 9 Glass shelf as a cover for the vegetable drawer 10 Defrost water drain 11 Bottle rac...

Page 48: ...g quick cooling 16 Temperature indicator 17 Alarm button to deactivate the alarm that sounds when for example the appliance door is left open for longer than 2 minutes 18 Button for switching the appl...

Page 49: ...he refrigerant flows through the pipes and a quiet hum ming sound can be heard The interior light ing will turn on when you open the door it will switch off when the door is closed 3 If the appliance...

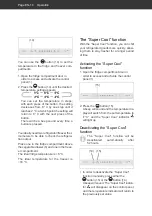
Page 50: ...The ideal fridge temperature is 6 C The ideal temperature for the freezer is 18 C The Super Cool function With the Super Cool function you can chill your refrigerated goods more quickly allow ing the...

Page 51: ...utton 17 A beep will sound and the Alarm indicator will disappear Glass and door shelves The glass shelves 12 bottle rack 11 and the door shelves 3 and 4 can be taken out and rearranged as required Yo...

Page 52: ...ombine the drawers glass shelves and door shelves as shown in the diagram on page EN 16 to achieve the most efficient use of energy for your appliance A temperature setting that is too high or too low...

Page 53: ...ase if the doors are opened frequently or for a prolonged period if the temperature falls below or exceeds the prescribed interior temperature Energy consumption is also dependent on the selected loca...

Page 54: ...ance and store it in a suf ciently cool place or in another refrigerating appliance After a malfunction check wheth er the stored food is still edible Con sume thawed and defrosted foods immediately d...

Page 55: ...to air and liquid not too stiff and labelled It should be desig nated as suitable for freezer use Use plastic clips rubber bands or adhe sive tapes to seal Portions Use flat portions as much as possib...

Page 56: ...iquid To defrost food quickly use the defrost function on your microwave for example Observe the manufacturer s instructions and note that bacteria and germs can form in this way If you only want to d...

Page 57: ...test them clamp a thin piece of paper in various places The paper should be difficult to pull through at all points 2 If the seal is not uniform everywhere Warm the seal in the appropriate places in f...

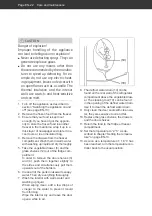
Page 58: ...wer 8 and the glass shelves 12 out of the fridge com partment In order to remove the door shelves 3 and 4 push them together slightly to the sides and simultaneously pull them upwards out of the holde...

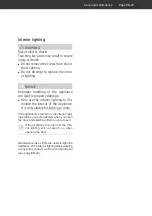
Page 59: ...ting to illu minate the interior of the appliance It is not suitable for lighting a room If the appliance is turned on the interior light ing switches on automatically when you open the door and switc...

Page 60: ...is happens rinse eyes with clean water and seek medical assis tance immediately NOTICE Risk of damage Improper handling of the appliance may result in damage If possible do not tilt the cooling ap pli...

Page 61: ...in the cable CAUTION Fire hazard Improper handling of the appliance can lead to re and property damage Only connect the appliance to a properly installed and earthed elec tric socket Do not connect t...

Page 62: ...or may make its way into the cool ing circuit Allow the appliance to stand upright for approx 2 hours after transport and before connecting This allows the lubricant enough time to ow back into the co...

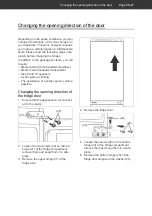
Page 63: ...stance of another person where possible Changing the opening direction of the fridge door 1 Ensure that the appliance is not connect ed to the mains 20 21 2 Loosen the two screws 20 on the top hinge 2...

Page 64: ...hinge 21 of the fridge door around and screw it onto the location where the lower blanking plugs 26 were previously Put the washer 24 on 10 Mount the fridge door onto the hinge 21 11 Reinstall the hi...

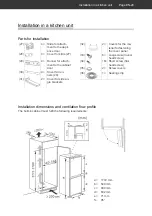
Page 65: ...pli ance door 28 4 Cover for slide 27 29 4 Runner for attach ment to the cabinet door 30 4 Cover for run ners 29 31 2 Cover for side an gle brackets 32 2 Covers for the ma terial for fastening the cov...

Page 66: ...cessary correct the position of the refrigerator 5 Open the appliance door and cabinet doors at the same time As you do so mark the best position for the runners on the inside of the cabinet door 34 2...

Page 67: ...e built in cabinet To do so use four short screws 34 at the top and the two long screws 33 at the bottom After the long screws 33 are driven cover them with the screw covers 35 32 16 Reattach the cove...

Page 68: ...The appliance doesn t cool suffi ciently The temperature setting is set too low Select a higher setting see Setting the tem perature on page EN 13 Door not tightly closed or door seal is not completel...

Page 69: ...lanations Water has accu mulated in the fridge compart ment at the bot tom The defrost water drain below the lower vegetable drawer is blocked Unblock the defrost water drain using the enclosed cleani...

Page 70: ...m peri od of seven years after the final version of the model has been placed on the market Door seals are available for a period of ten years Customers in Germany Please contact our technical service...

Page 71: ...sed of Refrigerant leakage may cause a re hazard Until the point of proper disposal ensure that none of the cooling ns or tubes on a cooling appliance are damaged Our contribution to the protection of...

Page 72: ...Climate class N ST This appliance is intended to be used at an ambient temperature between 16 C and 38 C This product contains a light source of energy efficiency class G The product fiche for your de...

Reviews: