background image

Freezing foods / storing frozen foods

Page GB-15

Storing frozen food

The deep-freeze chain must not be broken 
between the manufacturer and your freezer. 
The temperature of the frozen food must al-
ways be at least -18° C.

Therefore, do not buy any goods that


– are in frosty, over-icy chests.


– are stacked above the stipulated high-load 

marker.


– partially clumped (particularly easy to iden-

tify with berries and vegetables).


– have snow and juice traces.

Transport frozen foods in special styrofoam 
boxes or insulated bags.

Observe the storage conditions and times on 
the packaging

Defrosting food

Observe the following basic rules when de-
frosting food:


– To defrost food, remove it from the freezer 

and let it defrost at room temperature or in 
the refrigerator. 


– Always defrost meat, poultry and fish in the 

refrigerator. Make sure that the frozen food 
is not immersed in its own thawing liquid.


– To  defrost  food  quickly,  use  the  defrost 

function on your microwave, for example. 
Observe  the  manufacturer’s  instructions 
and note that bacteria and germs can form 
in this way. 


– If you only want to defrost part of a pack, 

remove the portion you need and immedi-
ately close the rest of the pack. In this way, 
you will avoid “freezer burn” and will reduce 
ice formation on the remaining foods.

Cook  or  use  thawed  foods  as  soon  as 
possible. Dispose of the defrosting liquid. 

Preparing ice cubes

 WARNING

Health hazard!
Eating ice cubes which have been pre-
pared using impure or standing water 
can be harmful to health. Incorrect 
handling can lead to risks of causing 
food poisoning.


Use only drinking water to make ice 
cubes.

•  Fill the supplied ice cube container to 

the ¾ level with fresh drinking water and 
place it horizontally in the freezer com-
partment. Let the water cool off over sev-
eral hours.

The  ice  cubes  are  best  removed  by 
bending the ice cube container slightly 

or holding it under running water for a short 
while.

Summary of Contents for HGS 8555A3W

Page 1: ...Gefrierschrank Gebrauchsanleitung Anleitung Version 196831_DE_20190404 Bestell Nr 5501 7005 7096 2344 Nachdruck auch auszugsweise nicht gestattet HGS 8555A3W HGS 85355A3I MED...

Page 2: ...richten DE 19 Grundreinigung DE 20 Ger t elektrisch anschlie en DE 20 T ranschlag wechseln DE 21 Gefrierschrank ausrichten DE 23 Bevor Sie das Ger t benut zen lesen Sie bitte zuerst die Sicherheitshin...

Page 3: ...e DE 18 2 Entfernen Sie alle Verpackungsteile Kunststoffprofile Klebestreifen und Schaumpolster 3 Pr fen Sie ob die Lieferung vollst ndig ist 4 Kontrollieren Sie ob das Ger t Transport sch den aufweis...

Page 4: ...Ger teteile Bedienelemente Seite DE 4 Ger teteile Bedienelemente 1 Temperaturregler 2 Gefrierkorb 3 3 Schraubfu 2 1 3 2...

Page 5: ...Folge haben kann VORSICHT Dieser Signalbegriff bezeichnet eine Gef hrdung mit einem niedrigen Risiko grad die wenn sie nicht vermieden wird eine geringf gige oder m ige Verletzung zur Folge haben kan...

Page 6: ...ine allpolige Trennvorrichtung gem berspannungskategorie III inderHausinstallationmitmindestens 3 mm Kontaktabstand vorgeschaltet sein hierzu z hlen Sicherungen LS Schalter und Sch tze Netzkabel nicht...

Page 7: ...VORSICHT Risiken f r bestimmte Personengruppen Gefahren f r Kinder und Personen mit eingeschr nkten physischen sensorischen oder geistigen F higkeiten Dieses Ger t kann von Kindern ab 8 Jahren und dar...

Page 8: ...estgr e von 1 m3 je 8 g K ltemittel haben Die Menge des K ltemittels in Ihrem Ger t nden Sie auf dem Datenblatt siehe Technische Daten auf Seite DE 28 Verletzungsgefahr Unsachgem er Umgang mit dem Ger...

Page 9: ...ind Auf oder angetaute Lebensmittel nicht wieder einfrieren sondern sofort verbrauchen Zur Bereitung von Eisw rfeln nur Trink wasser verwenden Das Ger t arbeitet eventuell nicht einwandfrei wenn es be...

Page 10: ...etc einla gern Wasser dehnt sich im gefrore nen Zustand aus und kann den Beh l ter sprengen Ger t rechtzeitig abtauen bevor sich eine Eis und Reifschicht von mehr als 5 mm bildet Bei zu starker Eisbil...

Page 11: ...ellen Die K hlleistung ist stufenlos von MIN bis MAX einstellbar MAX ist dabei die niedrigste Temperatur Bei der vorgeschriebenen Umgebungstempe ratur reicht die Einstellung MED aus wenn Sie die T r n...

Page 12: ...Hinweis Wenn Sie den Temperatur Regler auf MIN einstellen ist der Gefrier schrank nicht ausgeschaltet 2 Nehmen Sie alle Lebensmittel aus dem Gefrierschrank und lagern Sie sie wei terhin k hl damit die...

Page 13: ...offen lassen um Schimmelbildung zu vermeiden Gesundheitsgefahr Durch falsche Handhabung unzureichende K hlung oder berlagerung k nnen die eingelagerten Lebensmittel verderben Bei Verzehr besteht die...

Page 14: ...erpackungsma terial das widerstandsf hig luft und fl ssigkeitsundurchl ssig nicht zu steif und zu beschriften ist Es sollte als Ge frierverpackung ausgewiesen sein Verwenden Sie zum Verschlie en Plas...

Page 15: ...nd Fisch im mer im K hlschrank auf Achten Sie darauf dass das Gefriergut nicht in der eigenen Auftaufl ssigkeit liegt Um Lebensmittel schnell aufzutauen nutzen Sie z B die Auftaufunktion Ihrer Mikrowe...

Page 16: ...er teteile aus Kunststoff sind emp ndlich gegen l und Fett Verunreinigungen m g lichst schnell entfernen Nur weiche T cher verwenden T rdichtungen kontrollieren und reinigen Die T rdichtungen m ssen r...

Page 17: ...K ltereserve und taut nicht so schnell auf Abtauen 1 Stellen Sie den Temperaturregler auf MIN 2 Ziehen Sie den Netzstecker aus der Steckdose 3 Nehmen Sie das Gefriergut heraus Wi ckeln Sie es dick in...

Page 18: ...den HINWEIS Besch digungsgefahr Unsachgem er Umgang mit dem Ger t kann zu Besch digungen f hren Das K hlger t m glichst nur in der Horizontalen transportieren Zum Auspacken keine scharfen oder spitzen...

Page 19: ...ingehal ten werden zu Elektroherden 3 cm zu l und Kohleherden 30 cm zu anderen K hlger ten 2 cm zu Wasch Geschirrsp lmaschinen 2 cm M chten Sie diese Abst nde verringern k nnen Sie eine Isolierplatte...

Page 20: ...nach dem Auf stellen nicht mehr zug nglich ist muss eine allpolige Trennvorrichtung gem berspannungskategorie III in der Hausinstallation mit min destens 3 mm Kontaktabstand vor geschaltet sein hierz...

Page 21: ...raubabdeckun gen auf der Oberseite der Abdeckung mit einem Schlitz Schraubendreher 3 Drehen Sie die zwei Schrauben links und rechts aus der Oberseite der Abdeckung heraus Verwenden Sie daf r einen Kre...

Page 22: ...en Gefrierschrank nach hin ten maximal 45 damit Sie auch das untere T rscharnier umsetzen k nnen 10 Schrauben Sie die beiden vorderen Schraubf e 3 heraus 11 Schrauben Sie die untere Schar nierplatte a...

Page 23: ...n T ranschlag erfolgreich gewechselt Gefrierschrank ausrichten Der Gefrierschrank muss auf einem ebenen festen Untergrund stehen berpr fen Sie den Stand des Gefrierschranks am besten mit einer Wasserw...

Page 24: ...ig eingestellt H here Einstellung w hlen siehe Tempe ratur einstellen auf Seite DE 11 T r nicht fest verschlossen oder T rdichtung liegt nicht voll auf Siehe T rdichtungen kontrollieren und rei nigen...

Page 25: ...tahl HGS 85355A3I 7096 2344 Unser Service Reparaturen und Ersatzteile Kunden in Deutschland Wenden Sie sich bitte an unseren Technik Service Telefon 0 18 06 18 05 00 Festnetz 20 Cent Anruf Mobilfunk m...

Page 26: ...i Austritt von K ltemittel besteht Brandgefahr Achten Sie darauf dass an einem K hlger t bis zur fachgerechten Ent sorgung keine K hlrippen oder Rohre besch digt werden Unser Beitrag zum Schutz der Oz...

Page 27: ...der Grundlage von Ergebnissen der Normpr fung ber 24 Stunden Der tats chliche Verbrauch h ngt von der Nutzung und vom Standort des Ger ts ab Nutzinhalt K hlbereich Gefrierbereich Sterne Einstufung L 8...

Page 28: ...frierschrank Modell HGS8555A3W HGS8555A3I Ger tema e H he Breite Tiefe mit Anschl ssen 85 0 cm 54 5 cm 57 5 cm Leergewicht 33 kg K ltemittel R600a K ltemittel F llmenge 57 g Schaummittel Zyklopentan L...

Page 29: ...Freezer User manual Manual version 196831 GB 20190404 Article no 5501 7005 7096 2344 Reproduction even of excerpts is not permitted HGS 8555A3W HGS 85355A3I MED...

Page 30: ...ricity GB 20 Changing the door hinges GB 21 Positioning the freezer GB 23 Please read through the safety instructions and user manual carefully be fore using the appliance This is the only way you can...

Page 31: ...age GB 18 2 Remove all parts of the packaging plastic profiles tape and foam padding 3 Check that the delivery is complete 4 Check whether the appliance was dam aged during transit 5 If the delivery i...

Page 32: ...Appliance parts control elements Page GB 4 Appliance parts control elements 1 Temperature controller 2 Freezer baskets 3 3 Screw feet 2 1 3 2...

Page 33: ...erty This symbol refers to useful addi tional information Explanation of symbols Caution Fire hazard 4 star logo Freezer compartment at 18 C or colder Safety notices In this chapter you will nd genera...

Page 34: ...the mains cord Never touch the mains plug with wet hands Never immerse the mains cord or plug in water or any other liquids If the mains cable of the appliance is damaged it must be replaced by the m...

Page 35: ...e appliance Make sure children do not have unsu pervised access to the appliance Risks in handling freezers Fire hazard Improper handling of the appliance can lead to re and property damage Only conne...

Page 36: ...en food compartments are suitable for storing pre frozen food storing or making ice cream and making ice cubes One two and three star compart ments are not suitable for the free zing of fresh food If...

Page 37: ...appliance must only be placed on a level and rm surface The sur face must be strong enough to sup port the appliance s weight when ful ly laden Do not use sharp or pointed objects to unpack it Do not...

Page 38: ...ic surfaces All purpose cleaners with a neutral pH are recommended Door seals and plastic parts are sensitive to oil and grease Remove contaminants as quickly as possi ble Use only soft cloths for cle...

Page 39: ...e cooling pow er is variable and adjustable from MIN to MAX MAX is the lowest temperature At the prescribed ambient temperature the setting MED will suffice if you do not open the door too often and a...

Page 40: ...socket to switch off the freezer Notice If you set the temperature control ler to MIN the freezer is not switched off 2 Remove all food from the freezer and store it in a cool place so that the food...

Page 41: ...and leave the door open to prevent mould developing within the appliance Health hazard Incorrect handling insuf cient cool ing or overlapping items can spoil the stored food This could lead to a risk...

Page 42: ...rubber bands or adhe sive tapes to seal Portions Use flat portions as much as possible these freeze through to the core faster Expel the air from the freezer bag as this causes the contents to dry ou...

Page 43: ...ersed in its own thawing liquid To defrost food quickly use the defrost function on your microwave for example Observe the manufacturer s instructions and note that bacteria and germs can form in this...

Page 44: ...possible Only use soft cloths Checking and cleaning door seals The door seals must be checked regularly so that no air can enter the appliance 1 To test them clamp a thin piece of paper in various pl...

Page 45: ...ing 1 Set the temperature controller to MIN 2 Pull the mains plug out of the socket 3 Remove the frozen food Wrap it thickly in newspaper and place it in a cool room or in a fridge 4 Remove the freeze...

Page 46: ...roper handling of the appliance may result in damage Where possible keep the cooling unit level when transporting it Do not use sharp or pointed objects to unpack it 1 Move the appliance using a dolly...

Page 47: ...hob or radiator The following minimum distances must be maintained from electrical hobs 3 cm from oil and coal burning stoves 30cm from other cooling appliances 2 cm from washing machines dishwashers...

Page 48: ...If the mains plug is no longer acces sible after installation an all pole dis connecting device complying with overvoltage category III must be connected to the house wiring with a contact gap of at...

Page 49: ...ever out the two screw covers on top of the cover using a slotted screw driver 3 Unscrew the two screws on the left and right from the top of the cover To do this use a cross head screwdriver 4 Lever...

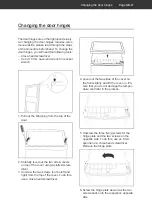
Page 50: ...wards maximum 45 so that you can also move the lower door hinge 10 Unscrew the two front screw feet 3 11 Unscrew the lower hinge plate To do this use an 8 mm spanner or a cross head screwdriver 12 Rem...

Page 51: ...r You have successfully changed the door hinges Positioning the freezer The freezer must stand on a level solid sur face For the best result check the position of the appliance with a spirit level Whe...

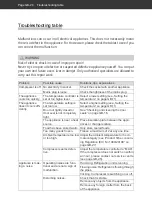
Page 52: ...g is set too low Select a higher setting see Setting the temperature on page GB 11 Door not tightly closed or door seal is not completely tight See Checking and cleaning the door seals on page GB 16 T...

Page 53: ...8555A3W 5501 7005 stainless steel HGS 85355A3I 7096 2344 Our Service Centre Repairs and spare parts Customers in Germany Please contact our technical service Telephone 0 18 06 18 05 00 landline 20 ce...

Page 54: ...nsulation have to be proper ly disposed of Refrigerant leakage may cause a re hazard Until the point of proper disposal ensure that none of the cooling ns or tubes on a cooling appliance are damaged O...

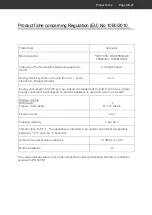
Page 55: ...based on standard test results for 24 hours Actual energy consumption will depend on how the appliance is used and where it is located Storage volume Refrigerator Freezer Star rating L 81 L 4 Sterne P...

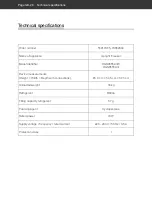
Page 56: ...ezer Model identifier HGS8555A3W HGS8555A3I Device measurements Height Width Depth with connections 85 0 cm 54 5 cm 57 5 cm Unloaded weight 33 kg Refrigerant R600a Filling capacity refrigerant 57 g Fo...

Page 57: ......
Reviews: