background image

Environmental protection

Page EN-44

 Environmental protection

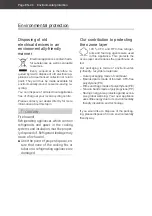
Disposing of old 
electrical devices in an 
environmentally-friendly 
manner

Electrical appliances contain harm-
ful substances as well as valuable 
resources.

Every consumer is therefore re-

quired by law to dispose of old electrical ap-
pliances at an authorised collection or return 
point. They will thus be made available for 
environmentally-sound, resource-saving re-
cycling.

You can dispose of old electrical appliances 
free of charge at your local recycling centre.

Please contact your dealer directly for more 
information about this topic.

 CAUTION

Fire hazard!
Refrigerating appliances, which contain 
refrigerants and gases in the cooling 
systems and insulation, must be proper-
ly disposed of. Refrigerant leakage may 
cause a fi re hazard.

Until the point of proper disposal, en-
sure that none of the cooling fi ns or 
tubes on a refrigerating appliance are 
damaged.

Our contribution to protecting 
the ozone layer

100 % CFC and HFC-free refriger-
ants and foaming agents were used 
in this appliance. This protects the 

ozone layer and reduces the greenhouse ef-
fect.

Our packaging is made of environmental-
ly-friendly, recyclable materials: 

– Outer packaging made of cardboard 
– Moulded parts made of foamed, CFC-free 

polystyrene (PS) 

– Films and bags made of polyethylene (PE)
– Tension bands made of polypropylene (PP)
– Saving energy also protects against exces-

sive global warming. Your new appliance 
uses little energy due to its environmentally 
friendly insulation and technology.

If you would like to dispose of the packag-
ing, please dispose of it in an environmentally 
friendly way.

Summary of Contents for HSBS17990WEFBK

Page 1: ...Gefrier Kombination mit Wasserspender und Eisbereiter Gebrauchsanleitung Anleitung Version 2001 00989 DE 20200828 Bestell Nr 1526 9720 8756 9360 Nachdruck auch auszugswei se nicht gestattet HSBS17990W...

Page 2: ...fgitter reinigen DE 32 Eisw rfelbeh lter reinigen DE 32 Eisspender reinigen DE 33 Wasserfilter austauschen DE 33 Beleuchtung DE 34 Inbetriebnahme DE 35 Bevor Sie das Ger t in Betrieb nehmen DE 35 Tran...

Page 3: ...Zulaufschlauch wei 4 m 1 Verl ngerungsschlauch blau 6 m 1 Schraubanschluss Zoll 1 Wasserfilter 2 Wandhalterung 5 Sicherheitsclip zum Teil vorinstalliert 2 Schraube M4 25 2 D bel 2 Schlauchkupplung 1 G...

Page 4: ...r und Eisbreiter 5 Innenbeleuchtung 6 Glasablagen im Gefrierbereich 7 gro e Gefrierschublade 8 kleine Gefrierschublade 9 Flaschenablage 10 Glasablagen im K hlbereich 11 gro e Obst Gem seschublade 12 k...

Page 5: ...e LOCK UNLOCK zum Sperren und Entsperren des Bedienfelds 22 Anzeige LOCK UNLOCK Wenn das Bedienfeld gesperrt ist erscheint das Symbol Wenn das Bedienfeld entsperrt ist erscheint das Symbol 23 Anzeige...

Page 6: ...g gilt als nicht bestimmungsgem und kann zu Sachsch den oder sogar zu Personensch den f hren Der Hersteller bernimmt keine Haftung f r Sch den die durch nicht bestimmungsgem en Gebrauch entstanden sin...

Page 7: ...B die Anschlussleitung defekt ist Rauch entwickelt oder verbrannt riecht ungewohnte Ger usche von sich gibt In einem solchen Fall Netzstecker aus der Steckdose ziehen bzw Sicherung herausschrauben aus...

Page 8: ...m Ger t be nden sich elek trische und mechanische Teile die zum Schutz gegen Gefahrenquellen unerl sslich sind Bei Reparaturen d rfen ausschlie lich Teile verwendet werden die den urspr nglichen Ge r...

Page 9: ...e Menge des K ltemittels in Ihrem Ge r t nden Sie auf dem Typschild des Ger ts Um Funkenbildung zu verhindern bei einem Gasleck nicht den Netzstecker ziehen Risiken durch chemische Stoffe VORSICHT Exp...

Page 10: ...tege h use oder im Einbaugeh use nicht verschlie en VORSICHT Gesundheitsgefahr Verunreinigte Lebensmittel k nnen ge sundheitliche Sch den verursachen Wenn die T r f r eine l ngere Zeit ge ffnet wird...

Page 11: ...ittel noch genie bar sind Auf oder angetaute Lebensmittel nicht wieder einfrieren sondern sofort verbrauchen Zur Bereitung von Eisw rfeln nur Trinkwasser verwenden Verletzungsgefahr durch Gefriergut U...

Page 12: ...es K hlsystems stecken und sicherstellen dass auch Kinder keine Gegenst nde hineinste cken Innenraumbeleuchtung ausschlie lich zur Beleuchtung des Ger teinne ren verwenden Sie ist nicht zur Be leuchtu...

Page 13: ...beh lter greifen Keine Gegenst nde wie z B Mes ser Gabeln oder dergleichen in den Eis bzw Kaltwasserauslass oder das Mahlwerk stecken Beim Reinigen des Mahlwerks u erst vorsichtig vorgehen Eisbereite...

Page 14: ...en Sie ist nicht zur Beleuchtung eines Raumes geeignet Bedienung Einschalten 1 Stecken Sie den Netzstecker in eine leicht zug ngliche Steckdose 220 240 V 50 Hz Wenn Sie eine Ger tet r ffnen ist der Ge...

Page 15: ...teinneren kommen Immer die vorgeschriebene Umge bungstemperatur einhalten siehe Bestimmungsgem er Gebrauch auf Seite DE 6 Wenn Sie eine niedrigere Temperatur einstellen ben tigen Sie mehr K hl leistun...

Page 16: ...auf die zuletzt eingestellte Temperatur um Sie k nnen Schnelles Einfrieren und Schnelles K hlen auch jederzeit manuell beenden Schnelles Einfrieren QUICK FRZ QUICK REF FILTER RESET 3 MODE 31 16 17 W h...

Page 17: ...ICK REF auf dem Display erschei nen Um Schnelles Einfrieren und Schnelles K hlen auszuschalten dr cken Sie die Wahltaste MODE so oft bis auf dem Dis play die Symbole QUICK FRZ und QUICK REF erl schen...

Page 18: ...en h ufig oder lange ge ffnet werden Um einen berm igen K lteverlust zu ver hindern ert nt ein Signalton wenn eine oder beide T ren der K hl Gefrier Kombination l nger als 2 Minuten ge ffnet sind Schl...

Page 19: ...tel nicht ber hrt oder auf diese tropft Wenn das K hl Gefrierger t l ngere Zeit leer steht das Ger t ausschalten abtauen reinigen und die T r offen lassen um Schimmelbildung zu ver meiden Kombinieren...

Page 20: ...igsten Legen Sie frisches Obst und Gem se in die Obst Gem seschubladen 11 und 12 Lagern Sie hochprozentigen Alkohol nur stehend und fest verschlossen Lassen Sie warme Lebensmittel abk hlen ehe Sie sie...

Page 21: ...rn Die maximale Lagerzeit bei ei ner St rung entnehmen Sie dem Typ schild des Ger ts Nach einer St rung berpr fen ob die eingelagerten Lebensmittel noch genie bar sind Auf oder angetaute Lebensmittel...

Page 22: ...teste Energienutzung f r Ihr Ger t zu erzielen Lebensmittel vorbereiten Frieren Sie nur qualitativ einwandfreie Le bensmittel ein Frieren Sie frische und zubereitete Spei sen ungesalzen und ungew rzt...

Page 23: ...rgeschriebenen Markie rungsmarke gestapelt ist teilweise verklumpt ist vor allem bei Bee ren und Gem se leicht festzustellen Schnee und Saftspuren aufweist Transportieren Sie Tiefk hlkost in Spezial b...

Page 24: ...eit Wenn Sie nur einen Teil einer Packung auftauen m chten entnehmen Sie diesen und schlie en Sie die Packung sofort wie der Dadurch beugen Sie Gefrierbrand vor und vermindern die Eisbildung am ver bl...

Page 25: ...runreinigtem oder abgestandenem Wasser bereitet wurden kann die Ge sundheit gef hrden Durch falsche Handhabung besteht die Gefahr einer Lebensmittelvergiftung Zur Bereitung von Eisw rfeln nur fri sche...

Page 26: ...h lter Wie Sie den Eisw rfelbeh lter aus dem Gefrier raum herausnehmen ist im Abschnitt Eisw r felbeh lter reinigen auf Seite DE 32 erkl rt Wenn im Eisw rfelbeh lter nicht genug Eis w rfel vorhanden s...

Page 27: ...aufleuchtet HOLD 3S UNLOCK 33 2 Dr cken Sie ein Gef gegen das Entnah me Pad 33 Gek hltes Wasser beginnt in das Gef zu flie en 3 Nehmen Sie das Gef vom Entnah me Pad um den Wasserfluss zu been den Zers...

Page 28: ...fel zu verhin dern 3 Dr cken Sie das Gef gegen das Ent nahme Pad 33 Eisw rfel beginnen in das Gef zu fallen 4 Nehmen Sie das Gef vom Entnah me Pad um die Eisentnahme zu beenden Eisbereiter sperren ent...

Page 29: ...n l und Fett Verunreinigungen m g lichst schnell entfernen Nur weiche T cher verwenden Einzelne Ger teteile nicht in der Sp l maschine waschen Sie sind nicht sp lmaschinenfest Ger t niemals mit einem...

Page 30: ...er um Schimmel bildung vorzubeugen 4 Reinigen Sie die T rdichtung nur mit kla rem Wasser sie ist empfindlich gegen ber l und Fett 5 Wischen Sie den Innenraum trocken und lassen Sie die T r zum L ften...

Page 31: ...us dem Gefrierbereich heraus Glasabla gen 6 Eisw rfelbeh lter 4 Gefrier schubladen 7 und 8 4 Sterne T rabla ge 1 und 2 Sterne T rablagen 3 Reinigen 1 Reinigen Sie den Eisw rfelbeh lter 4 wie im Abschn...

Page 32: ...in dass die Eisw rfel im Eisw r felbeh lter 4 verklumpt sind In diesem Fall wird es n tig den Eisw rfelbeh lter zu reini gen bzw die Blockade zu beseitigen Reinigen Sie den Eisw rfelbeh lter regelm ig...

Page 33: ...hen Nach 150 Tagen ununterbrochenen Betriebs erscheint die Anzeige auf dem Display Wenn dies geschieht sollten Sie den Was serfilter austauschen Nach weiteren 30 Tagen beginnt die Anzeige zu blinken S...

Page 34: ...isch Mechanisch Kapazit t 1136 Liter maximale Betriebsdauer 6 Monate Zertifizierung NSF ANSI Standard 42 zur Verringerung der Partikel der Klasse 1 Sedimente Chlor Blei Geruch und Geschmack Der mitgel...

Page 35: ...n die Hori zontale kippen Zum Auspacken keine scharfen oder spitzen Gegenst nde verwenden Transportieren Sie das Ger t mithilfe einer M bel Rollplatte und einer zweiten Per son Packen Sie das Ger t au...

Page 36: ...len 1 Stellen Sie das Ger t aufrecht auf einen m glichst ebenen festen Untergrund 2 Um eine ausreichende Luftzirkulation zu gew hrleisten halten Sie zur R ckwand einen Mindest abstand von 7 5 cm ein a...

Page 37: ...Die maximale Justierh he be tr gt 5 mm 1 ffnen Sie die T r des K hlbereichs weit 44 45 absenken anheben 2 Drehen Sie die Sicherungsmutter 44 zwei volle Umdrehungen im Uhrzeigersinn um sie zu l sen Ve...

Page 38: ...Ziehen Sie einen Fachmann zurate Empfehlenswert ist die Montage unterhalb eines Sp lbeckens 54 1 Bestimmen Sie die Montageh he des Wasserfilters 41 Der wei e Ger teschlauch 54 muss bis zum Wasserfilt...

Page 39: ...Wasserfilter in Richtung des wei en Ger teschlauchs 54 zeigt Wasserfilter anschlie en F r den Anschluss des Wasserfilters 41 be n tigen Sie diese Teile 40 2 Schlauchkupplung 49 2 Sicherheitsclips 52 1...

Page 40: ...hkupp lung 56 am Verl ngerungsschlauch 55 49 2 Fixieren Sie den Verl ngerungsschlauch mithilfe eines Sicherheitsclips 49 3 Schlie en Sie den Wasserfilter 41 wie im Abschnitt Wasserfilter anschlie en a...

Page 41: ...e den Schlauch erneut an 5 ffnen Sie die Wasserzufuhr 6 Pr fen Sie nochmals die Schlauchverbin dung auf Wasseraustritt Sollte das Problem weiterhin bestehen nehmen Sie bitte Kontakt mit unserem Ser vi...

Page 42: ...en f hren Ger t nur an eine ordnungsgem installierte Schutzkontakt Steckdose anschlie en Der Anschluss an eine Steckdosenleiste oder eine Mehrfach steckdose ist unzul ssig HINWEIS Besch digungsgefahr...

Page 43: ...ltet sich der Kompressor selbstt tig ein Ger t k hlt zu stark Temperatur ist zu niedrig ein gestellt H here Einstellung w hlen siehe Tempera tur einstellen auf Seite DE 15 Ger t k hlt nicht ausreichen...

Page 44: ...rung auftritt wird der entsprechende St rungscode z B EE angezeigt bis die St rung behoben ist Zur Beseitigung der St rung nehmen Sie bitte Kontakt mit unserem Service auf siehe Seite DE 45 St rungsco...

Page 45: ...stehen f r eine Mindestdauer von sieben Jahren nach dem Inverkehrbringen des letzten Exemplars des Modells zur Ver f gung T rdichtungen stehen f r einen Zeit raum von zehn Jahren zur Verf gung Kunden...

Page 46: ...Austritt von K ltemit tel besteht Brandgefahr Achten Sie darauf dass an einem K hlger t bis zur fachgerechten Ent sorgung keine K hlrippen oder Rohre besch digt werden Unser Beitrag zum Schutz der Ozo...

Page 47: ...en Sie unter Technische Daten Technische Daten Bestellnummer 15269720 87569360 Ger tebezeichnung Side by side K hl Gefrierkombination Modellkennung HSBS17990WEFBK HSBS17990WEFI Ger tema e H he Breite...

Page 48: ...Produktdatenblatt nach VO EU Nr 2019 2016 Seite DE 48...

Page 49: ...ide fridge freezer with water dispenser and ice maker User manual Manual version 2001 00989 EN 20200828 Order no 1526 9720 8756 9360 Reproduction even of excerpts is not permitted HSBS17990WEFBK HSBS1...

Page 50: ...be container EN 29 Cleaning the ice dispenser EN 30 Replacing the water filter EN 31 Lighting EN 32 Start up EN 33 Before starting to use the applianceEN 33 Moving and unpacking EN 33 Choosing a suita...

Page 51: ...reezer drawer small 3 Door shelf 1 Egg tray 1 Spanner 1 Inlet hose white 4 m 1 Extension hose blue 6 m 1 Screw connector inch 1 Water filter 2 Wall bracket 5 Safety clip partially pre assembled 2 Scre...

Page 52: ...e cube container and ice maker 5 Interior light 6 Glass shelves in freezer 7 Large freezer drawer 8 Small freezer drawer 9 Bottle rack 10 Glass shelves in fridge 11 Large fruit vegetable drawer 12 Sma...

Page 53: ...tton for setting the temperature in fridge 21 LOCK UNLOCK button for locking unlocking the control panel 22 LOCK UNLOCK signal When the control panel is locked the symbol appears When the control pane...

Page 54: ...r even personal injury The manufacturer accepts no li ability for damage caused by improper use Explanation of terms The following symbols can be found in this user manual WARNING This symbol indicate...

Page 55: ...tor that has been properly installed When connecting the appliance make sure that the voltage is correct More detailed information about this can be found on the nameplate To disconnect this applianc...

Page 56: ...system for dis tance monitoring and control Do not locate multiple portable sock et outlets or portable power supplies at the rear of the appliance Risks associated with using refrigerants WARNING Ri...

Page 57: ...ing small parts from the device or taking them out of the accessory bag and putting them in their mouths When disposing of the appliance en sure that children cannot suffocate inside the appliance e g...

Page 58: ...ster etc Incorrect handling insuf cient cool ing or overlapping items can spoil the stored food This could lead to a risk of food poisoning when consumed Pay attention to the star classi ca tions and...

Page 59: ...s doors or door handles Place the appliance only on a lev el and rm surface that can support the weight of the appliance when it is lled Do not use sharp or pointed objects to unpack it When unpacking...

Page 60: ...the ice These could break as a resultofthedifferenceintemperature The water lter can only lter out oat ing particles from the water It does not destroy bacteria or microbes Only connect to the drinki...

Page 61: ...ting a room Operation Switching on 1 Insert the mains plug into an easily acces sible socket 220 240 V 50 Hz When you open one of the appliance doors the interior of the appliance is lit up The compre...

Page 62: ...ure inside the appliance Always ensure the prescribed ambi ent temperature is maintained see Intended use on page EN 6 If you set a lower temperature you will require greater refrigeration perfor manc...

Page 63: ...t the Quick refrigerating mode and return to the previously set fridge tempera ture You can also end Quick freezing and Quick refrigerating manually at any time Quick freezing QUICK FRZ QUICK REF FILT...

Page 64: ...urn off Quick refrigerating and Quick freezing press MODE selection button enough times until the QUICK FRZ and QUICK REF symbols disappear from the display Holiday mode WARNING Health hazard Incorrec...

Page 65: ...ng periods of time To avoid an excessive loss of cooling a tone will sound when one or both doors of the fridge freezer have been open for more than 2 minutes Close the open door s When you open the d...

Page 66: ...tch off defrost clean dry and leave the door open to prevent mould developing within the appliance Combine the drawers glass shelves and door shelves as shown in the figure on page EN 18 to achieve th...

Page 67: ...y store strong alcohol standing upright and tightly closed Allow hot food to cool before placing it in the fridge If you intend to refill the fridge with large amounts of food set Quick refrigerating...

Page 68: ...still edible Con sume thawed and defrosted foods immediately do not refreeze Health hazard Contaminated food can cause health problems Two star frozen food compartments are suitable for storing pre fr...

Page 69: ...ecause the carbon dioxide es capes during freezing Selecting suitable packaging Packaging is important when freezing This will protect against oxidation penetration by microbes transfer of odours and...

Page 70: ...1 star door shelf is 6 C and colder Only use the 1 star door shelf for the short term storage of food that is already frozen The maximum storage time in the 1 star door shelf is 1 week Please note the...

Page 71: ...drinking water to make ice cubes CAUTION Risk of injury Do not put ice cubes crushed ice or ice lollies straight into your mouth from the freezer Function of the ice maker When the freezer has reache...

Page 72: ...e cubes are produced In order to prevent unpleasant odours or fla vours from developing in the ice cubes clean the ice cube container on a regular basis You can only dispense water and ice when the do...

Page 73: ...tainer 3 Remove the vessel from the dispenser guide to stop the flow of water Dispensing crushed ice QUICK FRZ QUICK REF FILTER RESET 3S HOLD 3S UNLOCK 24 25 1 Press the DISPENSER selection but ton 24...

Page 74: ...34 to prevent ice cubes from escaping 3 Push the container against the dispenser guide 33 Ice cubes will begin to pour into the vessel 4 Remove the vessel from the dispenser guide to stop the flow of...

Page 75: ...high pressure cleaner Make sure that no water gets into the electrical parts of the appliance Checking and cleaning door seals The door seals must be checked regularly so that no air can enter the app...

Page 76: ...Set the desired fridge and freezer temper ature see page EN 14 Cleaning the freezer WARNING Danger of explosion Improper handling of the appliance can lead to de agration or explosion Never use defro...

Page 77: ...the fuse again 3 To quickly cool the fridge and freezer switch on Quick freezing QUICK FRZ and Quick refrigerating QUICK REF at the same time see page EN 16 4 Place the frozen food back into the freez...

Page 78: ...cloth water and a mild cleaner 3 Dry all parts thoroughly Using the appliance again 1 Place the cover 37 on the ice cube con tainer 4 39 2 Push the ice cube container back into the freezer compartment...

Page 79: ...rection of water flow Insert the hose couplings 40 into the new water filter and firmly press them down 7 Insert the new water filter into the wall bracket 8 Reattach the water supply and check whethe...

Page 80: ...ling of the appliance can lead to damage to property The interior light must only be used to illuminate the interior of the appli ance It is not suitable for lighting a room The interior lighting 5 sw...

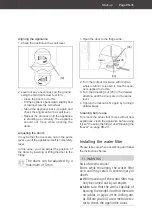
Page 81: ...second person Unpack the appliance and carefully re move all packaging plastic moulding adhesive strips protective film and foam padding from the inside outside and back of the appliance Choosing a s...

Page 82: ...the appliance upright on as flat and as firm a base as possible 2 To ensure adequate air circulation maintain a minimum distance of 7 5 cm to the rear wall maintain a distance of 10cm on the sides fre...

Page 83: ...or to the fridge wide 44 45 lower lift 2 Turn the locknut clockwise with 44 two whole rotations to loosen it Use the span ner supplied to do this 3 Turn the adjusting nut 45 in the desired direction u...

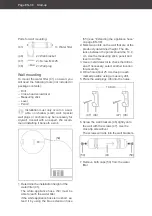
Page 84: ...able to reach the water filter If the white appliance hose is too short ex tend it by using the blue extension hose 55 see Extending the appliance hose on page EN 38 2 Mark two points on the wall that...

Page 85: ...the white appli ance hose 54 54 3 Insert the end of the appliance hose into the hose coupling to which the arrow on the water filter is pointing until it makes contact 49 4 Fix the appliance hose in p...

Page 86: ...aulty assembly of the water connec tion can result in water damage The appliance s water pressure is set at 2 7 bar For higher water pressure a pressure regulator needs to be in stalled If in doubt en...

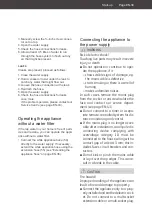
Page 87: ...ing the appliance to the power supply WARNING Risk of electric shock Touching live parts may result in severe injury or death Do not operate or continue to oper ate the appliance if it shows visible s...

Page 88: ...horizontally Allow the appliance to stand upright for approx 2 hours after transport and before connecting This allows the lubricant enough time to ow back into the compressor Insert the mains plug in...

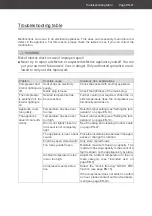
Page 89: ...mperature rises the compressor au tomatically switches on Appliance cools too quickly Temperature has been set too low Select a higher setting see Setting the tem perature on page EN 14 The appliance...

Page 90: ...ppliance Fault code If a fault occurs the corresponding fault code e g EE will be displayed until the fault has been fixed To fix the fault please contact our Service Centre see page EN 43 Fault code...

Page 91: ...epairs and spare parts Spare parts are available for a minimum peri od of seven years after the final version of the model has been placed on the market Door seals are available for a period of ten ye...

Page 92: ...nd insulation must be proper ly disposed of Refrigerant leakage may cause a re hazard Until the point of proper disposal en sure that none of the cooling ns or tubes on a refrigerating appliance are d...

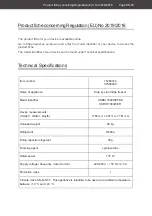
Page 93: ...cal specifications Technical Specifications Item number 15269720 87569360 Name of appliance Side by side fridge freezer Model identifier HSBS17990WEFBK HSBS17990WEFI Device measurements Height Width D...

Page 94: ...ProductficheconcerningRegulation EU No2019 2016 Page EN 46...

Reviews: