Start-up
Page GB-39
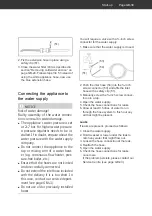
(51)
2. Fix the extension hose in place using a
safety clip (51).
3. Close the water filter (43) as described in
section "Removing cold water and ice“ on
page GB-24. Follow steps 3 to 5. Instead of
using the white appliance hose, now use
the blue extension hose.
Connecting the appliance to
the water supply
NOTICE
Risk of water damage!
Faulty assembly of the water connec-
tion can result in water damage.
■
The appliance’s water pressure is set
at 2–7 bar. For higher water pressure,
a pressure regulator needs to be in-
stalled. If in doubt, enquire about the
water pressure with the water supply
company.
■
Do not connect the appliance to the
tap or mixing arm of a water heat-
er (e.g. continuous flow heater, pres-
sure-free boiler, etc.).
■
Ensure that the hoses are not kinked
and are carefully connected.
■
Do not extend the inlet hose included
with the delivery if it is too short. In
this case, contact our service depart-
ment (see page GB-43).
■
Do not use old or previously installed
hoses.
You will require a valve with a ¾-inch screw
connector for the water supply.
1. Make sure that the water supply is closed.
(53)
(54)
(51)
2. Push the inlet hose (54) into the ¾-inch
screw connector (53) and affix the inlet
hose with a safety clip (51).
3. Manually screw the ¾-inch screw connec-
tor onto a tap.
4. Open the water supply.
5. Check the hose connections for leaks.
6. Allow at least 3.5 litres of water to run
through the hose system to flush out any
air that might be present.
Leaks
If leaks are present, proceed as follows:
1. Close the water supply.
2. Hold a vessel or towel under the leak to
catch any water that might flow out.
3. Loosen the hose connection at the leak.
4. Reattach the hose.
5. Open the water supply.
6. Check the hose connections for leaks
once more.
If the problem persists, please contact our
Service Centre (see page GB-43).

