background image

Start-up

Page GB-17

Setting up and aligning the 
appliance

1. Place the appliance on as flat and as firm 

a base as possible. 

2. To ensure adequate air circulation, 


– do not place the appliance directly 

against the wall. Leave a gap of at least 
10 cm to the back wall and 5 cm to the 
side.

3. Check the position with a spirit level. 

(2)

4. Level out any unevenness on the ground 

using both of the front screw feet.


– Close the glass door (1).


– Tilt the appliance backwards slightly and 

screw/unscrew the screw feet (2).


– Stand the appliance back up again and 

check the alignment with a spirit level. 
Repeat the process until the appliance 
is standing up vertically. The appliance 
should not move when opening the 
glass door.

Basic cleaning

To remove the odour that comes with all new 
appliances, clean the appliance before us-
ing it see „Care and maintenance“ on page 
GB-13).

Connecting the appliance

 WARNING

Risk of electric shock!
Touching live parts may result in severe 
injury or death.


Do not operate or continue to oper-
ate the appliance if


it shows visible signs of damage, 
e.g. the power cord is defective,


it starts smoking or there is a smell 
of burning,


it makes unfamiliar noises.

In such cases, remove the mains plug 
and contact our Service department 
(see page GB-23).


Connection to a timer or separate re-
mote control system for the purpos-
es of remotely monitoring and con-
trolling it is not permitted.


Do not kink or pinch the mains cord 
or lay it over sharp edges. This can re-
sult in a break in the cable.

Summary of Contents for JC-201S

Page 1: ...Weink hlschrank Gebrauchsanleitung Anleitung Version 196248_DE_20180703 Bestell Nr 4167 7525 Nachdruck auch auszugsweise nicht gestattet JC 201S...

Page 2: ...w hlen DE 16 Ger t aufstellen und ausrichten DE 18 Grundreinigung DE 18 Ger t anschlie en DE 18 T ranschlag wechseln DE 20 Fehlersuchtabelle DE 22 Service DE 24 Beratung Bestellung und Reklamation DE...

Page 3: ...Transport sch den aufweist 5 Sollte die Lieferung unvollst ndig sein oder das Ger t einen Transportschaden aufweisen nehmen Sie bitte Kontakt mit unserem Service auf siehe Seite DE 24 WARNUNG Stromsch...

Page 4: ...Ger teteile Bedienelement Seite DE 4 Ger teteile Bedienelement 1 Glast r 2 Schraubf e 3 Tauwasserablauf 1 2 4 3 4 5 6 4 Flaschenborde 5 Bedienfeld 6 LED Beleuchtung...

Page 5: ...f hrdung mit einem mittleren Risiko grad die wenn sie nicht vermieden wird den Tod oder eine schwere Verlet zung zur Folge haben kann VORSICHT Dieser Signalbegriff bezeichnet eine Gef hrdung mit einem...

Page 6: ...digt ist muss es durch den Her steller dessen Kundendienst oder eine quali zierte Fachkraft ausge tauscht werden Eingriffe und Reparaturen am Ge r t d rfen ausschlie lich autorisier te Fachkr fte vorn...

Page 7: ...haben Die Menge des K ltemittels in Ihrem Ger t nden Sie auf dem Datenblatt am Ende der Ge brauchsanleitung Explosionsgefahr Unsachgem er Umgang mit che mischen Stoffen kann zu Explosionen f hren Kein...

Page 8: ...als Trittbrett oder zum Abst tzen verwenden Keine schweren Gegenst nde auf dem Ger t abstellen Netzkabel so verlegen dass es nicht zur Stolperfalle wird Das Ger t arbeitet eventuell nicht ein wandfre...

Page 9: ...fohlenen benutzen Beim Reinigen beachten Auf keinen Fall aggressive k r nige soda s ure l semittelhal tige oder schmirgelnde Reinigungs mittel verwenden Diese greifen die Kunststofffl chen an Empfeh l...

Page 10: ...Bereich rechts f r den unteren Bereich Der Kompressor beginnt h rbar zu arbei ten und das Ger t k hlt Das Ger t ist eingeschaltet Einschalten Dr cken Sie auf die Taste 7 Ein Signalton ert nt Die Tempe...

Page 11: ...11 so oft bis die gew nschte Temperatur angezeigt wird zu senken dr cken Sie die Taste 12 so oft bis die gew nschte Temperatur angezeigt wird Nach kurzer Zeit endet das Blinken die ge w nschte Tempera...

Page 12: ...er t besch digen Die maximale Belastung von 14 Fla schen pro Bord nicht berschreiten Das Ger t ist f r die Lagerung einer bestimm ten Anzahl an Flaschen vorgesehen die so genannte Nennkapazit t Die Ne...

Page 13: ...wein 3 bis 5 Jahre Rotwein ca 6 Jahre sehr s e Weine 15 Jahre und mehr Weitere Einfl sse Achten Sie darauf dass der Wein w h rend der Lagerung m glichst nicht bewegt wird H ufiges Bewegen des Weins f...

Page 14: ...ralen pH Wert T rdichtungen und Ger teteile aus Kunststoff sind emp ndlich gegen l und Fett Verunreinigungen m g lichst schnell entfernen Nur weiche T cher verwenden T rdichtungen kontrollieren und re...

Page 15: ...n Sie den Innenraum mit warmem Wasser und etwas Sp lmittel aus Geben Sie beim Nachwischen einige Tropfen Essig ins Wasser um Schimmel bildung vorzubeugen 7 Wischen Sie den Innenraum trocken und lassen...

Page 16: ...h digen 1 Transportieren Sie das Ger t mithilfe einer Transportkarre oder einer zweiten Person 2 Packen Sie das Ger t aus und entfer nen Sie vorsichtig alle Verpackungsteile Kunststoffprofile Klebestr...

Page 17: ...en Ger ts tragen k nnen Gut geeignet sind Standorte die trocken gut bel ftet und m glichst k hl sind Ung nstig sind Standorte mit direkter Sonneneinstrahlung oder unmittelbar ne ben einem Ofen Herd od...

Page 18: ...t senkrecht ausge richtet ist Beim ffnen der Glast r darf sich das Ger t nicht bewegen Grundreinigung Um den Geruch zu entfernen der allen neuen Ger ten anhaftet reinigen Sie das Ger t be vor Sie es b...

Page 19: ...nn das K hlger t liegend trans portiert wird kann Schmiermittel aus dem Kompressor in den K hlkreislauf gelangt sein Nach dem Transport und vor dem An schlie en das Ger t ca 2 Stunden aufrecht stehen...

Page 20: ...en Sie folgendes Werkzeug mittelgro er Kreuzschlitz Schraubendreher mittelgro er Schlitz Schraubendreher Glast r abmontieren 1 Stellen Sie sicher dass das Ger t nicht ans Stromnetz angeschlossen ist 2...

Page 21: ...r 3 Drehen Sie die Glast r 1 um 180 und setzen Sie sie vorsichtig auf dem unteren Scharnier ein Halten Sie die Glast r fest Sie ist noch lose 4 berpr fen Sie den korrekten Sitz der Glast r Justieren S...

Page 22: ...sor selbstt tig ein Ger t k hlt zu stark Temperatur zu niedrig einge stellt H here Einstellung w hlen siehe Tempe ratur einstellen auf Seite DE 11 Ger t k hlt nicht ausreichend Temperatur zu hoch eing...

Page 23: ...en K lteaggregat l uft Flie ger usche K ltemittel flie t durch die Rohre Klicken Kompressor schaltet ein oder aus St rende Ger usche Festen Stand berpr fen Gegenst nde vom Ger t entfernen Fremdk rper...

Page 24: ...Service Reparaturen und Ersatzteile Kunden in Deutschland Wenden Sie sich bitte an unseren Technik Service Telefon 0 18 06 18 05 00 Festnetz 20 Cent Anruf Mobilfunk max 60 Cent Anruf Kunden in sterre...

Page 25: ...ff Recyclinghof abgeben F r weitere Informationen zu diesem Thema wenden Sie sich direkt an Ihren H ndler VORSICHT Brandgefahr K hlger te enthalten in den K hl systemen und Isolierungen K ltemit tel u...

Page 26: ...r temodells 2 K hlschrank mit Kellerzone Keller fach K hlger t und Weinschrank Energieeffizienzklasse auf einer Skala A h chste Effizienz bis G geringste Effizienz B Energieverbrauch 204 kWh Jahr auf...

Page 27: ...Wine refrigerator User manual Manual version 196248_GB_20180703 Article no 4167 7525 Reproduction even of excerpts is not permitted JC 201S...

Page 28: ...appliance GB 17 Basic cleaning GB 17 Connecting the appliance GB 17 Changing the door hinges GB 19 Troubleshooting table GB 21 Service GB 23 Advice order and complaint GB 23 Repairs and spare parts GB...

Page 29: ...aged during transit 5 If the delivery is incomplete or the appli ance has been damaged during transport please contact our Service Centre see page GB 23 WARNING Risk of electric shock Never use a dam...

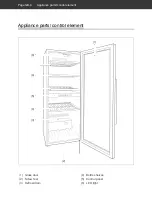
Page 30: ...Appliance parts control element Page GB 4 Appliance parts control element 1 Glass door 2 Screw feet 3 Defrost drain 1 2 4 3 4 5 6 4 Bottle shelves 5 Control panel 6 LED light...

Page 31: ...ot avoided could result in minor or moderate injury NOTICE This symbol warns against possible damage to property This symbol refers to useful addi tional information Safety notices In this chapter you...

Page 32: ...ty and warranty claims will be forfeited Never try to repair a defective or suspected defective ap pliance yourself This appliance contains electrical and mechanical parts which are essential forprote...

Page 33: ...ng sprays They can generate explosive gases CAUTION Risks for certain groups of people Danger to children and people with im paired physical sensory or mental abil ities This appliance can be used by...

Page 34: ...it to stand up right for 2 hours before start up The lubricant will ow back into the com pressor during this time Improper handling of the appliance can lead to property damage Do not use the door to...

Page 35: ...r the lower zone You will hear the compressor start to work and the appliance will begin cooling The appliance is switched on Switching on Press the key 7 A beep will sound The temperature indicator 1...

Page 36: ...ected zone can be increased by pressing the key 11 un til the desired temperature is displayed reduced by pressing the key 12 until the desired temperature is displayed After a short while the flashin...

Page 37: ...that the device is at least 70 filled in order to counteract fluctuations in temperature Maximum storage capacity NOTICE Risk of damage Damage may be caused to the appli ance by placing too much weig...

Page 38: ...the appliance s nominal capacity is ex ceeded Storage period The storage periods of wines differs and is dependent on many factors Use the follow ing storage periods as a general guideline Wine Stora...

Page 39: ...Checking and cleaning door seals The door seals must be checked regularly so that no air can enter the appliance 1 To test them clamp a thin piece of paper in various places The paper should be diffic...

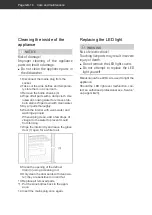
Page 40: ...ng clean add a few drops of vinegar to the water to prevent mould from forming 7 Wipe the interior dry and leave the glass door 1 open for a while to air 3 8 Clean the opening of the defrost drain 3 u...

Page 41: ...e appliance using a dolly or with a second person 2 Unpack the appliance and carefully re move all packaging plastic moulding adhesive strips protective film and foam padding from the inside outside a...

Page 42: ...he appliance s weight when fully laden Suitable locations are dry well ventilated areas that are cool if possible Unsuitable locations are ones with direct sunlight or which are directly next to an ov...

Page 43: ...The appliance should not move when opening the glass door Basic cleaning To remove the odour that comes with all new appliances clean the appliance before us ing it see Care and maintenance on page GB...

Page 44: ...it has been transport ed horizontally lubricant from the com pressor may get into the cooling circuit Allow the appliance to stand upright for approx 2 hours after transport and before connecting This...

Page 45: ...the following tools to change the door hinges Medium size cross tip screwdriver Medium size flat headed screwdriver Removing the glass door 1 Ensure that the appliance is not connect ed to the power...

Page 46: ...e fully insert it on the lower hinge Firmly hold onto the glass door It is still loose 4 Ensure that the glass door is positioned properly Adjust the door if necessary Re peat steps 1 to 4 20 21 5 Tig...

Page 47: ...ly switches on Appliance cools too quickly Temperature has been set too low Select a higher setting see Setting the tem perature on page GB 10 The appliance doesn t cool suffi ciently Temperature has...

Page 48: ...igeration unit is running Flowing noise Refrigerant is flowing through the pipes Clicking Compressor is switching on or off Disturbing noises Check that it is stable Remove any objects from the applia...

Page 49: ...efrigerator JC 201S 4167 7525 Service Repairs and spare parts Customers in Germany Please contact our technical service Telephone 0 18 06 18 05 00 landline 20 cents call mobile max 60 cents call Custo...

Page 50: ...old electrical appliances free of charge at your local recycling centre Please contact your dealer directly for more information about this topic CAUTION Fire hazard Cooling appliances which contain r...

Page 51: ...hold refrigerator model category 2 cellar refrigerator refrigerator with cellar compartment wine storage unit Energy efficiency class on a scale of A highest efficiency to G lowest efficiency B Energy...

Page 52: ......

Reviews: