background image

Akkustaubsauger

Gebrauchsanleitung

VSS01B16P-18.0Li

Anleitung/Version:
2001-00032 DE 20200715 
Bestell-Nr.: 8249 5929
Nachdruck, auch aus-
 zugs wei se, nicht ge-
 stat tet!

Summary of Contents for VSS01B16P-18.0Li

Page 1: ...Akkustaubsauger Gebrauchsanleitung VSS01B16P 18 0Li Anleitung Version 2001 00032DE20200715 Bestell Nr 8249 5929 Nachdruck auch aus zugsweise nicht ge stattet ...

Page 2: ...en saugen DE 14 Saugkraft einstellen DE 15 Saugen beenden DE 16 Abstellen DE 16 Platzsparendes Aufbe wahren DE 16 Pflege und Wartung DE 17 Staubbehälter entleeren DE 17 Schaumstofffilter und Feinstaubfilter reinigen DE 18 Feinstaubfilter wechseln DE 19 Gerät reinigen DE 20 Staubbehälter und Filtereinheit reinigen DE 21 Bodendüse reinigen DE 22 Fehlersuchtabelle DE 25 Service DE 26 Beratung Bestell...

Page 3: ...n geeigneten Standort und packen Sie es aus 2 Prüfen Sie ob die Lieferung vollständig ist 3 Kontrollieren Sie ob das Gerät Transportschäden aufweist 4 Sollte die Lieferung unvollstän dig sein oder das Gerät einen Transportschaden aufweisen nehmen Sie bitte Kontakt mit unserem Service auf siehe Service auf Seite DE 26 WARNUNG Gerät nicht in Betrieb neh men wenn es einen sichtba ren Schaden aufweist...

Page 4: ...immungsgemäßer Gebrauch Das Gerät dient zum Aufsaugen von losem trockenem Schmutz wie z B Staub Fusseln Krümeln auf Bodenbelägen und Polstern in Haushalt und Auto Zur Auf nahme gefährlichen Staubes oder von Flüssigkeiten ist es nicht geeignet Das Gerät ist nur zur Verwen dung im privaten Haushalt bestimmt und ist nicht für eine gewerbliche Nutzung oder Mehr fachnutzung z B Verwendung durch mehrere...

Page 5: ...mbol verweist auf nützliche Zusatzinfor mationen Sicherheitshinweise In diesem Kapitel finden Sie all gemeine Sicherheitshinweise die Sie zu Ihrem eigenen Schutz und zum Schutz Dritter stets beachten müssen Beachten Sie zusätzlich die Warnhinweise in den einzel nen Kapiteln zu Bedienung Rei nigung etc Risiken im Umgang mit elektrischen Haushaltsgeräten WARNUNG Stromschlaggefahr Das Berühren spannu...

Page 6: ...en Gerät nie unbeaufsichtigt lassen wenn sich der Netz stecker in der Steckdose befindet Netzstecker nie am Netz kabel aus der Steckdose ziehen immer den Netzste cker selbst anfassen Im Fehlerfall sowie vor Reinigung und Wartung z B Filter wechseln den Netzstecker immer aus der Steckdose ziehen Netzstecker niemals mit feuchten Händen anfassen Darauf achten dass kein Wasser in das Gerät ein dringt G...

Page 7: ...von Kin dern ab 8 Jahren sowie von Personen mit reduzierten physischen sensorischen oder mentalen Fähigkeiten oder Mangel an Erfahrung und oder Wissen benutzt werden wenn sie beauf sichtigt oder bezüglich des sicheren Gebrauchs unter wiesen wurden und die da raus resultierenden Gefah ren verstanden haben Kinder dürfen nicht mit dem Gerät spielen und kei nen Zugriff auf das Gerät haben wenn sie unb...

Page 8: ...der der Schaumstofffilter fehlt oder beschädigt ist Der aufgesaugte Staub kann sonst in das Gerät eindrin gen und in die Raumluft gelangen Brandgefahr Das Einsaugen von glühen der Asche brennenden Ziga retten etc setzt den Filter in Brand Weder glühende Asche brennende Zigaretten noch Streichhölzer aufsaugen Risiken im Umgang mit dem Akkupack Verletzungsgefahr Unsachgemäßer Umgang mit dem Li Ion Ak...

Page 9: ...ser Materia lien verstopft die Filter Niemals Wasser und ande re Flüssigkeiten aufsaugen Niemals spitze Gegenstän de wie z B Glassplitter aufsaugen Bei frisch schamponiertem Teppich mit dem Absaugen so lange warten bis das Reinigungsmittel vollstän dig trocken ist Den Staubsauger nie direkt neben eine Heizung oder einen Ofen stellen Den Feinstaubfilter niemals auf einer Heizung oder mit einem Haar ...

Page 10: ...ffs 5 Motorgehäuse 6 Ladekontrollanzeige Akku 7 Abluftöffnung 8 Staubbehälter 9 Entriegelungstaste für Staubbehälter 10 Entriegelungstaste für Bodendüse 11 Bodendüse 12 Rückenteil der Ladestation 13 Fuß der Ladestation 14 Steckernetzteil 15 Kamm zum Reinigen der Bürste Geräteteile 10 11 12 13 9 8 7 6 5 4 2 3 1 14 15 ...

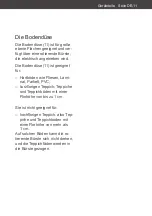
Page 11: ...se 11 ist geeignet für Hartböden wie Fliesen Lami nat Parkett PVC kurzflorigen Teppich Teppiche und Teppichböden mit einer Florhöhe von bis zu 1 cm Sie ist nicht geeignet für hochflorigen Teppich also Tep piche und Teppichboden mit einer Florhöhe von mehr als 1 cm Auf solchen Böden kann die ro tierende Bürste sich nicht drehen und die Teppichfäden werden in die Bürste gezogen ...

Page 12: ...le Verpackungsteile Kunststoff profile Klebestreifen und Schaumpolster Gerät vorbereiten 12 13 16 1 Stecken Sie das Rücken teil 12 auf den Fuß 13 der Ladestation Achten Sie dabei darauf dass die Kontakte 16 am Rücken teil 12 nach vorne zeigen 18 19 17 2 Stecken Sie den Stecker 18 des Steckernetzteils 14 in die Buchse 19 an der Rückseite der Ladestation 17 11 3 Stecken Sie die Bodendüse 11 auf den ...

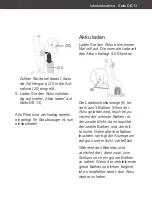
Page 13: ...e normale Ladezeit des Akkus beträgt 4 5 Stunden 6 Die Ladekontrollanzeige 6 be steht aus 3 Balken Wenn der Akku geladen wird leuchtet zu nächst der unterste Balken rot der zweite blinkt dann leuchtet der zweite Balken und der drit te blinkt Wenn alle drei Balken leuchten springt die Anzeige um auf grün und erlischt schließlich Während des Betriebs sind zunächst drei dann zwei zum Schluss noch ein...

Page 14: ...sigkeiten auf saugen Glühende Asche brennende Zigaretten etc setzen den Filter in Brand Feuchtigkeit kann zum Kurzschluss führen spitze Gegenstände beschädigen den Filter und können zum Kurzschluss führen VORSICHT Gesundheitsgefahr Unsachgemäßer Umgang mit dem Gerät kann zu Be einträchtigungen der Ge sundheit führen Das Gerät nicht benutzen wenn der Hygiene oder der Schaumstofffilter fehlt oder bes...

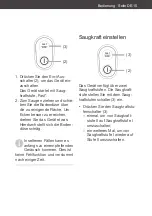
Page 15: ...ellt sich die Boden düse schräg In seltenen Fällen kann es anfangs zu einem pfeifenden Geräusch kommen Dies ist keine Fehlfunktion und verstummt nach einiger Zeit Saugkraft einstellen FAST SLOW 2 3 Das Gerät verfügt über zwei Saugkraftstufen Die Saugkraft stufe stellen Sie mit dem Saug kraftstufenschalter 3 ein Drücken Sie den Saugkraftstu fenschalter 3 einmal um von Saugkraft stufe II auf Saugkra...

Page 16: ...uschalten Abstellen 17 Zum Abstellen stellen Sie das Gerät wie gezeigt in die La destation 17 Platzsparendes Aufbewahren 4 1 Um das Gerät platzsparend auf zubewahren können Sie den Handgriff 1 einklappen Drücken Sie die Taste 4 zur Entriegelung des Hand griffs 1 und klappen Sie den Handgriff 1 nach unten ...

Page 17: ...e die Entriegelungs taste 9 für den Staubbehäl ter 8 nach oben und nehmen Sie den Staubbehälter 8 ab 22 8 2 Ziehen Sie die Filtereinheit 22 aus dem Staubbehälter 8 3 Halten Sie den Staubbehäl ter 8 so über einen Mülleimer dass der Staubbehälterboden zum Mülleimer zeigt und schütten Sie den Staub in den Müllbehälter 4 Wenn der Staubbehälter leer ist setzen Sie die Filterein heit 22 wieder in den St...

Page 18: ...Niemals ohne oder mit be schädigtem Filter saugen Der aufgesaugte Staub würde in das Gerät eindrin gen und den Motor be schädigen Zum Waschen der Filter nicht die Waschmaschine oder den Geschirrspüler verwenden Der Schaumstofffilter sollte re gelmäßig gereinigt werden Nur wenn er beschädigt sein sollte oder nicht mehr ausreichend gereinigt werden kann muss er gegen einen neuen ausgetauscht werden ...

Page 19: ...der in den Staubbehälter 8 ein wie im Abschnitt Staubbehälter entleeren auf Seite DE 17 be schrieben Feinstaubfilter wechseln WARNUNG Stromschlaggefahr Unsachgemäßer Umgang mit dem Gerät kann zu schweren Verletzungen oder zum Tod führen Vor dem Wechseln oder Reinigen des Feinstaubfil ters immer den Netzstecker aus der Steckdose ziehen HINWEIS Beschädigungsgefahr Unsachgemäßer Umgang mit dem Gerät k...

Page 20: ...ummidichtung 29 4 Setzen Sie die Filterhalte rung 25 mit dem neuen Feinstaubfilter 28 wieder zusammen setzen Sie die Filtereinheit 22 wieder zusam men und setzen Sie diese in den Staubbehälter 8 ein wie im Abschnitt Schaumstofffilter und Feinstaubfilter reinigen auf Seite DE 18 beschrieben Die Artikelnummer zum Nachbestellen von Staub und Feinstaubfilter finden Sie im Kapitel siehe Service auf Sei...

Page 21: ...hren Gerät erst wieder einschal ten wenn alle Teile des Geräts vollkommen trocken sind HINWEIS Beschädigungsgefahr Unsachgemäßes Reinigen des Geräts kann die Oberflä che angreifen Zum Reinigen des Geräts keine scharfen Reiniger Scheuermittel Verdün nung verwenden 1 Nehmen Sie den Staubbe hälter 8 ab und entnehmen Sie die Filtereinheit 22 wie im Abschnitt Staubbehälter entleeren auf Seite DE 17 be s...

Page 22: ...gen VORSICHT Verletzungsgefahr Unsachgemäßer Umgang mit dem Gerät kann zu Ver letzungen führen Niemals in sich bewegen de Teile des Geräts und des Zubehörs z B die Boden düse fassen Es besteht die Gefahr des Einklemmens Die Bodendüse vor der Rei nigung immer vom Teles koprohr oder Saugschlauch abziehen Wischen Sie bei Bedarf die Bo dendüse 11 mit einem feuchten Tuch ab Dabei darf keine Flüssigkeit...

Page 23: ...s Symbols 32 33 3 Nehmen Sie den Verschluss riegel 32 heraus Fassen Sie zum Herausnehmen des Verschlussriegels 32 unter den Grat 33 am Verschluss riegel 32 32 34 4 Nehmen Sie auch die Bürs te 34 heraus 5 Entfernen Sie Fusseln und Haare von der Bürste 34 15 Benutzen Sie zum Entfernen hartnäckiger Fusseln den beiliegenden Kamm 15 ...

Page 24: ...ie gel 32 wieder ein Achten Sie dabei darauf dass die Zapfen 35 am Verschluss riegel 32 in die Aussparun gen 36 im Gehäuse der Bo dendüse 11 eingreifen Der Verschlussriegel 32 muss mit einem Klick einrasten 8 Drehen Sie z B mit einer Münze den Schlitz in der Bürs tenverriegelung 31 auf die Position des Symbols ...

Page 25: ... Gerät arbeitet nicht Gerät ist ausgeschaltet Gerät einschalten Akkuleistung zu gering Akku laden Gerät schaltet sich selbsttätig aus Akkuleistung zu gering Akku laden Saugleistung ist schwach Bodendüse sitzt nicht richtig Bodendüse korrekt auf setzen Gegenstand verstopft die Bodendüse Gerät ausschalten Bodendüse auf Verstop fung prüfen Gegen stand entfernen Akkuleistung zu gering Akku laden Filte...

Page 26: ... haben sich eine Störung nicht mithilfe der Fehlersuchtabelle beheben lässt Sie weiteres Zubehör bestellen möchten Ersatzteile Kunden in Deutschland Wenden Sie sich bitte an die Firma Hermes Fulfilment GmbH Tel 057 32 99 66 00 Montag Donnerstag 8 15 Uhr Freitag 8 14 Uhr Kunden in Österreich Wenden Sie sich bitte an das Kundencenter oder die Produktbera tung Ihres Versandhauses Bitte beachten Sie S...

Page 27: ...lten oder nicht bei einer Sammelstelle seiner Ge meinde seines Stadtteils oder im Handel abzugeben damit sie einer umweltschonenden Entsorgung zugeführt werden können Batterien und Akkus bitte nur in entladenem Zustand abgeben gekennzeichnet mit Cd Cadmium Hg Quecksilber Pb Blei Verpackung Unsere Verpackungen werden aus umwelt freundlichen wiederver wertbaren Materialien hergestellt Außenverpackun...

Page 28: ...00 240 V Eingangswechselstromfrequenz 50 60 Hz Ausgangsspannung 22 2 V Ausgangsstrom 0 5 A Ausgangsleistung 11 1 W Durchschnittliche Effizienz im Betrieb 84 0 Effizienz bei geringer Last 10 76 0 Leistungsaufnahme bei Nulllast 0 09 W Akku Typ BP18020B Betriebsspannung 18 V Schutzklasse II Gewicht zusammengebaut ca 3 6 kg Bestellnummer 8249 5929 Hinweis Der Staubsauger wurde als Universalstaubsauger...

Page 29: ...Battery Operated Vacuum Cleaner User manual VSS01B16P 18 0Li Manual version 2001 00032EN20200715 Article no 8249 5929 Reproduction even of excerpts is not permit ted ...

Page 30: ...tion force EN 15 Finishing vacuuming EN 16 Storage EN 16 Space saving storage EN 16 Care and maintenance EN 17 Emptying the dust bin EN 17 Clean the foam filter and fine dust filter EN 18 Switching the fine dust filter EN 19 Cleaning the appliance EN 20 Cleaning the dust bin and dust filter unit EN 21 Cleaning the floor nozzle EN 22 Troubleshooting table EN 24 Service EN 25 Advice order and compla...

Page 31: ...livery 1 Move the appliance to a suita ble place and unpack it 2 Check that the delivery is com plete 3 Check whether the appliance was damaged during transit 4 If the delivery is incomplete or the appliance has been dam aged during transit please contact our service department see Service on page EN 25 WARNING Do not operate the appliance if it has visible damage ...

Page 32: ...ons on to the subsequent user of the appliance Intended use The appliance is intended for vacuuming up loose and dry dirt such as dust lint crumbs on floors and cushions around the home and car It is not suitable for vacuuming hazardous dusts or fluids The appliance is designed for use in private households only and is not designed for commer cial use or multiple use e g use by several families in...

Page 33: ...you will find gen eral safety notices which you must always observe for your own protection and that of third parties Please also observe the warning notices in the individual chapters on operation cleaning etc Risks in handling household electrical appliances WARNING Risk of electric shock Touching live parts may re sult in severe injury or death Only use the appliance in doors Do not use in wet ...

Page 34: ... socket Never pull the mains plug out of the socket by the mains cord always hold the mains plug itself In the event of a fault and before cleaning and main tenance e g changing fil ter always pull the mains plug out of the socket Never touch the mains plug with wet hands Ensure that no water seeps into the appliance Never immerse the appliance in water Only insert the mains plug into the socket if...

Page 35: ...ons with re duced physical sensory or mental capacities or those lacking experience and or knowledge if they are supervised or have been instructed in how to safely use the appliance and have understood the dangers as sociated with operating it Children should not be allowed to play with the appliance nor should they have access to the appli ance when left unattend ed Do not leave the appliance un...

Page 36: ...r or foam filter is missing or dam aged Otherwise vacu umed dust can penetrate the appliance and escape into the ambient air Fire hazard Vacuuming glowing ash burning cigarettes etc will set the filter on fire Do not vacuum glowing ash burning cigarettes or matches Risks when handling the battery pack Risk of injury Improper handling of the lithium ion battery may lead to injuries If the battery pack...

Page 37: ... materials blocks the filter Never vacuum water and other liquids Never vacuum sharp ob jects e g glass fragments On freshly shampooed car pets always wait until the detergent is completely dry before vacuuming Never place the vacuum cleaner directly next to a heater or oven Never dry the fine dust fil ter on a heater or with a hairdryer or tumble dryer etc This will cause the fine dust filter to becom...

Page 38: ...5 Motor housing 6 Battery charge indicator 7 Vent hole 8 Dust bin 9 Release button for dust bin 10 Release button for floor nozzle 11 Floor nozzle 12 Back part of charging station 13 Charging station base 14 Mains power adapter 15 Comb for cleaning the brush Appliance parts 10 11 12 13 9 8 7 6 5 4 2 3 1 14 15 ...

Page 39: ...sh The floor nozzle 11 is suitable for Hard floors such as tiles lami nate parquet PVC Short pile carpet Rugs and carpets with a pile height of up to 1 cm It is not suitable for deep pile carpet i e rugs and carpets with a pile height of more than 1 cm The rotating brush cannot turn on such floors and the carpet threads are drawn into the brush ...

Page 40: ... of the packaging plastic profiles tape and foam padding Preparing the appliance 12 13 16 1 Put the back part 12 on the base 13 of the charging sta tion Make sure that the con tacts 16 on the back part 12 are facing forward 18 19 17 2 Insert the plug 18 of the mains power adapter 14 into the socket 19 on the back of the charging station 17 11 3 Put the floor nozzle 11 on the vacuum 17 4 Put the ap...

Page 41: ...harge the battery for the first time Charging the bat tery usually takes 4 5 hours 6 The battery charge indicator 6 has three bars When the battery is charged the bottom bar lights up red first the second flashes then the second bar lights up and the third flashes When all three bars light up the display switch es to green and finally switches off During operation first three than two and finally ...

Page 42: ...cts glass fragments water or other liquids Glowing ash burning cigarettes etc set the filter on fire moisture can cause short circuits sharp objects damage the filter and can cause short circuits CAUTION Health hazard Improper handling of the ap pliance may result in health hazards Do not use the appliance if the hygiene filter or foam filter is missing or dam aged Otherwise vacu umed dust can penetrat...

Page 43: ...ore effectively This positions the floor nozzle diag onally In rare cases this can make a whistling noise initially This is not a malfunction and stops after a while Setting the suction force FAST SLOW 2 3 The appliance is equipped with two suction levels Set the suc tion level using the suction level switch 3 Press the suction level switch 3 once to switch from suction level II to suction level I...

Page 44: ...the appliance off Storage 17 To store away the appliance hang it on the charging sta tion 17 as illustrated Space saving storage 4 1 To store the appliance away in a space saving manner the han dle 1 can be folded up Press the 4 button to unlock the handle 1 and then fold down the handle 1 ...

Page 45: ...L 22 8 2 Remove the dust filter unit 22 from the dust bin 8 3 Hold the dust bin 8 over a rubbish bin so that the bottom of the dust bin is facing the rubbish bin Then pour the dust into the rubbish bin 4 Once the dust bin is empty put the dust filter unit 22 back into the dust bin 8 PULL PULL PULL 23 24 In doing so make sure that the opening 23 on the dust filter unit 22 is positioned precisely ov...

Page 46: ...er should be cleaned on a regular basis Should it be damaged or is no longer suffi ciently cleanable it must be re placed with a new one 1 Remove the dust bin 8 and remove the dust filter unit 22 as described in sec tion Emptying the dust bin on page EN 17 25 26 2 Remove the filter holder 25 from the dust filter unit hous ing 26 27 28 29 3 Separate the filter holder 25 into the foam filter 27 the ...

Page 47: ...ome porous and can be damaged Never wash the fine dust filter in a washing machine Only let the fine dust filter air dry The fine dust filter should be cleaned regularly If odours cannot be removed by cleaning or the filter is too heavily soiled it must be replaced 1 Remove the dust bin 8 and remove the dust filter unit 22 as described in sec tion Emptying the dust bin on page EN 17 2 Remove the filte...

Page 48: ...eath Never immerse the appli ance in water Only switch on the appli ance again once all parts of the appliance are com pletely dry NOTICE Risk of damage Improper cleaning of the appliance can impair the surface Do not use any abrasive cleaners scouring or thin ning agents to clean the appliance Wipe the housing and the accessories with a damp cloth as required Never allow liquid to penetrate the v...

Page 49: ...couring or thin ning agents to clean the appliance 1 Remove the dust bin 8 and remove the dust filter unit 22 as described in sec tion Emptying the dust bin on page EN 17 2 Remove the filter holder 25 from the dust filter unit hous ing 26 and take it apart as described in section Clean the foam filter and fine dust filter on page EN 18 30 26 3 Fold up the dust filter unit housing s 26 protective c...

Page 50: ... trapped Always remove the floor brush from the telescopic tube or suction hose before cleaning Wipe the floor nozzle 11 with a damp cloth if necessary Never allow liquid to penetrate the vacuum If the floor nozzle 11 isn t work ing anymore then clean the roller 11 10 1 Remove the floor nozzle 11 from the appliance 31 2 Turn the slot in the brush lock 31 e g using a coin to the symbol 32 33 3 Remov...

Page 51: ... 15 Use the comb 15 provided for removing stubborn lint 34 6 Re insert the brush 34 32 35 36 7 Re insert the locking latch 32 Make sure that the connec tor pins 35 on the locking latch 32 click into the open ings 36 in the floor nozzle housing 11 The locking latch 32 must click into place 8 Turn the slot in the brush lock 31 e g using a coin to the symbol ...

Page 52: ...g Appliance is switched off Switch the appliance on Battery performance is too low Charge the battery Appliance switches it self off Battery performance is too low Charge the battery Suction force is weak Floor nozzle is not posi tioned correctly Position the floor nozzle correctly Object is plugging the floor nozzle Switch the appliance off and check the floor nozzle for obstructions Remove objec...

Page 53: ...ions about your appliance a malfunction cannot be rectified using the troubleshooting table you would like to order further accessories Spare parts Customers in Germany Please contact the company Hermes Fulfilment GmbH Tel 49 0 057 32 99 66 00 Monday Thursday 8 a m 3 p m Friday 8 a m 2 p m Customers in Austria Please contact your mail order company s customer service centre or product advice centr...

Page 54: ...al appliances free of charge at your local recycling centre Please contact your dealer di rectly for more information about this topic Batteries and rechargeable batteries Batteries and rechargea ble batteries do not be long in the household waste Each end user is required by law to bring all batteries and re chargeable batteries regardless whether they contain harmful substances or not to a colle...

Page 55: ...styrene PS Films and bags made of poly ethylene PE Tension bands made of poly propylene PP If you have sufficient space we recommend keeping the packag ing at least during the warranty period If the appliance has to be sent in for repair or brought to one of the repair service points the appliance will only be ade quately protected in the original packaging Dispose of the packaging re sponsibly ...

Page 56: ...41A E222050 Input voltage 100 240 V AC input frequency 50 60 Hz Output voltage 22 2 V Output current 0 5 A Output power 11 1 W Average active efficiency 84 0 Low load efficiency 10 76 0 No load power consumption 0 09 W Battery type BP18020B Operating voltage 18 V Protection class II Weight assembled approx 3 6 kg Order number 8249 5929 Notice The vacuum cleaner was tested as a universal vacuum cle...

Reviews: