User Manual 10
22. Menu softkey
Correspond to the left menus respectively. Press any softkey to activate the corresponding
menu.
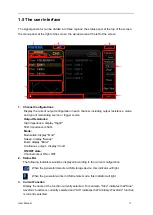
23. LCD
800 × 480 TFT color LCD is used to display the current function menu and parameters setting,
system state as well as prompt messages.
1.3 Rear Panel
1. AC Power Input
2. USB Device
1.4 Prepare Instrument for Use
Adjust the Supporting Legs
Adjust the supporting legs properly to use them as stands to tilt the oscilloscope upwards for
stable placement of the oscilloscope as well as better operation and observation.
Connect the Power Cord
Connect the power cord as desired.
This oscilloscope can accept 100-240 V, 45-440 Hz AC power supply. Please use the power cord
supplied with the accessories to connect the oscilloscope to the power source as shown in the
figure below.
Turn the instrument on by pressing the power switch in the lower left corner of front panel. If the
instrument does not turn on, verify that the power cord is firmly connected. Also make sure that
the instrument is connected to an energized power source.
Power Switch:
To turn off the instrument, please press power switch.


