background image

English_15


INTRODUC

TION

ACO-6020R/ACO-8020R

1


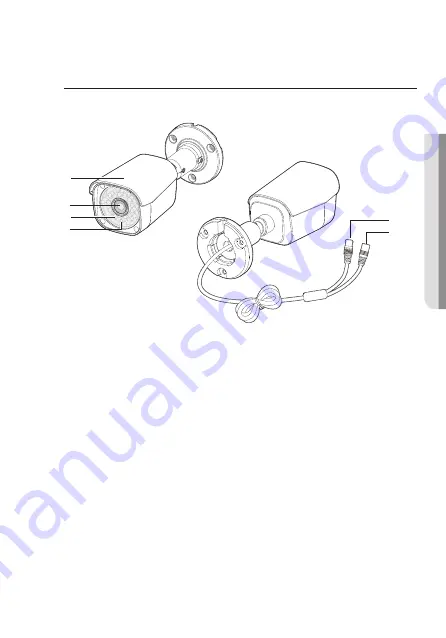
Camera Sunshield

2


Lens Module

3


IR LED :

  These infrared LEDs are controlled by the illumination sensor.

4


IIIumination sensor :

  Detects incoming light to control the IR LED.

5


Video Output Jack :

  Video signals are output through this port. Connect this port to the Video 

IN port of a DVR.

6


Power Input Connector (DC12V) 

1

2

5
6

4

3

Summary of Contents for ACE-6020R

Page 1: ...High Resolution Camera User Manual ACE 6020R ACE 8020R ACV 8080R ACV 8081R ACO 6020R ACO 8020R...

Page 2: ...umstances this document shall be reproduced distributed or changed partially or wholly without formal authorization Disclaimer Hanwha Vision makes the best to verify the integrity and correctness of t...

Page 3: ...hazard do not expose this appliance to rain or moisture To prevent injury this apparatus must be securely attached to the floor wall in accordance with the installation instructions WARNING 1 Be sure...

Page 4: ...c shock CAUTION 1 Do not drop objects on the product or apply strong shock to it Keep away from a location subject to excessive vibrationor magnetic interference 2 Do not install in a location subject...

Page 5: ...posed of with other household waste at the end of their working life Where marked the chemical symbols Hg Cd or Pb indicate that the battery contains mercury cadmium or lead above the reference levels...

Page 6: ...the manufacturer 12 Use only with cart stand tripod bracket or table specified by the manufacturer or sold with the apparatus 13 Unplug this apparatus when a card is used Use caution when moving the...

Page 7: ...ot been recommended the production functions performance may not be guaranteed Install the product by referring to Installation connection in the user manual 22 Installing or using the product in wate...

Page 8: ...16 Before Installation 16 Installation ACE 6020R ACE 8020R 19 Installation ACV 8080R ACV 8081R 21 Installation ACO 6020R ACO 8020R 23 Adjusting the monitoring direction for the camera CONNECTION 25 2...

Page 9: ...y increasing exposure in dark areas while decreasing it in bright areas y Day Night This camera has a function that automatically selects the mode that is appropriate for day time or night time condit...

Page 10: ...10_ introduction introduction COMPONENTS AND ACCESSORIES Check if the following items are included in the product package ACE 6020R ACE 8020R Camera QuickGuide TappingScrews PlasticAnchor Template...

Page 11: ...English_11 INTRODUCTION ACV 8080R ACV 8081R Camera QuickGuide TappingScrews PlasticAnchor Hex Lwrench Template...

Page 12: ...12_ introduction introduction ACO 6020R ACO 8020R Camera QuickGuide TappingScrews PlasticAnchor Hex Lwrench Template...

Page 13: ...d by the illumination sensor 2 IIIumination sensor Detects incoming light to control the IR LED 3 Lens Module 4 Middle Cover 5 Video Output Jack Video signals are output through this port Connect this...

Page 14: ...These infrared LEDs are controlled by the illumination sensor 3 IIIumination sensor Detects incoming light to control the IR LED 4 Lens Module 5 Video Output Jack Video signals are output through thi...

Page 15: ...ED These infrared LEDs are controlled by the illumination sensor 4 IIIumination sensor Detects incoming light to control the IR LED 5 Video Output Jack Video signals are output through this port Conne...

Page 16: ...installingyourcamera youhavetoadjustthelensfocus zoom andswitchsettings y Wheninstallingyourcamera don tallowanypersontoapproachtheinstallationsite y Theinstallationshouldbedonebyqualifiedserviceperso...

Page 17: ...and drill holes according to the template 2 Insert plastic anchors into the installation holes and use 2 tapping screws to firmly place the camera 3 After connecting the power and video cables arrang...

Page 18: ...sen the screws of the bracket that fixes the inner cover 5 Adjust the lens in a desired direction by referring to the Adjusting the monitoring direction for the camera section page 23 6 Put the middle...

Page 19: ...80R ACV 8081R Disassembling 1 Using the Torx L wrench provided turn the 3 fastening bolts on the dome cover counter clockwise to remove the cover Installation 1 Attach the template for the installatio...

Page 20: ...nnecting the power and video cables arrange the cables through the appropriate grooves Be careful not to twist the cable 4 Adjust the lens in a desired direction by referring to the Adjusting the moni...

Page 21: ...the installation and drill holes according to the template 2 Insert plastic anchors into the installation holes and use 3 tapping screws to firmly place the camera 3 After connecting the power and vi...

Page 22: ...llation 22_Installation 4 Adjust the camera direction using the Torx L wrench 5 Adjust the lens in a desired direction by referring to the Adjusting the monitoring direction for the camera section pag...

Page 23: ...lish_23 INSTALLATION ACE 6020R ACE 8020R ACV 8080R ACV 8081R ADJUSTING THE MONITORING DIRECTION FOR THE CAMERA Pan Pan Tilt Tilt Lens rotation Lens rotation Pan Pan Tilt Tilt Lens rotation Lens rotati...

Page 24: ...rning the lens on its axis is called Rotation Methods of adjustment 1 After installing the camera adjust the panning angle in consideration of the monitoring direction 2 Adjust the view angle and focu...

Page 25: ...English_25 CONNECTION connection CONNECTING WITH OTHER DEVICE HDMI VIDEO INPUT DVR Power Adaptor Monitor BNCCABLE...

Page 26: ...when the power is turned off This product supports 4 video output formats of AHD TVI CVI CVBS The default is AHD Select the video output appropriate for your DVR Video Cable The camera s video output...

Page 27: ...ue of copper wire is at 20 C 68 F Copperwiresize AWG 24 0 22mm2 22 0 33mm2 20 0 52mm2 18 0 83mm2 Resistancevalue m 0 078 0 050 0 030 0 018 VoltageDrop V m 0 028 0 018 0 011 0 006 As shown in the table...

Page 28: ...RN EXIT SAVE END NOTSAVE RESET MENU SETUP The OSD can be controlled through the Camera setup menu of the DVR connected to the camera Refer to the user manual of the connected DVR for how to use it M A...

Page 29: ...lestateforthecurrentlightingenvironmentandwaitfor3 secondssothatthecurrentvaluecanbesaved Readjustthevaluewhenthe environmentchanges M White Balance may not work properly under the following condition...

Page 30: ...tter value is large it can cause noise spots and white areas but still operate normally Depending on the setting range of the minimal maximal shutter the screen exposure can become saturated AGC OFF L...

Page 31: ...a LOW MIDDLE HIGH BLC AREA Adjust the area to be enhanced POS SIZE RET AGAIN RETURN Return to the MAIN SETUP menu WDR The WDR function is only supported in the ACV 8081R model When there are both brig...

Page 32: ...IRROR MIRROR Flip an image horizontally V FLIP Flip an image vertically ROTATE Rotate the image RETURN Return to the SPECIAL menu M If you increase the SHARPNESS level too high the picture may become...

Page 33: ...ON OFF and does not perform the AF function OFF Does not perform the AF function ONE SHOT AF Select if you want to focus the video from the current position TDN AF Select whether to readjust focus af...

Page 34: ...Save the current settings and exit the MAIN SETUP menu NOT SAVE Do not save the current settings and exit the MAIN SETUP menu RESET Return the camera to its factory default state However the language...

Page 35: ...ained with dirt Clean your lens with soft clean cloth y Adjust the monitor status y If the camera is exposed to very strong light change the camera position The image on the screen is dark y Adjust th...

Page 36: ......

Reviews: