background image


least 300 mm in front of the naked flame/incandescent fuel bed, extends at least 150 mm at 
either side, and around its periphery is a height of at least 50 mm above finished floor level. 

11.  Lead  the  hose  away  from  the  built-in  gas  fire  burner  kit  without  twisting  it.  Do  not  let  the 

hose touch the hot surface. 

12.  Never change the air valve settings of the burner. 
13.  Every time the gas connection is reconnected do a leak test. 
14.  Those parts sealed by the manufacturer or the agent must not be altered by the user. 
15.  Any modification of this built-in gas fire burner kit may be dangerous. 
16.  Do not move this built-in gas fire burner kit during use. 
17.  Turn off the gas supply at the cylinder or main shut off valve of city network gas after use. 
18.  Do not touch the logs or lava rocks until they cool down. 
19.  This appliance is intended for warming purposes. 
20.  This  appliance  has  a  naked  flame.  Fit  the  glass  screen  kit  supplied  with  the  appliance  for 

the protection of young children, aged or infirm persons.  

21.  When  first  use,  preheat  the  lava  rocks  and  logs  for  15  minutes  to  burn  out  the impurities 

and air in the natural lava rocks and handmade logs.


22.  To  change  the  gas  cylinder  in  an  amply  ventilated  area,  away  from  any  ignition  source 

(candle, cigarettes, other flame producing appliances).


23.  This appliance must be installed and the gas cylinder stored in accordance with the national 

regulations in force.


24.  Shut off the valve at the gas cylinder or the regulator before moving the appliance.


25.  Use only the type of gas and the type of cylinder specified by the manufacturer.


26.  The use of this appliance in enclosed areas can be dangerous and is PROHIBITED. 


Glass screen kit 

13B 


Contents 


14B

1.


Technical Data


15B

Page 3-3


16B

2. Instructions for assembly


17B

Page 4-14


18B

3. Installation and operation instructions 


19B

Page 15-19


20B

4. Maintenance


21B

Page 20-21


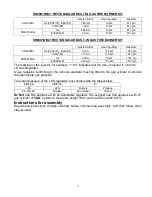
The  built-in  gas  fire  burner  kit  is  an  I3+(28-30/37),  I3  B/P(30),  I3  B/P(50),  I2L(G25)  & 
I2H/I2E/I2E+(G20)  appliance,  designed  to  operate  on  Butane  at  28/30mbar,  Propane  37mbar, 
B/P  30/50mbar,  I2L  at  25mbar  &  I2H/I2E/I2E+  at  20mbar.  Gas  consumption,  pressures  and 
injectors orifices sizes are shown below: 


Summary of Contents for SR4001BI/I2+

Page 1: ...Butane propane or their mixture at 30mbar Injector SR4001BI 1 65 mm SR6001BI 2 1mm AT DE SK CH Cat I3 B P 50 Butane propane or their mixture at 50mbar Injector SR4001BI 1 4mm SR6001 1 75mm AT BE CH C...

Page 2: ...gas leak the appliance shall not be used or if alight turn off gas supply at the LPG cylinder or the nearest main shut off valve of city network gas And the appliance shall be investigated and rectifi...

Page 3: ...ng children aged or infirm persons 21 When first use preheat the lava rocks and logs for 15 minutes to burn out the impurities and air in the natural lava rocks and handmade logs 22 To change the gas...

Page 4: ...73 g h The marking on the injector for example 1 65 indicates that the size of injector is 1 65mm LP Gas Regulator A gas regulator confirming to the national standard must be fitted to the gas cylinde...

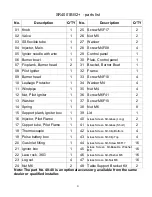
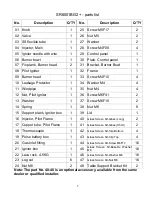
Page 5: ...M6F41 2 13 Washer 1 37 Screw M6F10 2 14 Spring 1 38 Nut M6 8 15 Support plank Igniter box 1 39 Lid 1 16 Injector Pilot Flame 1 40 Glass Screen Kit Glass Long 2 17 Copper tube Pilot Flame 1 41 Glass S...

Page 6: ...M6F41 2 13 Washer 1 37 Screw M6F10 2 14 Spring 1 38 Nut M6 8 15 Support plank Igniter box 1 39 Lid 1 16 Injector Pilot Flame 1 40 Glass Screen Kit Glass Long 2 17 Copper tube Pilot Flame 1 41 Glass Sc...

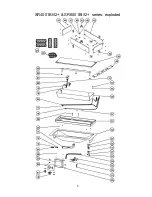
Page 7: ...6 SR4001BI I2 SR6001BI I2 series exploded...

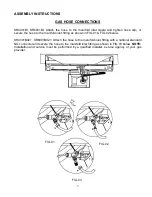
Page 8: ...old inlet fitting as shown in FIG 01 FIG 02 below SR4001BII2 SR6001BII2 Attach the hose to the manifold inlet fitting with a national standard NG connector and secure the hose to the manifold inlet fi...

Page 9: ...your wooden table as shown in FIG 01 NOTE You may need to use and attach the optional table support bracket kit as shown in FIG 02 to secure the slats you saw off Adjust and secure underneath the slat...

Page 10: ...uld be perpendicular to the igniter box Lay the other logs in a teepee configuration over the first log It is important that the logs not lay directly on top of the burner By blocking the burner it wi...

Page 11: ...10 SR6001BI I2...
Page 12: ...SEMBLY INSTRUCTIONS UINSTALLATION OF GLASS SCREEN KIT After layer the lava rocks and logs in the burner bowl set down the glass screen kit onto the build in gas fire burner kit as shown in the image b...

Page 13: ...e ground with screw Attach the manifold inlet fitting with the national standard NG connector supplied Connection of the NG supply to the appliance inlet should be made by a qualified installer Note F...

Page 14: ...NSTRUCTIONS 74BUINSTALLATION OF THE LID When the appliance is not in use disconnect and take off the logs and close the lid to use as a normal table NOTE Be sure unit is cool before touching any of th...

Page 15: ...ES Turn off the gas supply at the cylinder or main shut off valve of city network gas Do not try to light any appliance Do not touch any electrical switches Do not use any phone including cellular pho...

Page 16: ...son The appliance should be inspected before use and at least annually by a qualified service person More frequent cleaning may be required as necessary It is imperative the control compartment burner...

Page 17: ...erioration or damage leak test the entire outer surface while under pressure Replace at first sign of leak or age cracking Remember to turn the cylinder valve OFF before removing the hose The hose sho...

Page 18: ...solution to check all the connections between the gas tank connection and the gas valve at the back of the control panel for leaks before attempting to light the appliance If a leak is found turn the...

Page 19: ...o light any appliance Do not touch any electric switch do not use any phone in your building Immediately call your gas supplier from a neighbor s phone Follow the gas supplier s instructions If you ca...

Page 20: ...EPAIR Any repairs must be performed by a qualified installer service agency or your gas provider 1 Check all the joints 2 Smell all around the appliance area for gas odors and test for gas leaks accor...

Reviews: