adjacent to the electric energizer installation.
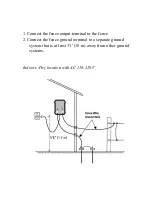
Drive ground rods into the soil. Use high-voltage, insulated
cable and ground clamps continuously connect the ground
rods and the energizer’s fence ground terminal. Make sure the
insulation is stripped back to ensure good contact between the
wire and the ground rod.
For an all-live fence only, test the ground system using the
following procedure:
1.
Turn off the electric fence energizer
2.
At least 330’ (100 m) away from the electric fence
energizer, short-circuit the fence by laying several steel
rods or lengths of pipe against the fence. For best results,
the fence voltage should be lowered to 2 kV or less. In dry
or sandy conditions, it may be necessary to drive the rods
up to 12” (30 cm) into the ground.
Note
: It is not acceptable to short circuit a ground wire return
system to the ground wire of the fence.
3.
Turn the electric fence energizer back on.
4.
Using a digital voltmeter, ensure that the fence voltage is
below 2 kV
5.
Check your ground system. Insert the voltmeter’s ground
probe into the ground at the full extent of the lead and hold
the other terminal against the last ground rod. The tester
should not read more than 0.3 kV. Anything higher than
this indicates that better grounding is required. Either add
more ground rods or find a better ground area to drive in
the ground rods.


