background image

Training Workbook: HAPPY HCS2-1201 Voyager Operation and Maintenance

Education Department

Chapter 1:  Introduction and Basics

13

Embroidery Thread

Thread Path through the moving head

-

Proper Thread Routing:  

All threads 

must

be routed 

correctly at all points along the path through the sewing 
head.

-

Practice good thread “Discipline”:

After threading all 

needles, ensure there is no slack anywhere along the 
thread path.  Make sure to:

-

Pull all threads

– to ensure thread feeds smoothly 

and turns the break sensor, and all slack is removed 
from around thread cones 

-

“Dock” all thread ends 

from each needle onto the 

thread-holding spring.  Prevents thread from coming 
loose and catching where not desired.
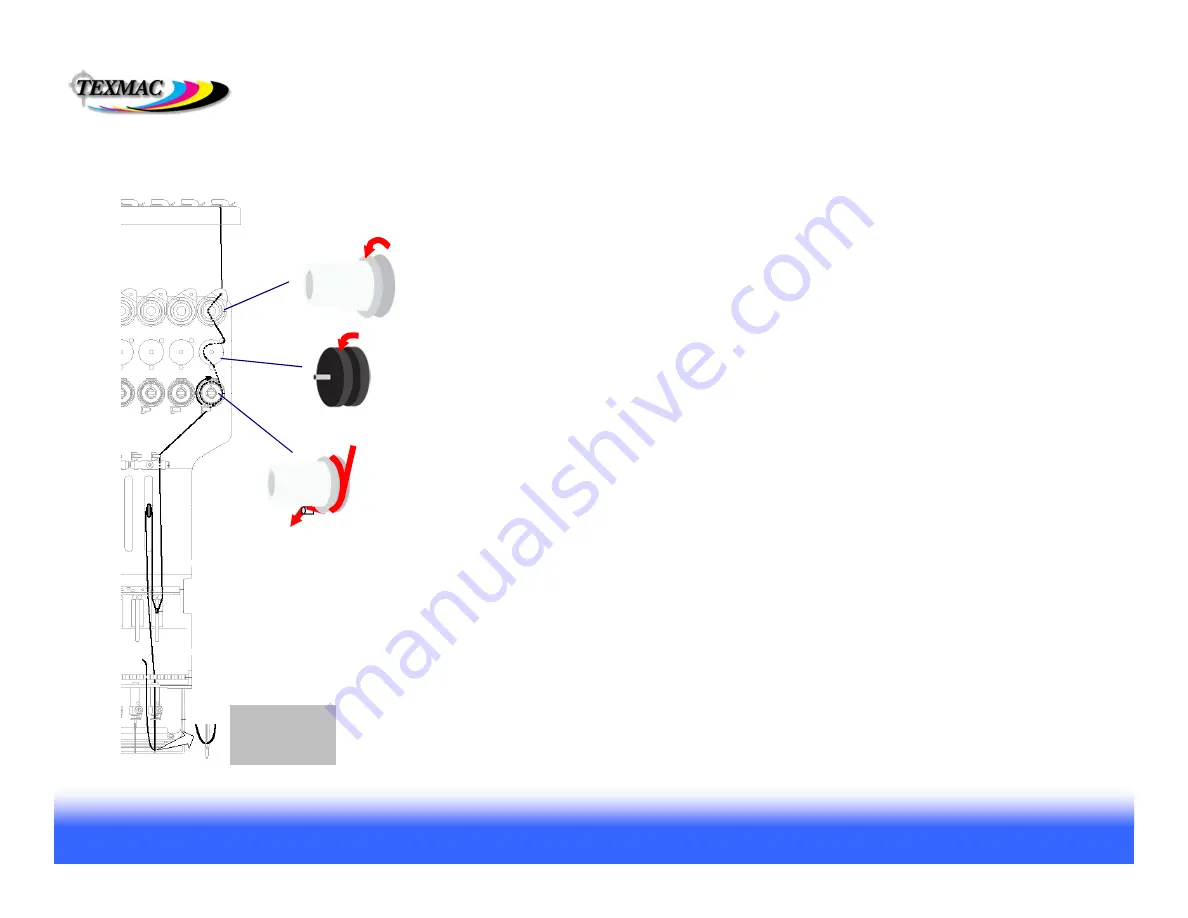
Upper Tensioner

Thread only makes 
½ turn – make sure 
it passes to the left 
between the 2 metal 
discs.

Lower Tensioner

Thread makes 1 full turn 
clockwise around the base of the 
knob – make sure it runs in the 
V-shaped groove of the spoked 
wheel.

Thread Break Sensor

Thread this like the upper 
tensioner – ½ turn to the left.  
Make sure the thread falls in 
the groove as shown.

Thread “docked” 
in thread 
holding spring

Summary of Contents for HCS2-1201

Page 1: ...major parts p 2 Diagram of major systems Pantograph sewing machine color change cut p 3 The Sewing Cycle p 4 Machine environment p 5 Control Panel Introduction Orientation p 6 Power on off emergency s...

Page 2: ...s Main power switch Press and hold continuously for 1 2 sec to power on cylinder arm Rotary hook door bobbin cover Oiling guide instructions Manual needle selector knob Table area beneath cylinder arm...

Page 3: ...and thread is cut below needle plate between a fixed moving knife 2 Then when needle comes back up the catcher hook grabs the cut end and docks it into the thread holder Side view of machine head and...

Page 4: ...ead below the garment surface Then as it starts back up the slack causes the loop to open allowing the rotary hook below to pass behind the needle and grab the thread Presser Foot presses down on the...

Page 5: ...some older buildings may only have 2 prong outlets Steady Table Mounting Surface Your machine will perform better especially at higher speeds when operated on a strong level and steady mounting surfac...

Page 6: ...oduction and Basics 6 Control Panel Intro Power On to the Main Drive Screen Power On Power on your machine with the black switch located on the side of the machine The screen below appears Press to co...

Page 7: ...ode to sew or to accept design transfers by PC connection Note the important information shown in the Drive screen here This is the only screen where this information is displayed Current stitch posit...

Page 8: ...700 7 1 1 Sewing Position Screen Jump to any position in the design using this screen by piece by color block or by stitch Adjust Max Speed During sewout or while stopped Select hoop Adjust Sewing Pos...

Page 9: ...rform basic edits adjustments to the current design OPTION adjust settings for machine designs and stitch data LETTER onboard lettering feature QUEUE queue a sequence of designs to be sewn OTHER date...

Page 10: ...oping proper hooping is a must Not too tight not too loose We will cover this in class Digitizing hire a digitizing service and or learn how to digitize in digitizing classes Machine Adjustments we wi...

Page 11: ...ntact oil dust humidity moisture can prevent it from unspooling smoothly and cause it to hang up Use thread cone stabilizers plastic springs to minimize cone movement during sewing Bobbin thread L typ...

Page 12: ...of upper thread on your machine Layout of Cone Needle Sequence Needle numbers are arranged right to left lowest number to highest needle 1 needle 2 needle 3 needle 4 needle 5 needle 6 needle 12 needle...

Page 13: ...ensure thread feeds smoothly and turns the break sensor and all slack is removed from around thread cones Dock all thread ends from each needle onto the thread holding spring Prevents thread from com...

Page 14: ...o 3 Good tension Upon stopping your hand the slight downward momentum of the bobbin case should cause it to unspool and continue downwards slightly and stop If downward motion of your hand causes the...

Page 15: ...Alternate needle for sewing caps and other tightly woven goods heavy canvas is 80 12 sharp point for better penetration The width of the shaft of an embroidery needle limits the the finest possible d...

Reviews: