background image

Training Workbook: HAPPY HCS2-1201 Voyager Operation and Maintenance

Education Department

Chapter 1:  Introduction and Basics

14

Embroidery Thread

Bobbin Loading and Tension Check/Adjustment

RE-LOADING THE BOBBIN CORRECTLY

The bobbin will need to be replaced frequently, allowing only 30,000 to 60,000 stitches per 
spool.  This has to be done correctly every time. 

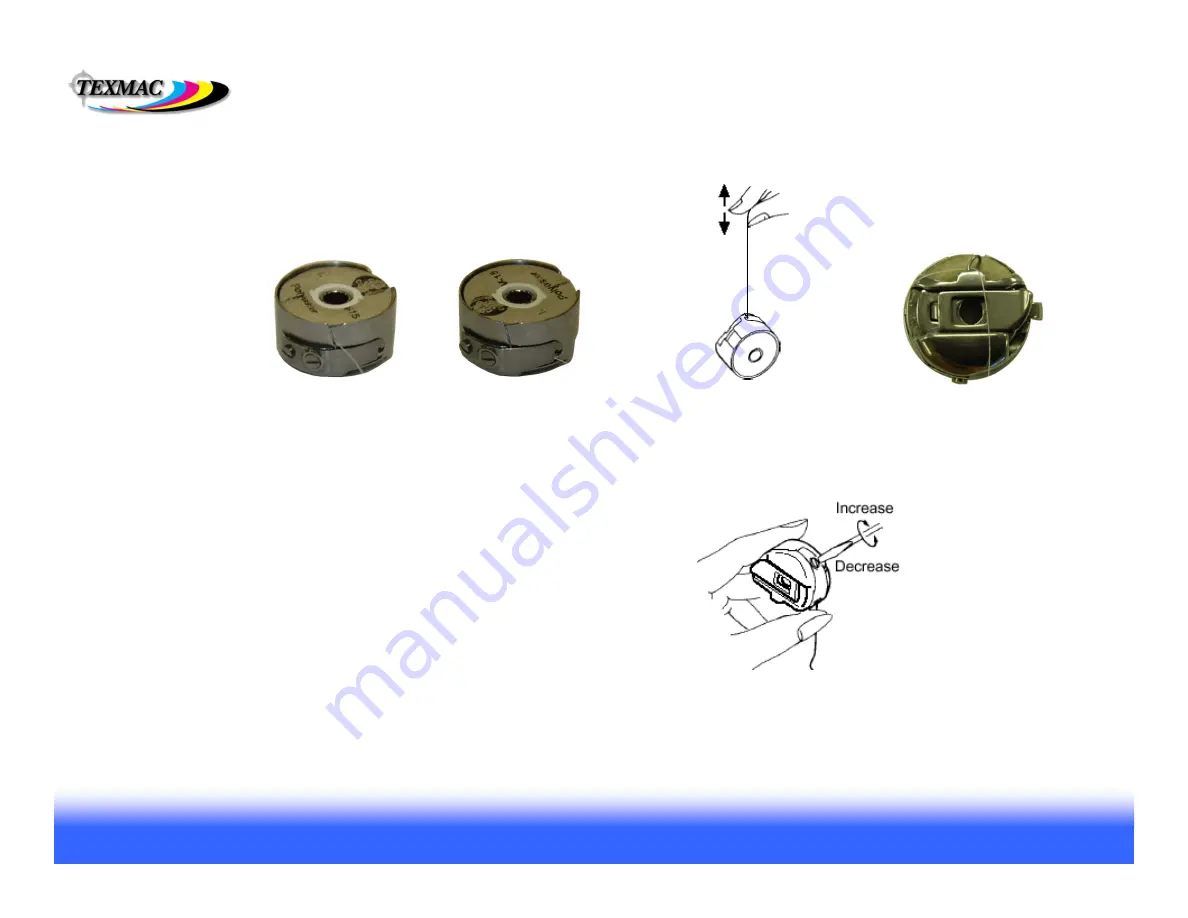
1. Ensure bobbin turns 

clockwise.  Pull thread 
through this slit.

2.   Feed thread through 

eye at the end of the 
tension flap.

4.   Pass thread through the  

wire loop 

at the top front of 

the bobbin case. Do this 
after you’re satisfied with 
tension, and before 
inserting into the machine.

1.

Hold the bobbin case as shown in step 3, 

after feeding the thread through 

the eye at the end of the tension flap.

2.

“Cast” the bobbin case downward gently

, very much like throwing a yo-yo.

3.

Good tension: 

Upon stopping your hand, the slight downward momentum of 

the bobbin case should cause it to unspool and continue downwards slightly 
and stop.  (If downward motion of your hand causes the bobbin to jump out of 
the case, try again but more gently).  

4.

Wrong tension: 

If the bobbin doesn’t unspool at all, tension is too tight.  If the 

bobbin unspools on its own when held like in step 3, tension is too loose.  
Make adjustments if needed as shown on the right.

With a working bobbin case and a properly loaded bobbin, this test reliably 

tests to 25g on a bobbin tension gauge, precise within 1g.  Perform this quick 
check each time you re-load the bobbin until you are comfortable with tension.

5. TAKE CARE TO RE-INSERT THE RELOADED 
BOBBIN CASE FULLY 

after re-loading or the machine 

will not function correctly.

CHECKING TENSION WITH THE “DROP” TEST. 

Make small adjustments

if 

you find it necessary.  – no 
more than a ¼ or ½ turn in 
either direction before re-
checking tension.

3.  Check tension with the 

“drop” test (explained 
lower left).  

Summary of Contents for HCS2-1201

Page 1: ...major parts p 2 Diagram of major systems Pantograph sewing machine color change cut p 3 The Sewing Cycle p 4 Machine environment p 5 Control Panel Introduction Orientation p 6 Power on off emergency s...

Page 2: ...s Main power switch Press and hold continuously for 1 2 sec to power on cylinder arm Rotary hook door bobbin cover Oiling guide instructions Manual needle selector knob Table area beneath cylinder arm...

Page 3: ...and thread is cut below needle plate between a fixed moving knife 2 Then when needle comes back up the catcher hook grabs the cut end and docks it into the thread holder Side view of machine head and...

Page 4: ...ead below the garment surface Then as it starts back up the slack causes the loop to open allowing the rotary hook below to pass behind the needle and grab the thread Presser Foot presses down on the...

Page 5: ...some older buildings may only have 2 prong outlets Steady Table Mounting Surface Your machine will perform better especially at higher speeds when operated on a strong level and steady mounting surfac...

Page 6: ...oduction and Basics 6 Control Panel Intro Power On to the Main Drive Screen Power On Power on your machine with the black switch located on the side of the machine The screen below appears Press to co...

Page 7: ...ode to sew or to accept design transfers by PC connection Note the important information shown in the Drive screen here This is the only screen where this information is displayed Current stitch posit...

Page 8: ...700 7 1 1 Sewing Position Screen Jump to any position in the design using this screen by piece by color block or by stitch Adjust Max Speed During sewout or while stopped Select hoop Adjust Sewing Pos...

Page 9: ...rform basic edits adjustments to the current design OPTION adjust settings for machine designs and stitch data LETTER onboard lettering feature QUEUE queue a sequence of designs to be sewn OTHER date...

Page 10: ...oping proper hooping is a must Not too tight not too loose We will cover this in class Digitizing hire a digitizing service and or learn how to digitize in digitizing classes Machine Adjustments we wi...

Page 11: ...ntact oil dust humidity moisture can prevent it from unspooling smoothly and cause it to hang up Use thread cone stabilizers plastic springs to minimize cone movement during sewing Bobbin thread L typ...

Page 12: ...of upper thread on your machine Layout of Cone Needle Sequence Needle numbers are arranged right to left lowest number to highest needle 1 needle 2 needle 3 needle 4 needle 5 needle 6 needle 12 needle...

Page 13: ...ensure thread feeds smoothly and turns the break sensor and all slack is removed from around thread cones Dock all thread ends from each needle onto the thread holding spring Prevents thread from com...

Page 14: ...o 3 Good tension Upon stopping your hand the slight downward momentum of the bobbin case should cause it to unspool and continue downwards slightly and stop If downward motion of your hand causes the...

Page 15: ...Alternate needle for sewing caps and other tightly woven goods heavy canvas is 80 12 sharp point for better penetration The width of the shaft of an embroidery needle limits the the finest possible d...

Reviews: