background image

Training Workbook: HAPPY HCS2-1201 Voyager Operation and Maintenance

Education Department

Chapter 1:  Introduction and Basics

4

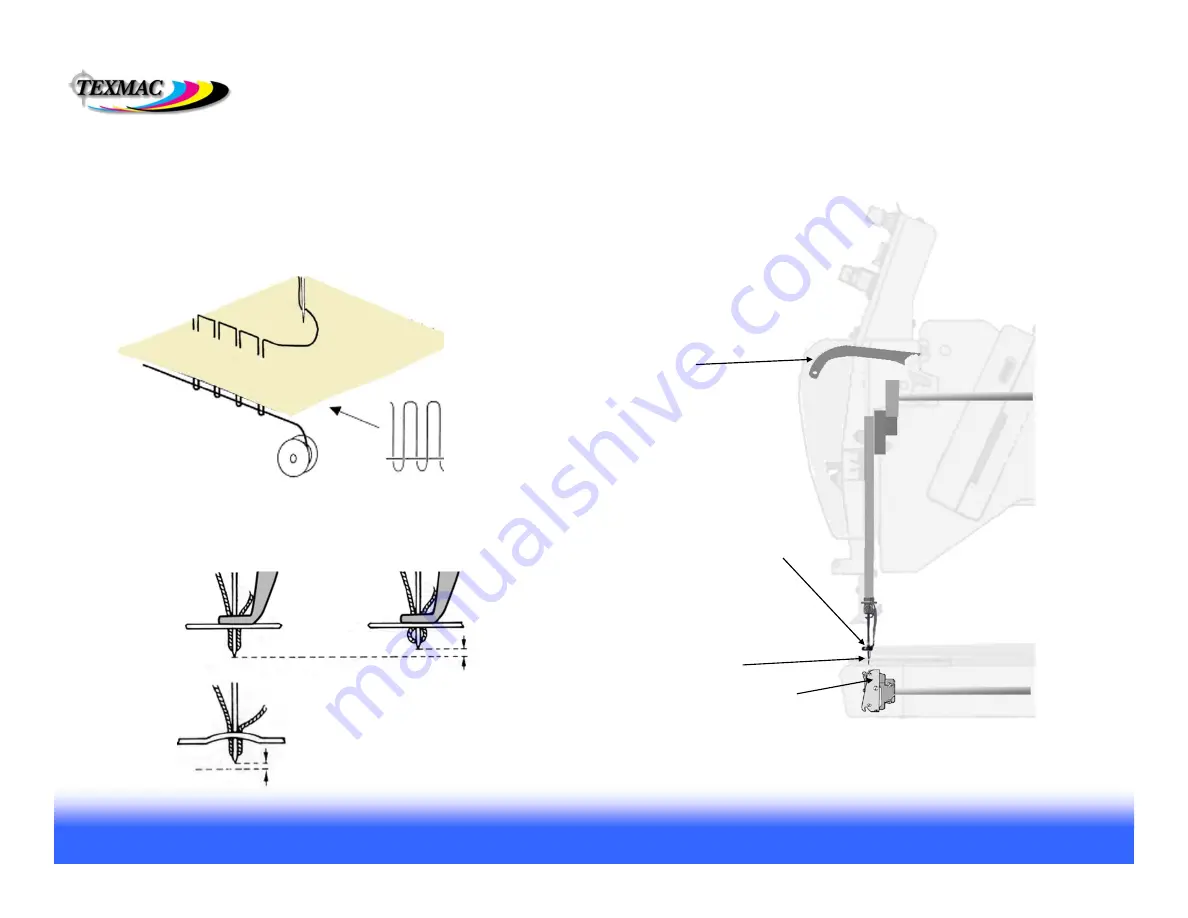
Basics: Lock Stitch Formation (sewing cycle)

bobbin thread

Take Up Lever: 

At the start of the cycle, the take-up 
lever lowers to allow enough slack 
for the loop to form.  After the hook 
catches the colored thread and makes 
the half-twist, it pulls back up to take  
up the slack and close the loop to 
finish the stitch.

Rotary Hook 

– spinning point reaches 

behind the needle eye, hooks the colored 
thread, spins/twists it around the bobbin 
thread to form the loop.

Needle –

Pushes a half-loop of thread 

below the garment surface. Then, as it 
starts back up, the slack causes the 
loop to open, allowing the rotary hook 
(below) to pass behind the needle and 
grab the thread.

Presser Foot –

presses down on the 

garment surface to allow cleaner entry 
of the needle. Also remains still as the 
needle starts to lift to help the loop 
form (see illustration at left.)

Lock Stitch Illustrated.

Notice how the top thread only half-loops with the bobbin 
thread for every stitch

How Each Part of the 
Cycle Works

The key parts of the sewing 
cycle.

Role of the Presser Foot in Loop Formation

Note how the presser foot (shown in grey) helps the loop 
open as the needle starts back up.

needle at 
bottom

needle 
coming up

upper (colored) 
thread 

Without the presser foot, loop  
may  not form, as material and 
thread rises with needle coming 
back up.

Summary of Contents for HCS2-1201

Page 1: ...major parts p 2 Diagram of major systems Pantograph sewing machine color change cut p 3 The Sewing Cycle p 4 Machine environment p 5 Control Panel Introduction Orientation p 6 Power on off emergency s...

Page 2: ...s Main power switch Press and hold continuously for 1 2 sec to power on cylinder arm Rotary hook door bobbin cover Oiling guide instructions Manual needle selector knob Table area beneath cylinder arm...

Page 3: ...and thread is cut below needle plate between a fixed moving knife 2 Then when needle comes back up the catcher hook grabs the cut end and docks it into the thread holder Side view of machine head and...

Page 4: ...ead below the garment surface Then as it starts back up the slack causes the loop to open allowing the rotary hook below to pass behind the needle and grab the thread Presser Foot presses down on the...

Page 5: ...some older buildings may only have 2 prong outlets Steady Table Mounting Surface Your machine will perform better especially at higher speeds when operated on a strong level and steady mounting surfac...

Page 6: ...oduction and Basics 6 Control Panel Intro Power On to the Main Drive Screen Power On Power on your machine with the black switch located on the side of the machine The screen below appears Press to co...

Page 7: ...ode to sew or to accept design transfers by PC connection Note the important information shown in the Drive screen here This is the only screen where this information is displayed Current stitch posit...

Page 8: ...700 7 1 1 Sewing Position Screen Jump to any position in the design using this screen by piece by color block or by stitch Adjust Max Speed During sewout or while stopped Select hoop Adjust Sewing Pos...

Page 9: ...rform basic edits adjustments to the current design OPTION adjust settings for machine designs and stitch data LETTER onboard lettering feature QUEUE queue a sequence of designs to be sewn OTHER date...

Page 10: ...oping proper hooping is a must Not too tight not too loose We will cover this in class Digitizing hire a digitizing service and or learn how to digitize in digitizing classes Machine Adjustments we wi...

Page 11: ...ntact oil dust humidity moisture can prevent it from unspooling smoothly and cause it to hang up Use thread cone stabilizers plastic springs to minimize cone movement during sewing Bobbin thread L typ...

Page 12: ...of upper thread on your machine Layout of Cone Needle Sequence Needle numbers are arranged right to left lowest number to highest needle 1 needle 2 needle 3 needle 4 needle 5 needle 6 needle 12 needle...

Page 13: ...ensure thread feeds smoothly and turns the break sensor and all slack is removed from around thread cones Dock all thread ends from each needle onto the thread holding spring Prevents thread from com...

Page 14: ...o 3 Good tension Upon stopping your hand the slight downward momentum of the bobbin case should cause it to unspool and continue downwards slightly and stop If downward motion of your hand causes the...

Page 15: ...Alternate needle for sewing caps and other tightly woven goods heavy canvas is 80 12 sharp point for better penetration The width of the shaft of an embroidery needle limits the the finest possible d...

Reviews: