background image


84

Adjustment of moving knife and fixed knife

                          3-6-8 

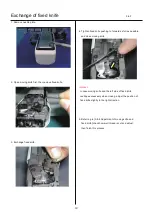
1. Remove needle plate. 


2. Open 

moving knife

, check if knife drive shaft has no 

backlash in up and down direction. 

  If backlash is found, adjust it referring to [3-6-6 Exchange 
  of moving knife]. 

  Close moving knife 


3. Adjust slant of fixed knife with [upper adjustment screw] 

and [lower adjustment screw] that fix fixed knife. 


<Note>

 Rub these screws together to the extent that you 

         don’t feel resistance. 


   <Spanner> 5.5mm 


4. Cut thread and check how well it is cut. 
  Use two polyester threads for checking. 


5. Check several times and if no mistakes are found, finish 
  this process. 


Summary of Contents for HCH-701-30

Page 1: ...Maintenance Manual for Embroidery Machine HCH 701 30 Version 2 4 HappyJapan Inc ...

Page 2: ...e with work process in this manual In case there are no specific instructions or explanations in work process please be sure to unplug cord from receptacle When you exchange parts please be sure to use genuine parts designated by us Please never remodel the embroidery machine When you handle circuit boards In order to prevent troubles from static electricity please remove earth from human body Ple...

Page 3: ...e of rod 27 3 2 3 Adjustment of the lowest needle point 28 3 2 4 Exchange of needle bar driver 29 3 2 5 Adjustment of fixing of jump device 31 3 2 6 Exchange of take up lever cam 33 3 2 7 Exchange of roller shaft ass y 34 3 2 8 Adjustment of take up lever timing 35 3 2 9 Exchange of pressure foot cam 36 3 2 10 Check of height of pressure foot 37 3 2 11 Exchange of pressure foot 38 3 2 12 Adjustmen...

Page 4: ...sting spring 67 3 3 11 Adjustment of tension of thread adjusting spring 68 3 3 13 Adjustment of thread holder 69 3 3 14 Exchange of majic tape on thread holder 71 3 4 Needle bar change unit 3 4 1 Fixing of needle bar change unit 72 3 5 Rotary hook 3 5 1 Adjustment of rotary hook timing 74 3 5 2 Adjustment of retainer on rotary hook 76 3 6 Thread cut unit 3 6 1 Assemble the arm ass y 77 3 6 2 Excha...

Page 5: ...s 4 1 1 Remove LCD and LCD CE board 107 4 1 2 Setting for LCD CE board 109 4 1 3 Setting for power supply 110 4 2 Sensors 4 2 1 Adjustment of upper shaft timing C point L point 111 4 2 2 Adjustment of TC board 112 4 2 3 Adjustment of stop position of needle bar change unit 112 4 3 Initialization of system 4 3 1 Program update procedure 113 4 3 2 Preparation for program update 114 4 3 3 Machine pro...

Page 6: ...uestion As example step 131 7 2 Trouble shooting 7 2 1 Electricity doesn t turn on 132 7 2 2 Thread break 133 7 2 3 Erraneous thread cut 138 7 2 4 Off registration of pattern 140 7 2 5 Upper thread comes off from needle hole 142 7 2 6 Upper thread remains 144 7 2 7 Malfunction of thread break detection 145 7 2 8 Suspension of upper shaft 147 7 2 9 Malfunction of needle bar change 148 7 2 10 Defect...

Page 7: ...7 Special tool Measuring equipment Other HSA90020 2 0mm thickness gauge Page 88 89 HSA90030 Keeper positioning gauge Page 89 HSA90050 Bering positioning gauge 4 85mm Page 34 ...

Page 8: ...asuring equipment Other HSA90080 Retainer positioning gauge 0 8mm Page 76 HSA90090 Positioning pin Page 35 HSA90131 1 2mm thickness gauge Page 37 HSA90200 0 03mm thickness gauge Page 27 66 HSA90230 Tensile gauge Page 87 ...

Page 9: ...ring equipment Other HSA90240 Dial gauge set Page 28 HSA90270 Vernier calliper gauge 200mm HSA90280 Tension gauge 1000cN Page 91 95 103 HSA90311 Shell alvania EP Grease 100g Page 36 42 M0404342 Needle height gauge Page 61 ...

Page 10: ...read guide bracket Thread guide pillar Tread stand Thread tension unit Moving head Take up lever Control panel Front cover X carriage Thread adjusting spring Frame base Thread holder Needle plate Rotary hook Rotary hook cover C over over ng g ...

Page 11: ... Outline of mechanical mechanism 1 1 Needle bar driver unit Y carriage Thread cutting driver Upper shaft Take up lever cam Thread cacher Needle bar change unit Pressure foot driver unit Thread holder ...

Page 12: ...tronic parts 1 2 Pulse motor Needle bar change unit CONT J board TC board Display board Fuse Pulse motor Pressure foot Power swich Noise filter AC power Timing detecting board Main motor Power supply Pulse motor Thread catcher ...

Page 13: ... Removal of outer covers THREAD STAND 2 1 1 Remove thread guide bracket 2 Loosen a screw of thread guide pillar 3 Remove thread guide pillar and thread stand ...

Page 14: ... switch OFF before work 1 Remove three setscrews of arm E as shown in the figure below 2 Disconnect the connectors indicated by the arrows in the figure below Remove the screw that fixes cables 3 Remove two screws on arm D as shown in the figure below 4 Remove control box ...

Page 15: ...ct cable for X carriage 6 Remove 2 screws then take the X carriage off 7 Remove the guide 8 Take off rubber cap 9 Remove cover left Remove screw in arrow mark 10 Unlock nail of the cover left by pressing an arrow point of the cover right x x x ...

Page 16: ...ng an arrow part of the picture 1 Upper part of the cover 2 Front part of the cover Nail shape Male nail shape Female nail shape 12 Remove the screw of an arrow part of the picture which fixes cover right 13 Remove an arrow marked screw which fixes hold arm D x ...

Page 17: ...2 1 14 Remove cover light Remove screw in arrow mark 15 Remove the cover right 16 By above process removal of cover has finished If you need to operate the machine with control box please re assemble the arm and the control box x ...

Page 18: ...ust 2 Ceramic and rim of take up lever a No burr and crack 3 Thread path in lower side and needle holder a No burr and crack 4 Needle a Needle tip shouldn t be warped or bent When you slide needle tip on surface of nail and if the nail gets scratched needle tip is warped Please exchange it with new one Please place needle on flat surface and check clearance A from side If clearance is not equal ne...

Page 19: ... in needle hole and around it 6 Pressure foot a No burr and crack inside hole b Not bent 7 Rotary hook a No burr and crack b Hook point not warped c Backlash between bobbin case holder and outer hook should be less 8 Keeper a No burr and crack on tip Surface Reverse side ...

Page 20: ... order of 1 4 please remove and fix needle 1 Loosen screw holding needle 2 Remove needle 3 Insert needle till it goes to the end 4 Tighten screw holding needle Fix needle so that needle groove faces front Needle holder Needle Front ...

Page 21: ...Z twisted S twisted Left twisted Right twisted 2 Selection of lower thread Basically please use cotton thread 80 120 120 is recommendable Pay attention to the following in selection Thickness should be equal When it is lightly stretched it doesn t break easily In process of time it doesn t get inferior Commercially available paper bobbin can be used but please select thread with thickness correspo...

Page 22: ...g needle 2 Relation between needle and upper thread will be found below Representative example is shown Needle Size is German 75 in standard accessory If necessary please select in accordance with description of thread and cloth Thread In case needle size is German 75 if thread is rayon 120 is recommendable Relation between needle and upper thread Denier d If needle size and thickness of thread do...

Page 23: ...nnect TC cable Laser pointer cable and Front lighting cable 4 Remove the thread tension bracket Thread tension bracket 5 Loosen screws located at right and left side then take front cover off 6 Change needle bar to no 1 and no 7 with turning the gear by finger and remove all arrow marked screws then remove the moving head ...

Page 24: ... the left 9 Referring to 3 2 4 Exchange of needle bar driver remove needle bar driver ass y 10 Remove Bobbin winder 11 Remove power supply Cable 2 pcs Screw 2 pcs Power supply 12 Remove Cover Cover 13 Remove circuit board assembly for timing detecting board Cable 1 pcs Screw 2 pcs ...

Page 25: ...ollar 15 Loosen collar screw on take up lever cam 16 Loosen screw on crank 17 Pull out upper shaft To the extent that crank comes out 18 Remove Needle bar boss stopper 19 Loosen fixing screws and pull down pressure foot guide bar and guide shaft Pressure foot guide bar Guide shaft 20 Remove bearing retainer 21 Remove crank ass y ...

Page 26: ... Please push the Upper shaft to arrow marked direction and make sure that the Upper shaft collar are attached without space from machine body Upper shaft collar 3 Position of upper pulley is space from upper shaft collar 4 Confirm that belt is not interfere the pulley flange and not come out from pulley groove 18 Please check and adjust timing mentioned below to finish 1 Upper shaft timing L point...

Page 27: ...Exchange of needle bar driver remove needle bar driver ass y 3 Loosen screw on rod pin to remove rod 4 Install good parts Please confirm that the number is printed on one side of the crank and this side should be located front Important Leave space of 0 03mm between crank and rod 5 Put each unit back to where it was according to manual ...

Page 28: ...bar down 3 When dial disc reads 0 degree fix detecting disk 4 Work will finish by checking and adjusting timing mentioned below 1 upper shaft timing L point C point 2 Take up lever timing 3 Shuttle hook timing 4 Jump device 5 Needle height Please use dial gauge for strict checking Please see that timing on dial disc comes to 0 degree when dial swings in highest value Dial gauge Needle holder ...

Page 29: ...29 Exchange of needle bar driver 3 2 4 1 Referring to 3 2 1 Exchange of crank Remove board ass y face plate left ass y and moving head 2 Loosen screw on main shaft in head 3 Pull out main shaft in head ...

Page 30: ...l good parts Important Make sure that Needle bar driver ass y rotate smoothly and no clearance between rod and arm 7 Put each unit back according to manual 8 After exchange please be sure to adjust needle height Please refer to 3 3 6 Adjustment of needle height Attention Head shaft should be positioned slightly lower than ditch for oil ...

Page 31: ... good parts Set upper shaft to 80 degrees to adjust position of plunger of jump solenoid and jump body as illustrated below Front view Viewing from front Needle bar driver should come to center of Plunger Plunger Jump solenoid ass y Needle bar driver View from left This shows a state that plunger and Needle bar driver contacts Plunger Needle bar driver Front side ...

Page 32: ... Adjust upper shaft to be 180 degrees and tip of the body has to be same as the picture below 6 Please put parts back in reverse order to finish For adjustment of fixing of each unit please refer to process to adjust fixing of each unit 90 degrees ...

Page 33: ...se push the Upper shaft to arrow marked direction and make sure that Upper shaft collar are attached without space from machine body Upper shaft collar 3 Position of upper pulley is space from upper shaft collar 4 Confirm that belt is not interfere the pulley flange and not come out from pulley groove 5 Please insert the Barrel cam into the Fasten collar first then assemble it to the Upper shaft 5...

Page 34: ... Spanner 7mm 8mm 3 Insert bering positioning gauge 4 85mm between bering and bering and then tighten roller shaft ass y Please adjust roller shaft for machine front side ways This roller shaft ass y is eccentricity Turn lean screw and just touch roller to gauge Bering positioning gauge 4 85mm 4 Return take up lever crank ass y to previous place to finish Please push to arrow ways until stop Attent...

Page 35: ... from right side 4 Turn take up lever cam slowly and insert positioning pin into pin groove pin groove 5 Loosen screw Important Rotate the Take up lever cam clockwise until pin ditch touches to positioning pin then tighten the screw No gap between take up lever cam and crank 6 Pull out positioning pin 7 Turn upper shaft and set dial disc to C to finish ...

Page 36: ...nge of pressure foot cam 3 2 9 1 Remove screw on pressure foot cam 2 Exchange pressure foot cam 3 Put on grease to pressure foot cam Grease Shell alvania EP Grease2 Shell Gudas S2 V220 2 4 Exchange has finished ...

Page 37: ...by finger Also you can move down the needle bar by maintenance mode through menu of control box 3 Turn upper shaft and set dial disc to 0 degree 4 Insert Gauge I 2mm between needle plate and pressure foot No gap between gauge and pressure foot or needle plate will be OK In case the space is not 1 2mm loosen the fixing screw and adjust height of pressure foot as following picture ...

Page 38: ...sion 2 The needle which you insist to exchange pressure foot should be located at offset position from bed 1 Press key on control box 2 Turn gear with finger 3 Remove pressure foot 4 Install good pressure foot 5 Adjust height of pressure foot to finish Please refer to 3 2 10 Check of height of pressure foot ...

Page 39: ...g pressure foot guide bar down 3 Please confirm that the lenght of pressure foot gide bar should be 37 mm Also confirm that the pressure foot guide bar should not touch the LM guide when the bar goes up to top position 4 In case the lenght of pressure foot gide bar is not 37 mm loosen the screw which fixes guide bar block and adjust it as 37mm ...

Page 40: ...y loosen the screw which fixes pressure foot link A then remove block ass y 4 If you remove the pressure foot link B ass y first remove the pressure foot cam collar and pressure foot drive cam 5 Remove pressure foot link B ass y 6 Assemble the parts by opposite procedure to terminate this exchange When assembling each unit please refer to each procedure Instruction for assemble adjustment Attentio...

Page 41: ...rank remove face plate 2 Remove upper rail 3 Loosen fixing screw of guide bar boss and bring pressure foot guide bar down 4 After remove pressure foot spring remove pressure foot guide bar to up side 5 Remove pressure foot drive lever ass y 6 Exchange pressure foot drive lever ass y ...

Page 42: ...dy and oil bush of pressure foot lever ass y Grease Shell alvania EP Grease2 Shell Gudas S2 V220 2 Oil insert bush 8 Put on grease to fulcrum shaft Caution Do not put on grease to a part of screw 9 Assemble pressure foot drive lever ass y 10 Assemble pressure foot guide ...

Page 43: ...ust the height of pressure foot guide bar Please refer to 3 2 12 Adjustment of height of pressure foot guide bar 13 Assemble the upper rail of moving head Please refer to 3 3 1 Assemble the upper rail of moving head 14 Assemble the Needle bar boss stopper 15 Assemble the face plate 16 Install parts in reverse order to finish For adjustment of fixing of each unit please refer to process to adjust f...

Page 44: ...ss B lower 2 Remove pressure guide bar After remove pressure foot spring remove pressure foot guide bar to up side 3 Remove E ring E 4 which fixes guide bar boss 4 Exchange guide 5 Assemble the pressure foot gude bar and Pressure foot spring 6 Adjust the height of pressure foot guide bar to finish Please refer to 3 2 12 Adjustment of height of pressure foot guide bar ...

Page 45: ...able from pulse motor 2 Down the Pressure foot 3 Disconnect cable from Sensor board ass y and Remove bracket ass y Cable from Sensor board ass y 4 Remove drive gear A 5 Exchange the pulse motor Fix it temporarily 6 Assemble the drive gear A The position should come to the middle of the gear range ...

Page 46: ...lse motor then fix it Keep slightly backlash between drive geer A and gear Every point Remove clamp filter from original motor then re set to new motor 8 Continue to conduct Adjust the pressure foot bracket ass y Please refer to 3 2 17 Adjustment of pressure foot bracket ass y ...

Page 47: ... 3 Pull pressure foot bracket ass y downward then fix it 4 Adjust position of pressure foot guide plate B ass y Caution Make sure that pressure foot guide plate B ass y is mount perpendicular and parallel to the body 5 Procedure is done after confirming the pressure foot movement by pressing the on control box 90 degrees ...

Page 48: ...ss Machine Test 5 Press Catcher Adjust take thread catcher unit in and out and move and adjust the sensor shown in the direction of the arrow so that the dimension in the following figure meets the value in the following figure when hook goes back Fix the sensor with setscrew after adjustment Sensor Hook 6 Tighten the screws securely while pushing thread catcher unit in the direction of the arrows...

Page 49: ...nge of thread catcher 3 2 18 7 Continue to Adjustment of thread holder When you adjust thread holder you might need to adjust thread catcher unit again Follow the procedure in 3 3 13 Adjustment of thread holder ...

Page 50: ...t cover with keeping the space between shaft and the cover hole 4 Assemble guide as tentatively 4 Confirm that the shaft does not touch the cover by turning motor Set the empty bobbin and down the Guide If the motor shaft touches the outer cover left remove outer cover left and cover black plate then re adjust the position of winder bracket ass y Cover 5 Install the Thread stand and Rewind the bob...

Page 51: ...one side re adjust the angle of winder bracket ass y Change position of the motor shaft if you cannot solve the problem with above procedure 7 Adjust the height of Guide to adjust volume of thread to be winded 8 Remove the guide reinstall the parts which has been removed then re adjust height of the guide to finish ...

Page 52: ...semble the upper rail of moving head 3 3 1 1 Tighten right and left LM guide base Follow in picture keep push to allow way each LM guide base Notice Should be front side which letter on side of LM guide base ...

Page 53: ... Adjust positioning roller shaft so as to put moving rail lower between bearings Move moving head back and forth so as not to cause backlash 2 After adjustment check and adjust needle drop to finish Please refer to 3 3 4 Adjustment of needle position back and forth ...

Page 54: ...k ass y then insert forked part of take up lever into take up lever guide bar For above procedure you need to turn link B by finger and move block ass y till top position then re mount the moving head l Please note that Face plate Left is removed on the picture below just for taking photograph You also need to hold take up lever by finger as a line ...

Page 55: ...LM guide side 4 Turn the Gear for manual operation and make it the 1st needles 5 Tighten an inside screw arrow portion in a figure important Please perform a screw bundle in order of inside to outside At this time a moving head is pushed from the front and it is LM guide It is made for there to be no crevice ...

Page 56: ...ual operation and make it the 7th needles 8 Tighten an inside screw arrow portion in a figure important Please perform a screw bundle in order of inside to At this time a moving head is pushed from the front and it is LM guide It is made for there to be no crevice 9 Tighten an outside screw arrow portion in a figure ...

Page 57: ...find gap please adjust again with procedure 4 10 If there is no gap please refer to 3 3 4 Adjustment of needle position back and forth and re adjust the position 12 If not center right and left please loosen fixing screws and adjust again with procedure 4 10 When all needles are displaced to same direction please refer to 3 4 1 Fixing of needle bar change unit and re adjust the position 13 If OK P...

Page 58: ...box 3 Turn upper shaft and set needle near to the lowest needle position L to adjust positioning plate ass y Insert Lower rail to between the two bearing deeply This is for setting of Moving head completely lower rail positioning plate ass y Viewing from side set to center of needle hole Check and adjust with 1st 4th and 7th needle 4 After adjustment please be sure to check and adjust clearance be...

Page 59: ...pper axis raise a needle bar and unite with C 275 degrees It returns to 303 degrees 220 and unites with 275 degrees after that Note If a top axis is right rotated a needle will enter deeply and needle hole is greatly It becomes Therefore an exact needle position check becomes impossible 8 1st needle and the 7th needles are to 302 degrees 303 degrees about an upper axis by the above mentioned proce...

Page 60: ...ont panel 2 Remove bobbin case 3 Bring pressure foot down Either way mentioned below 1 press P_FOOT key on control box 2 Turn gear with finger 4 Bring needle down 5 Turn upper shaft to set dial disc to 5 degrees 6 Loosen needle bar boss and needle bar boss B Needle bar boss B Needle bar boss ...

Page 61: ...dle stop as illustrated below About 30 degrees 10 Tighten the screw of needle bar boss 11 Bring pressure foot down and Turn upper shaft to set dial disc to 270 degrees 12 Tighten the screw of needle bar boss B When tightening needle bar boss B please insert Calliper pre set as 25 3mm in between Check the movement of needle bar goes smoothly 13 Put things back in reverse order of 1 2 to finish ...

Page 62: ...ve lower front panel 2 The needle which you insist to exchange needle bar should be located at offset position from bed 1 Press key on control box 2 Turn gear with finger 3 Remove needle needle holder and pressure foot 4 Loosen needle bar boss and needle bar boss B Needle bar boss B Needle bar boss ...

Page 63: ...e foot spring Cushion and Plain washer M6 6 While pressing needle bar spring insert good needle bar with needle bar boss needle bar boss B Pressure foot block B Cushion Plain washer M6 Needle bar spring H and Pressure foot spring 7 Fix needle needle holder and pressure foot 8 Adjust needle height Please refer to 3 3 6 Adjustment of needle height 9 Put removed parts back to finish ...

Page 64: ... ov ve e B Bl lo oc ck k p pl la at te e 4 Remove boss screw Please note that you need hexagonal driver for front screw and spanner 4mm for rear nut as photo below 5 Exchange of needle bar boss guide plate and fix it Push needle bar boss check plate to arrow marked direction and keep the length of both sides equally as photo below then fix screws 8mm ...

Page 65: ...ved parts 10 Adjust height of block plate and confirm that pressure foot block B should goes into groove of guide bar boss B as photo below then fix screws 11 Set backing paper on embroidery frame and make needle hole on the paper 12 Press key on display of control box 13 Adjust position of laser pointer that the ray of laser should goes into theneedle hole 7 Put moving head and other removed part...

Page 66: ...head 2 Loosen screw on take up shaft 3 Remove the E ring 4 Remove the take up lever shaft first then remove the take up lever 5 Install take up lever assembly 6 Leave space of 0 03mm between take up lever and moving head then set the E ring 7 Put moving head in previous position to finish ...

Page 67: ...ew driver as picture below and slide the thread guide to arrow marked direction then you can remove the thread guide 4 Remove Thread adjusting plate and Thread adjusting spring 5 Exchange thread adjusting spring Set the thread adjusting plate and thread adjusting spring to same position as picture below 6 Put removed parts back in reverse order ...

Page 68: ...ead adjusting plate has a latch to be able to adjust tension in three steps Loosen screw of the thread adjusting plate then you can adjust the latch to desired position Also the thread adjusting plate have five spring grooves for fine adjustment Spring groove Fine adjustment 3 Put removed parts back in reverse order Middle Strong Weak Strong Weak ...

Page 69: ...ew to the extent that thread hoIder moves 3 Bring pressure foot down Either way mentioned below 1 press on control box 2 Turn gear with finger 4 Take the hook in and out by finger to check movement of hook goes smoothly Check this at 1th 4 th 7 th needle Positional relationship between hook and holder lower ...

Page 70: ...ead holder 3 3 13 5 If you can not set the correct position with procedure no 4 then Thread catcher device should be adjusted 6 Check up with thread trimmer function 7 Assemble lower front cover to terminate this procedure ...

Page 71: ...move Font cover 2 Remove thread holder ass y 3 Remove holder lower 4 Exchange the majic tape View from bottom Stick position for velcro strap 5 Assemble holder lower 6 Install holder ass y to moving head in reverse order to finish Please refer to 3 3 13 Adjustment of thread holder ...

Page 72: ...t cable 2 Turn slit collar and adjust angle that groove of slit collar should be located same position of sensor Refering to 4 2 3 Adjustment of stop position of needle bar change unit Confirm that the slit does not tough the sensor 3 Turn drive gear B by finger and set needle bar to no 4 4 Bring pressure foot down Either way mentioned below 1 press on control box 2 Turn gear with finger ...

Page 73: ... of unit assembly so that needle comes to center against needle hole on needle plate 7 Return other parts to previous For adjustment of fixing of each unit please refer to process to adjust fixing of each unit 8 Please check and adjust the following timing to finish 1 Shuttle hook timing 2 Needle height 3 pressure foot ...

Page 74: ...own Either way mentioned below 1 press on control box 2 Turn gear with finger 3 Tighten screw on rotary hook 3 places 4 Bring needle bar down by finger Also you can move down the needle bar by maintenance mode through menu of control box 5 Turn upper shaft and set dial disc to 25 degrees ...

Page 75: ...standard accessory At this moment clearance between needle and rotary hook should be 0 1 0 2mm Check and adjust with 1st 6th and 12th needle and tighten screws 7 For making sure check position of retainer on bobbin case holder Please refer to 3 5 2 Adjustment of retainer on rotary hook for adjusting value and follow it 8 Adjustment has finished 0 1 0 2mm ...

Page 76: ...terfere of screw and Rotary hook retainer during installing Needle plate 3 Adjust position back and forth left and right Tighten screws Space has to be 0 8mm and the position right and left is center of the needle 0 8mm Needle center and retainer center should come to same position Retainer positioning gauge 0 8mm Needle center position 4 Adjustment has finished a Needle center a ...

Page 77: ...w Caution Make sure that there is clearance between arm and body 3 Hold the left side of arm to body and tighten screw 4 Hold the right side of arm to arrow pointed direction at below picture and tighten screw 5 Assemble detecting plate Make sure that detecting plate is mount perpendicular and parallel to the arm ...

Page 78: ...ce between detecting plate and sensor or connector of sensor board A part of sensor Sensor Detecting plate Conector A part or conector 7 Adjust by bending detecting plate by hand if you find any interference with sensor or connector 8 Finish this process ...

Page 79: ... Exchange of crank Remove Thread stand and outer covers 2 Referring to 3 7 4 Exchange of Y carriage belt Remove arm 3 Remove power supply power supply 4 Disconnect cable from sensor board 5 Remove Weight 6 Loosen tension screw so as to move tension 7 Loosen screw for tension po p ...

Page 80: ...driver 3 6 2 8 Remove Y carriage left Y carriage left 9 Remove thread cutting driver センサー部 10 Disconnect cable 11 Remove Pulse motor 12 Remove Drive gear 13 Install Drive gear on good Pulse motor Position of Drive gear is space from Pulse motor 2mm ...

Page 81: ...ion base then turn arrow marked screw temporary and check if timing belt and idler pulley ass y meet well 16 Referring to 3 7 3 Adjustment of Y carriage belt tension adjust tension of Y belt 17 Referring to 3 6 9 Adjustment of position of moving knife Check the position of moving knife 18 Install each part in reverse order from step 5 to 1 then finish this process ...

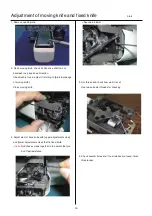
Page 82: ...knife 5 Setting drive link hole to moving knife insert knife drive shaft assembly 6 Pushing down moving knife and knife drive shaft retainer like putting them together fix knife drive shaft retainer Fix so that there is no backlash in upward and downward direction Close moving knife 7 Referring to 3 6 8 Adjustment of moving knife and fixed knife check how well thread is cut and adjust then finish ...

Page 83: ...pushing to forward as full as possible and close moving knife Notice In case moving knife and the left side of fixed knife overlaps excessively when closing adjust the position of fixed knife slightly to the right direction 5 Referring to 3 6 8 Adjustment of moving knife and fixed knife check how well thread is cut and adjust then finish this process ...

Page 84: ...g to 3 6 6 Exchange of moving knife Close moving knife 3 Adjust slant of fixed knife with upper adjustment screw and lower adjustment screw that fix fixed knife Note Rub these screws together to the extent that you don t feel resistance Spanner 5 5mm 4 Cut thread and check how well it is cut Use two polyester threads for checking 5 Check several times and if no mistakes are found finish this proce...

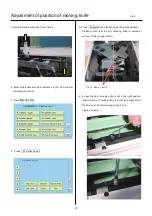
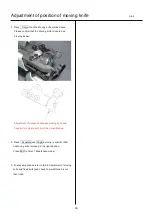
Page 85: ...ne Test 4 Press 2 Cutter Adjust 5 Press Separate then the Moving knife will be opened Please confirm that the tip of Moving knife is located at center of Rotary hook retainer Tip of moving knife 6 In case the tip of moving knife is not in the right position loosen screw on Thread cutting rod then adjust position of the Moving knife with turnning Eccentric pin Tighten screws ...

Page 86: ...w Adjustment of clearance between moving knife and fixed knife is where both tip of then are attached 8 Press Separate and Origin by turns to confirm that t he Moving knife is closed in the right position Press ESC to finish Maintenace mode 9 If necessary please refer to 3 6 8 Adjustment of moving knife and fixed knife and check how well thread is cut then finish ...

Page 87: ...fe and bobbin thread holder 3 Through height of bobbin thread holder you can adjust holding power for bobbin thread Pull bobbin thread toward arrow mark and adjust the height by screw thatbobbin thread comes off with tensile gauge 20 25g 4 Tighten lock nut Don t move adjusting screw 5 Check several times and if OK finish this process ...

Page 88: ...ntion Pushing keeper solenoid to solenoid base Insert 2 0mm thickness gauge between solenoid base to polyslider 2 0mm thickness gauge Front view Keeper plunger Solenoid base Clearance between keeper plunger and solenoid base should be kept as much as equally 5 Put keeper solenoid ass y in previous position then adjustment of position of keeper to finished Refering to 3 6 12 Adjustment of position ...

Page 89: ...eeper rod 4 Confirm that tip of keeper does not touch thread guide of bobbin case When tip of keeper touches thread guide adjust it by bending keeper 5 Adjust solenoid base where tip of keeper contacts slightly to the gauge then tighten bracket screw Clearance between bobbin and keepr is about 1 0mm View from right Keeper positioning gauge About 1 0mm Bobbin Keeper 6 Adjust position of stopper Thi...

Page 90: ...elt tension 3 7 1 1 Remove frame base 2 Disconnect X carriage cable 3 Remove X carriage Screw 2 pcs 4 Remove X carriage cover Screw 2 pcs 5 Remove sensor bracket 6 Loosen fixing screw for tension pulley bracket slightly front side ...

Page 91: ... belt is touch Note Slide connecting plate to right as full as possible Gauge in the middle of idler pulley and tension pulley Measurement point Idler pulley Tension pulley Adjustment tighten fixing screw for tension pulley bracket 9 Tighten fixing screw for tension pulley bracket front side 10 Tighten fixing screw for tension pulley bracket rear side 11 Return things back to previous places in re...

Page 92: ...92 Exchange of X carriage belt 3 7 2 1 Remove frame base 2 Disconnect X carriage cable 3 Remove X carriage 4 Remove X carriage cover 5 Remove sensor bracket 6 Loosen screw for tension ...

Page 93: ... Remove the plate nut located other side 8 Loosen screw rear slightly to the extent that tension bracket moves 9 Remove belt from motor pulley 10 Remove connecting plate 11 Exchange belt to good one Important Exchange it so as not to break groove and convex on belt of connecting plate ...

Page 94: ...osition of belt Space between edge of X base and belt is 10mm 13 Referring to 3 7 1 Adjustment of X carriage belt tension adjust tension of belt 14 Put removed screw and nut plate 15 Return X carriage assembly and frame base to previous places to finish ...

Page 95: ... screw so as to move tension 5 Loosen lock nut and screw for tension 6 Adjust belt tension to use belt tension gauge Use push and pull gauge Adjustment value When you push the Belt at 300g the bending value should be 5mm Push belt holding plate frontward as full as possible Gauge in the middle of idler pulley Measurement point Idler pulley rear Idler pulley front ...

Page 96: ...96 Adjustment of Y carriage belt tension 3 7 3 7 Tighten nut for tension screw Tighten screw on tension 8 Return weight X carriage assembly cover front and cover to previous places to finish ...

Page 97: ... carriage belt 3 7 4 1 Referring to 2 1 Removal of outer covers remove outer covers 2 Remove cover front 3 Remove arm 4 Remove Weight 5 Loosen tension screw so as to move tension 6 Loosen lock nut and screw for tension ...

Page 98: ...ar bush touches tension base 10 Set belt to belt groove of guide frame base Important Exchange it so as not to break groove and convex on belt Do not use center groove of Y belt support to avoid overlap both belt Y belt support 11 Pull both side bush guide until linear bush touches tension base then fix arrow marked screws on Y belt support ...

Page 99: ... are not displaced from screw holes of bush guide and connecting plate C Caution If you find displacement loosen lock nut and screw for tension Move one tooth of timing belt from idler pulley ass y to desired direction then adjust belt tension again 14 Please confirm that you can insert all screws smoothly then fix arm ass y 15 Return Weight arm X carriage ass y cover front and coversf to previous...

Page 100: ...ion of timing belt Important Tension shaft ass y to be set at the center against screw hole of the body No need to adjust tension Please move tension shaft ass y upward and downward to adjust 4 Please return power supply to previous places 5 Please return bobbin winder to previous places then adjustment to finished ...

Page 101: ...upply Power supply Cover Power supply 2 Remove timing detecting board ass y 3 Loosen screw on upper pulley Important Do not loosen the screw of Upper shaft collar Upper shaft collar 4 Loosen screw on fasten collar for take up lever cam 5 Loosen screw on crank 6 Remove timing belt from pulley then pull out upper shaft to the extent that shaft comes off from take up lever cam U p ply over ...

Page 102: ...lt Important Pay attention to following 1 4 1 Please fix upper pulley crank ass y on flat surface of upper shaft with screw tightly 2 Please push the Upper shaft to arrow marked direction and make sure that Upper shaft collar are attached without space from machine body Upper shaft collar 3 Position of upper pulley is space from upper shaft collar 4 Confirm that belt is not interfere the pulley fl...

Page 103: ...et 3 Loosen screw on main motor ass y 4 Adjust motor belt tension Use push and pull gauge Adjustment value When you push the Belt at 280 300g the bending value should be 10mm Gauge in the near center between drive pulley and motor pulley Measurement point Drive pulley Motor pulley bending value main motor ass y upward and downward to adjust ...

Page 104: ...104 Adjustment of motor belt tension 3 8 3 5 Tighten screw on main motor ass y 6 Install support bracket 7 Install each parts then finish this process ...

Page 105: ...nd and outer covers 2 Remove timing detecting board ass y 3 If you insist to exchange the Main motor ass y take connector out 4 Remove motor 5 If you insist to exchange Timing belt Motor pass new belt through space around the Drive pulley then set the belt 6 Mount new motor In case exchange of motor ...

Page 106: ...d motor belt 3 8 4 7 Install each parts in reverse order For installation and adjustment of each part please refer to respective manuals Referring to 3 8 3 Adjustment of motor belt tension adjust tensile strength of motor belt ...

Page 107: ... SW cable Box cable Cable for LCD inverter red white 3 Remove set screw and sealed case A 4 Remove core module 5 Remove narrow flat cable for LCD unit Latch Connector When you pull the latch to cord side the cord release When you push the latch to connector side the cord fixed Release Fix 6 Remove two sets screws and two studs Screws Stud ble Bo ble CD inv Sealed case A e A ch Co ...

Page 108: ...e peel off Connector Wide flat cable When you pull the latch to cord side the cord release When you push the latch to connector side the cord fixed Release Latch Fix 8 Remove four setscrews and LCD unit Mac No 1013030 Mac No 1013031 Remove touch panel Please reverse procedure when installing LCD CE board Display bracket LCD unit flat cable Dis LCD un Displa Dis LCD un LCD un Touch panel ...

Page 109: ...ry card from local market The necessary information will be provided Coin battery Insert our official coin battery EPZ01190 Refer to the latest parts list for the parts number The battery is used for back up power source of real time clock on an embroidery machine Replace new battery if clock dose not indicate the correct time after setting a clock and turning power switch OFF Mac No 1006002 Mac N...

Page 110: ...1 3 Disconnect power plug from electrical outlet before work Please use digital output tester 1 Turn the machine on and put tester against terminal plate or connector then turn V ADJ to adjust to 24 6V 0 1V for 100V For 200V VR VR ...

Page 111: ... detecting board 2 Set upper shaft to 0 degree 3 Move circuit board up and down and set to position where LED 2 disappears at 0 degree then fix with screw 4 With this state turn to C point and check if LED1 Iights between 265 and 282 degrees Check dose not scratch plastic slit to Timing sensor ...

Page 112: ...f sensor has to be same as the picture below Adjustment of stop position of needle bar change unit 4 2 3 Sensor board Set position where sensor on sensor board and slit don t cross to area where moving head doesn t move when turning groove cam Fixing screw for slit Imagine figure of position sensor and cam ...

Page 113: ... of the control box at the screen after the machine is booted 2 Enter maintenance mode and update program from the menu 3 Press MENU button and select System in menu of OTHER for initialization of system 4 Press MENU button and select Speed in menu of OTHER for automatic speed setting 5 Replacement of LCD CE board Calender setting 6 end of process Maintenance Manual 4 3 3 Machine program update 4 ...

Page 114: ...ress the file Program for HCD2 HCS2 HCH HCR2 MainProgramA Copy the decompressed file s or the folder that contains decompressed file to USB memory File names on your PC are shown below Program for HCD2 HCS2 HCH HCR2 UpDateFile NOTE 1 Copy the program to the root folder of USB memory ...

Page 115: ...rogram Update The screen shows contents of the USB memory 4 Select UpdateFile 5 Select MachineInstallData 6 Select the machine model 7 Select the file Installation of program begins After successful installation the display will return to step no 2 NOTE Please do not take out USB memory during installation Please do not turn off the power during installation it will take for a while for completion...

Page 116: ...116 9 Press NEXT 10 Referring to 4 3 5 Setting of revolution Perform Re Initialization of machine system And Initializing of machine speed End of process ...

Page 117: ...creen show Update on each item 4 Press ENTER Installation of program begins NOTE Please do not take out USB memory during installation Please do not turn off the power during installation it will take for a while for completion of installation Retry updating when the screen shows Error due to writing error Once update id complete the machine will be rebooted automatically Press NEXT button 10 Refe...

Page 118: ...ns NOTE Please do not take out USB memory during installation Please do not turn off the power during installation it will take for a while for completion of installation Retry updating when the screen shows Error due to writing error Once update id complete the machine will be rebooted automatically 5 Press NEXT button 6 Referring to 4 3 5 Setting of revolution Perform Re Initialization of machin...

Page 119: ...systems are carried out Indicate HAPPY logo in screen End of process Initializing of machine speed Setting of revolution of main shaft which is suitable to the machine is required If setting is not done the revolution may not speed up 1 Turn on the power After the program start up press MENU and press OTHER 2 Press Speed 3 Press OK Main shaft adjusts its revolution speed automatically Message comp...

Page 120: ...ntenance Register Registration of machine maintenance date Normally not used at maintenance Other Other This item is neither configured nor used License Registration Limited usable period Replaced CONT Board Machine Setting Navigation after exchanging CONT board Main program Ver 1 34 How to enter maintenance mode 4 4 1 1 Turn on machine 2 Press NEXT while pressing START STOP button at the screen o...

Page 121: ...n 11 Encoder Check Input test of L point C point timing Not used in HCH With turning main shaft you can use this function to check if L point signal C point signal and timing signal are correct or not 12 Position Data Entry Position Data Entry Confirm frame moving sensor This test is used to check action of Frame moving sensor From Main program Ver 1 34 the Pulse motor will be un locked when you a...

Page 122: ...enance mode 2 Press Machine Test 3 Select desired number to be confirmed Page is switched by pressing Selected item will be executed 4 The screen returns to the MACHINE TEST screen by pressing ESC Unnecessary to press ESC if the item completes automatically 5 Return to drive mode by pressing ESC and ESC ...

Page 123: ...eplace LCD CE board or Core module since the board might be broken NOTE All the internal design memory will be deleted by initialization of design memory You have to be careful when initializing design memory 1 Enter maintenance mode in reference to 9 1 How to enter maintenance mode 2 Press Memory All Clear 3 Confirmation of free area and all delete will be started after pressing OK 4 Return to dr...

Page 124: ...al number of stitch 4 4 4 1 1 Enter maintenance mode in reference to 9 1 How to enter maintenance mode 2 Press Record 3 Press STITCH The screen shows total number stitches used for embroidery so far 4 Selection menu of Clear Total Stitch will be opened when pressing CLEAR at Procedure 3 Total number of stitch is cleared after pressing OK and the screen shows one in the procedure 3 Total number of ...

Page 125: ...ror occurrence Enable to confirm Occurrence date and error number of last 32 cases with button Selection menu of Clear Error Record will be opened when pressing CLEAR Error record is cleared by pressing OK and the screen of the procedure 3 is displayed If you do not prefer to clear it press Cancel and the screen of the procedure 3 is displayed Clear Error Recode Cancel OK ...

Page 126: ... to E 255 will be displayed You can confirm accumulated number for E 000 to E 255 with The screen returns to the previous screen by pressing BACK 5 Selection menu of Clear Error Total Count will be opened when pressing CLEAR and the screen of procedure 4 is displayed Error record is cleared by pressing OK and the screen of the procedure 4 is displayed If you do not prefer to clear it press Cancel ...

Page 127: ... The screen returns to the previous screen by pressing BACK 5 Selection menu of Clear Thread Break Count will be opened when pressing CLEAR at the screen of procedure 3 Thread break history is cleared by pressing OK and the screen of the procedure 3 is displayed If you do not prefer to clear it press Cancel and the screen of the procedure 3 is displayed Clear Thread Break Count Cancel OK ...

Page 128: ...nce mode 2 Press Machine Setting 3 Select desired number and modify setting Setting values become default by pressing Page is switched by pressing 4 Press ESC button after modifying of setting number 5 The screen returns to drive mode by pressing 6 Turn off power and on again before use a machine ...

Page 129: ... When the machine runs more than 2000 hours default setting or 365 days are passed after last maintenance the machine will display the message to have regular maintenance Registered date Main program Ver 1 34 Pressing the RESET button delete the registered date When the Calender button is pressed you can set calendar of the machine By pressing Days button you can change the number of days for regu...

Page 130: ...ry that contains data for version up into insertion slot on the control box 2 Refer to 4 4 1 How to enter Maintenance mode and enter maintenance mode The screen shows below 3 Press Replaced CONT Board 4 Press OK 5 Press Skip 6 Press OK 7 Press OK 8 When the current machine program is older than latest version press OK The installation will be started If the current machine program is same or newer...

Page 131: ... OK 12 Press OK Initializing of machine speed will be started Refer to Initializing of machine speed of 4 3 5 Setting of revolution for more details 13 Press OK The screen returns to the maintenance mode End of process Final Step Speed setting OK Setup is completed OK ...

Page 132: ...128 Electrical connection diagram 5 ...

Page 133: ...129 Electrical connection diagrams 5 ...

Page 134: ...130 List of electrical connection diagrams 5 ...

Page 135: ...y CN No Function X1 Core module I F X2 Core module I F X5 7in LCD I F X5_1 7in touch panel input X5_2 7in LCD backlight output X6_1 USB A connector 1 X6_2 USB A connector 2 X7 LAN X12 USB B connector X13 AUX X14 SD card X16 TP SW board I F X90 CONT board I F Other CN Reserved ...

Page 136: ...I F X5 7in LCD I F X5_1 7in touch panel input X5_2 10 4in touch panel input X5_3 7in LCD backlight output X5_4 10 4in LCD I F X6_1 USB A connector 1 X6_2 USB A connector 2 X7 LAN X12 USB B connector X13 AUX X14 SD card X16 TP SW board I F X90 CONT board I F OOtherther Other CN Reserved ...

Page 137: ...130c HCD81222 LCD CE MX 基板組 ...

Page 138: ...130d HCD8116 TP switch board ass y 3 82 7 32 7 387487 2487 ...

Page 139: ...0 5 2 5 877 2 35 6 2635 0 5 2 437 26 321 7 5 6 2635 29 57 5 3 2 2 5 13735 387487 6 5 43 27 5 387487 5327 387487 4 5 630 23 387487 5 877 2 630 23 387487 2 6 7 5 137 387487 2487 3 43 27 43 27 2 6 7 2 0 0 5 2 13735 387487 87487 3 5 7 13735 5 6685 337 13735 387487 5 877 2 13735 387487 13735 387487 ...

Page 140: ...130f HCJ8103 TC SENSER Circuit Board Ass y HCJ8105 TIMING Circuit Board Ass y 3 82 7 32 3 5 3 27 5 387487 387487 3 82 7 32 87 487 3 43 27 43 27 2 0 6 2635 ...

Page 141: ...ENS0R Circuit Board Ass y HCB8116 FRONT LED Circuit Board Ass y 3 82 7 32 43 5 6385 2487 HCJ8104 X limit sensor board ass y 3 82 7 32 2635 387487 3 82 7 32 2635 9 08 387487 2635 2487 2635 2487 2635 387487 2635 387487 ...

Page 142: ...machine program Version of Happylinf software About connecting PC etc You may prepare instruction book and parts book by customer Respond for customer s question Advice by Instruction book and Parts book Advice referencing maintenance manual If you can not immediate contact again after more detail check Ask customer s contact number Phone Fax and E mail OK If you find case of respond contact custo...

Page 143: ...y 3 1 Check and adjust the correct voltage 4 1 3 3 2 Try to replace power supply 4 Check of Cable catching causes short circuit 4 1 Please insulate the cable after removing outer cover 4 2 Replace of cable 5 Confirm not getting power supply from same outlet with other embroidery machine or other machines which contains motor 5 1 Preferably only 1 embroidery machine should be connected with 1 outle...

Page 144: ...machine program Version of Happylinf software About connecting PC etc You may prepare instruction book and parts book by customer Respond for customer s question Advice by Instruction book and Parts book Advice referencing maintenance manual If you can not immediate contact again after more detail check Ask customer s contact number Phone Fax and E mail OK If you find case of respond contact custo...

Page 145: ...ly 3 1 Check and adjust the correct voltage 4 1 3 3 2 Try to replace power supply 4 Check of Cable catching causes short circuit 4 1 Please insulate the cable after removing outer cover 4 2 Replace of cable 5 Confirm not getting power supply from same outlet with other embroidery machine or other machines which contains motor 5 1 Preferably only 1 embroidery machine should be connected with 1 outl...

Page 146: ...heck cable of TC 12 Board is unconnected 5 No problem in thread guide unit and thread tension ass y 3 1 1 5 1 Remove burr and scratch if appeared 5 2 Remove lints and clean 6 Does disc on thread tension ass y turn smoothly 3 1 1 6 1 Remove lints and clean 6 2 Replace 7 Is backlash between take up lever and take up crank roller not bigger 7 1 Replace of take up lever 3 3 9 8 No problem in needle ho...

Page 147: ...e it 15 No problem in bobbin 15 1 Remove scratch iron bobbin 15 2 If distorted replace it 16 Is needle bar spring not broken 16 1 Replace it 3 3 7 17 Does needle bar make smooth movement 17 1 If bent replace it 3 3 7 18 No backlash in moving head 18 1 Adjust positioning roller shaft 3 3 2 19 Needle doesn t drop in the center of needle hole 19 1 Adjust positioning plate and adjust needle drop back ...

Page 148: ... by pattern adjustment 2 1 Adjust size so as to produce less thread break 2 2 Use pattern edited again density_ change 3 Is thread tension properly set 3 1 Upper thread Considering sewing finish set tension 8 1 3 2 Bobbin thread Considering upper thread tension set tension 4 5 5 Is bobbin put in bobbin case properly 5 1 Viewing from front of bobbin case set so that bobbin turns left wise 4 5 6 Doe...

Page 149: ...e thread with knot or uneven size 3 Is thread properly wound aginst cone 3 1 Use thread to be wound smoothly 4 Isn t tip of cone warped or isn t thread caught in scratch 4 1 Remove warp and scratch 5 Don t use thread left for a long period inferior thread 5 1 Don t buy thread more than you use 5 2 Tell not to store thread for a long period 5 3 Tell how to store direct sunshine humidity dust etc 6 ...

Page 150: ...e embroidery machine to proper place Pattern 1 Does thread break occur repeatedly at same place in design 1 1 Check pattern to modify punching 2 Is it too narrow between stitches 2 1 Check pattern to modify punching 2 2 Setting of create menu Stitch sweep 10 3 3 Too many empty stitches 3 1 Make create setting this setting doesn t read empty stitches 10 3 Others 1 Using spray paste adhesive materia...

Page 151: ...ve shaft 3 6 8 6 1 Check no loosening of screw on moving knife 6 2 Check no loosening of screw on knife drive shaft 7 No backlash in fixed knife 3 6 8 7 1 Check no loosening of screw on fixed knife 8 Does thread cut pulse motor work properly 8 1 Check cable 8 2 If trouble found in CONT J board ass y replace 8 3 If trouble found in thread cut pulse motor replace 9 Is number of revolution proper at ...

Page 152: ...othly 13 1 Readjust if it is not smooth 3 6 12 Operator 1 No negligence in cleaning thread cut device 23 2 1 1 Tell to clean regularly It s desirable to prepare brush with soft hair and air gun 2 Is timing of thread tension proper 2 1 Upper thread Considering sewing finish set tension 8 1 2 2 Bobbin thread Considering upper thread tension set tension 4 5 Environment 1 Are power and voltage rated a...

Page 153: ... roller shaft to remove backlash back and forth 3 3 2 8 Is height of pressure foot proper 8 1 Adjust as specified 3 2 10 9 No problem in motion of pulse motor for X Y carriage 9 1 Check wiring If screw got loosened tighten more 9 2 After 9 1 still problem then replace 10 No problem in motion of CONT J board ass y 10 1 Check wiring If screw got loosened tighten more 10 2 After 10 1 still problem th...

Page 154: ... 2 Use transformer 2 3 Use stabilizer 3 Is there no place where noise is generated near the machine 3 1 Don t use the machine near where noise is generated 4 Doesn t drive frame hit obstacle 2 5 4 1 Remove obstacle 4 2 When useing cap frame see not to hit table 2 6 Thread 1 Not using shrinkable cloth 4 3 cloth 1 1 Use backing paper consider number of sheets to use 2 Isn t breakable cloth is used b...

Page 155: ...obbin thread holder 5 No error in thread cut 2 threads cut 5 2 Position moving knife as specified 3 6 9 5 3 Check and polish burr or scratch on moving knife 5 4 In case moving knife is in trouble replace 3 6 6 6 Are clearance between needle and rotary point and needle height are proper 6 1 Adjust clearance between needle and rotary hook as specified 3 5 1 6 2 Adjust needle depth 3 3 6 7 Doesn t th...

Page 156: ...guide surely 4 Is bobbin thread properly wound 4 4 4 5 4 2 Pull out bobbin thread to check if it comes out smoothly 5 Is upper thread properly passed 4 6 4 7 5 1 Pass properly again 6 Does thread cone stand properly 4 6 6 1 Keep thread from hitting felt 6 2 Stand vertically 7 Is create properly set 15 1 7 1 Select longer setting of upper thread length 7 3 Select start lock stitch effective Thread ...

Page 157: ...ape in order 3 2 Replacement of magic tape 3 3 14 4 Doesn t thread catch hook cut upper thread 4 1 Polish burr on hook 4 2 In case hook is in trouble replace Operator 1 Setting of thread tension is weak 4 5 8 1 1 1 Strengthen so as not to cause trouble in sewing rhythm 2 Is create properly set 15 1 2 1 Select length of upper thread standard Thread 1 Using hard cloth make thread difficult to go thr...

Page 158: ... Adjust position of Photo interrupter on Thread catcher Operator 1 No thread is passed through detecting roller 1 1 Pass thread properly 4 7 2 Is thread tension proper 2 1 Observing sewing rhythm adjust thread tension properly 4 5 8 1 3 Is proper detection sensitivity of thread cut selected 5 1 3 1 Select detection sensitivity according to sewing condition of thread and cloth etc Environment 1 Is ...

Page 159: ...C 7 board not detected Operator 1 Is thread tension proper slow detected 1 1 Observing sewing rhythm adjust to proper thread tension 4 5 8 1 Adjust it little bits stronger 2 Is proper detecting sensitivity of thread cut selected 15 1 2 1 In case of being not detected make thread cut detection setting to yes 2 2 Select detection sensitivity of thread cut according to sewing condition of thread and ...

Page 160: ... B by sand paper 5 2 Replace of pressure foot block ass y and link ass y 3 2 13 6 Effect by breakage of parts 6 1 Repair broken place 7 No damage in electric parts 7 1 Replace of CONT J board ass y 7 2 Replace of Timing Board 8 Trouble of software in LCD CE U board ass y 25 1 8 1 Initialize then make automatic speed setting 25 2 5 3 2 9 Trouble in control of number of revolution 25 2 9 1 Make auto...

Page 161: ...022 2 1 Remove seized lint or waste 3 Effect by breakage of parts 3 1 Repair broken place Operator 1 Check Stopper of Moving Head is removed 1 1 Remove Stopper Uncontrollable Mechanical 1 No problem in sensor circuit board Move 1 1 Clean dust attached to sensor E 024 1 2 Replace sensor circuit board 4 2 1 E 025 2 Needle number is not exactly recognized 3 1 Check position of Photo interrupter on Ne...

Page 162: ...Hook 2 Check position of Thread catcher is proper 2 1 Adjust 3 2 18 3 Check position of Thread holder is proper 3 1 Adjust 3 3 13 4 Check Thread catcher 4 1 Check cable is securely connected 4 2 Replace Pulse Motor with trouble 5 Check CONT J board ass y 5 1 Replace CONT J board ass y Hook hits or Mechanical 1 Check Hook is bent or not catches Needle 1 1 Repair bent Hook E 193 1 2 Replace Hook 2 C...

Page 163: ...other or not foot movement 1 1 Adjust installment position of thread catch holder 3 3 13 1 2 In case pressure foot is fixed at an angle fix it vertically again 2 Defect of censor circuit board for Pressure foot 2 1 Replace of censor circuit board Abnormal noise Mechanical 1 By defect of cover installation Pressure foot drive Carriage etc 2 1 Take care of insert condition clearance etc and fix agai...

Page 164: ...ce of LCD 4 1 1 2 Inadequate condition of cable insertion 2 1 Insert to the back firmly 3 Check whether LCD CE U board ass y is out of order or not 3 1 Replace of LCD CE U board ass y 4 1 1 Defect of data Mechanical 1 Check whether cable USB or LAN is insert firmly between PC and Machine communication 1 1 Insert again E 90 2 Check whether PC has problem or not E 91 2 1 Affirm whether there is prob...

Page 165: ...T board does not match for the installed data of Machine setting When only control box has been exchanged open the menu of 4 4 4 5 Setup Machine setting and just close without any amendment When CONT board has been exchanged follow the procedure of 4 4 4 7 Machine Setting Navigation after exchanging CONT board Installed frame drive data in the machine does not match Check setting contents of Machi...

Page 166: ...position of needle regular position selection unit 2 Fix needle selection related mechanical trouble 3 Replace sensor circuit board 4 2 3 021 Needle move Suspension of needle selection motor 1 Turn needle selection cam by hand to set to 022 in mid way regular position Trouble in take up lever hinders 2 Fix needle selection related and take up lever Trouble in sensor circuit board related troubles ...

Page 167: ... went beyond limits in X direction 1 Move drive frame back to limits with move key 061 Y limit Drive frame went beyond limits in Y direction 2 Correct pattern size and setting contents 090 Miss reception Error occurred when transmitting data Let the machine read pattern data from first 5 4 5 6 091 No send Data is not put in for over 10 seconds Let the machine read data from first 5 4 5 6 103 Data ...

Page 168: ...ven change the battery 130 Card error Incapable of disposing of USB memory 1 Turn off power source once and turn it on again continuously 2 USB Memory reading processor may defective Replace the circuit board 131 Card no ready USB Memory is not set Check if USB memory is properly set 5 5 133 Bad card USB Memory is not proper or broken 1 USB Memory might be not readable with the machine 5 5 Prepare...

Page 169: ... for Timing Adjustment value Take up lever timing 10 degrees Rotary hook timing 25 degrees Needle height 5 degrees Main shaft timing L LED2 light out at 0 degrees C LED1 light on at 265 282 degrees Carriage X 200g Y 300g Timing belt Motor belt 320 330 g ...

Page 170: ...156 Use TAJIMA made tubular frame 7 4 2 ...

Page 171: ...2019 12 HappyJapan Inc 9 5 TAITO 2 CHOME TAITO KU TOKYO JAPAN TEL 81 3 3834 0711 FAX 81 3 3835 8917 ...

Reviews: