12
13
FINAL INSTALLATION
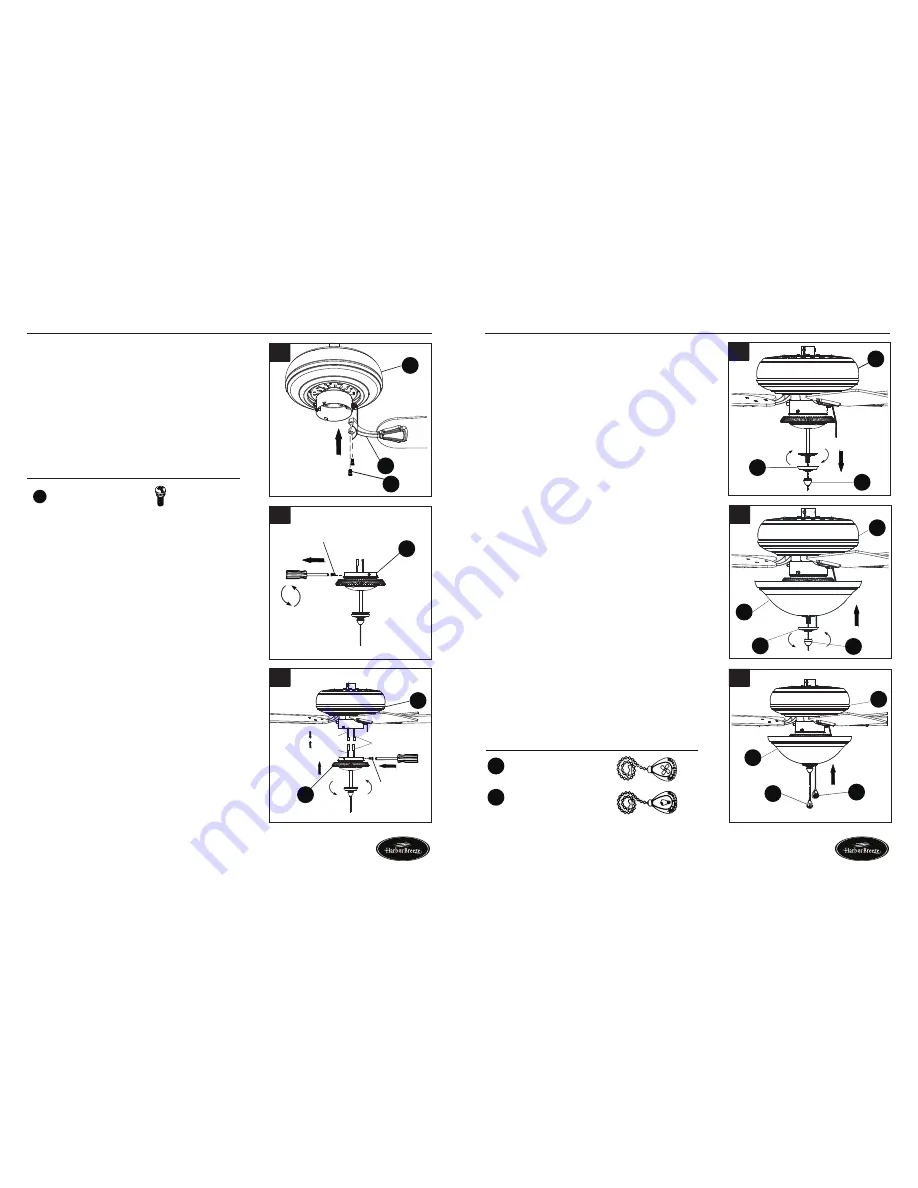
5. Align the post of blade bracket (F) to the slot on the
bottom of the motor housing assembly (E). Secure
each blade bracket (F) using 2 blade bracket
screws (EE).
Repeat this step for the remaining blade
assemblies.
8.
Remove the preassembled finial (K) and glass cap
(J) from the light kit (H).
9. Place glass (I) on the preassembled pipe on the
light kit (H) until it is flush with the preassembled
metal disk. Thread light kit pull chain and fan pull
chain through center hole on glass (I). Secure
with previously removed glass cap (J) and finial
(K). Tighten securely.
FINAL INSTALLATION
7. Connect the adapter plug of the
BLUE
wire from
the fan to the adapter plug of the
BLACK
wire from
the light kit (H) and connect the adapter plug of
the
WHITE
wire from the fan to the adapter plug
of the
WHITE
wire from the light kit (H). Align the
two loosened screws in the switch cover of the light
kit (H) with the keyholes in the switch box on the
bottom of the motor housing assembly (E). Push up
to engage the keyholes in the switch box then twist
to lock in place. Immediately tighten the two screws
firmly, then re-install the remaining screw previously
removed to fully secure the light kit (H) to the bottom
of the motor housing assembly (E).
6.
To install the fan WITH the light kit (H)
, loosen
two of the three preassembled screws in the switch
cover of the light kit (H). Remove and save the
remaining preassembled screw.
EE
Blade Bracket Screw x 10
Hardware Used
H
B
FF
5
H
B
FF
6
7
8
9
F
E
EE
Screw
H
E
H
Screw
White
Black
Blue
E
K
J
E
I
J
K
10
10. Attach fan pull chain extension (BB) and light pull
chain extension (CC).
Assembly is now complete.
Light Pull Chain Extension
x
BB
CC
1
x
1
Fan Pull Chain Extension
BB
CC
E
I
Hardware Used
To install this fan
WITH
the light kit (H), continue
to step 6. To install the fan
WITHOUT
the light
kit, skip to step 11.
Lowes.com/harborbreeze
Lowes.com/harborbreeze
Page 12


