background image

30

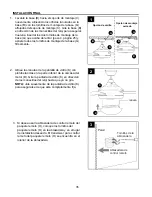
MONTAJE DEL VENTILADOR EN ESTILO DE VARILLA

 4. 

 2. 

 3. 

Introduzca la varilla (A) a través de la base (B) 
y la cubierta de la horquilla (E). Pase los conductores 
desde la carcasa del motor (D) a través de la varilla (A). 

Dependiendo del largo de la varilla que utilice, es 
posible que necesite cortar los cables conductores 
para simplificar el cableado. Si decide cortar los 
cables conductores, se sugiere hacerlo de la 
siguiente manera:

Sujete los cables conductores y asegúrese de 
jalarlos completamente a través de la parte superior 
de la varilla. Comience en la parte SUPERIOR de 
la bola para colgar en la varilla y mida 20,32 cm de 
cable conductor y corte el exceso de cable con las 
pinzas cortacables (no se incluyen). 

NOTA:

 Si 

no

 va a cortar los cables conductores, los 

pasos 4 y 5 no son necesarios y puede proceder 
con el paso 6 en su lugar

.

Deslice la varilla (A) en la horquilla, alinee 
los orificios y vuelva a instalar el pasador (L) 
y el sujetador (M). Apriete los tornillos de ajuste 
y luego las tuercas. Deslice la cubierta de la 
horquilla (E) hacia abajo hasta que quede sobre la 
carcasa del motor (D). 

2

A

B

E

Tornillo 

de ajuste 

y tuerca

3

A

M

L

E

D

Bola para 

colgar

20,32 cm

4

Summary of Contents for 0923049

Page 1: ...G FAN Español p 21 MODEL TG44LW3D1RS TG44OSB3D1RC ATTACH YOUR RECEIPT HERE Purchase Date Questions problems missing parts Before returning to your retailer call our customer service department at 1 800 527 1292 8 30 a m 5 p m CST Monday Friday 1 ...

Page 2: ...ntents 6 Preparation 6 Initial Installation 6 Downrod Style Fan Mounting 9 Closemount Style Fan Mounting 11 Wiring 13 Final Installation 15 Operating Instructions 16 Care and Maintenance 18 Troubleshooting 19 Limited Lifetime Warranty 20 TABLE OF CONTENTS ...

Page 3: ...energy and if not installed and used in accordance with the instructions may cause harmful interference to radio communications However there is no guarantee that interference will not occur in a particular installation If this equipment does cause harmful interference to radio or television reception which can be determined by turning the equipment off and on the user is encouraged to try to corr...

Page 4: ...es consult an electrician for the proper size wire connectors to use To reduce the risk of fire or electrical shock do not use the fan with any solid state speed control device or control fan speed with a full range dimmer switch To reduce the risk of fire electrical shock or personal injury do not bend the blades when installing or balancing them or cleaning the fan Do not insert objects between ...

Page 5: ...opy Mounting Screw 4 preassembled H Motor Screw 6 preassembled I Lock Washer preassembled 6 J Blade 3 DESCRIPTION PART QUANTITY IMPORTANT REMINDER You must use the parts provided with this fan for proper installation and safety DESCRIPTION PART QUANTITY K Glass Shade 1 L Pin preassembled 1 M Clip preassembled 1 N Remote Control Receiver 1 O Remote Pack 1 O N ...

Page 6: ...ols Required for Assembly not included Electrical Tape Phillips Screwdriver Pliers Safety Glasses Stepladder and Wire Strippers Helpful Tools not included AC Tester Light Tape Measure Do It Yourself Wiring Handbook and Wire Cutters PREPARATION Fiber Blade Washer Qty 9 1 extra CC Blade Screw Qty 9 1 extra Wire Connector Qty 4 AA BB CC INITIAL INSTALLATION ON OFF ON OFF 1 Turn off circuit breakers a...

Page 7: ...cluded Angle style mounting is best suited for angled or vaulted ceilings A longer downrod is sometimes necessary to ensure proper blade clearance Closemount mounting is more suitable for ceilings lower than 8 ft high Check to make sure blades J will be at least 30 in from any obstruction and at least 7 ft above the floor 3 4 Temporarily raise canopy B to mounting bracket C and determine which 2 c...

Page 8: ...h holes in blade arm located inside of motor Attach blade J with 3 blade screws AA and fiber washers BB Repeat for remaining blades J Note Make sure to completely secure each blade J before proceeding to the next 6 7 Reattach top plate and yoke plate to motor housing D with lock washers I and motor screws H previously removed in Step 5 Hardware Used Blade Screw x 9 AA Fiber Blade Washer x 9 BB 5 t...

Page 9: ...TANT If using the angle mount make sure open end of mounting bracket C is installed facing the higher point of the ceiling and ensure the ceiling angle is not steeper than 19 8 For DOWNROD STYLE FAN MOUNTING proceed to step 1 below For CLOSEMOUNT STYLE FAN MOUNTING skip to page 11 Remove pin L and clip M from downrod A Partially loosen preassembled set screws and nuts in yoke at top of motor housi...

Page 10: ... manner Take the lead wires and make sure you have pulled them all the way through the top of the downrod Start at the TOP of the hanging ball on the downrod and measure 8 in of lead wire and then cut the excess wire off with wire cutters not included NOTE If you do not cut back the lead wires Steps 4 and 5 are not necessary and you may proceed to Step 6 instead E Slip downrod A into yoke align ho...

Page 11: ...s in Step 4 strip 1 2 in of insulation from end of each wire WHITE BLACK GREEN and BLUE Twist stripped ends of each strand of wire within the insulation with pliers not included Install hanging ball of downrod A into opening of mounting bracket C Align one of the slots in hanging ball with the tab in mounting bracket C DANGER Failure to align slot in hanging ball with the tab in mounting bracket C...

Page 12: ...B D Remove every other motor screw H and lock washer I from top of motor housing D 2 Pull wires up through hole in the middle of the canopy B Align larger holes in canopy B with 3 screws in top of motor housing D Attach canopy B to motor housing D using the three motor screws H and lock washers I previously removed H I 2 D D H I Tab C 4 B Non Slotted ...

Page 13: ...nections for remote control operation as detailed below and in the figure For each wire connection use one of the wire connectors CC making sure to screw wire connector CC on in a clockwise direction CAUTION Assistance from another person is recommended for this step Connect all GROUND GREEN wires from fan on downrod A if applicable and mounting bracket C to BARE GREEN supply wire from ceiling Con...

Page 14: ...or x 4 CC 3 Gently slide remote control receiver N flat side up into mounting bracket C Turn spliced taped wires upward and gently push wires and wire connectors CC into outlet box Let antenna from remote control receiver N hang to the side NOTE The remote control included with this fan meets the following requirements a Not for use with solid state fans b Electrical rating 120V 60 Hz motor amps 1...

Page 15: ...ion Closemount Option 2 Align slots on glass shade K with protrusions on underside of motor housing D Turn glass shade K clockwise until it no longer turns NOTE Pull down gently on the glass shade K to make sure it is secured completely 3 Remote Control Bracket Wall 3 If you wish to use the remote control bracket from remote pack O install screws from remote pack O through bracket and into the des...

Page 16: ...er is encouraged to try to correct the interference by one or more of the following measures Reorient or relocate the receiving antenna Increase the separation between the equipment and receiver Connect the equipment into an outlet on a circuit different from that to which the receiver is connected Consult the dealer or an experienced radio TV technician for help Remove battery cover from back of ...

Page 17: ...r fan MEDIUM speed 1 button for fan LOW speed 0 button to turn fan OFF button to turn light ON or OFF Tap button quickly to turn lights off or on Hold button down to increase or decrease lights If you press button in excess of 0 7 seconds it becomes a dimmer The lights vary cyclically in 8 seconds The light button has an auto resume function which keeps the light at the same brightness as the last...

Page 18: ...ng the reverse switch in the RIGHT position will result in upward airflow that can help move stagnant hot air off the ceiling area At least twice each year lower canopy B to check downrod A assembly and then tighten all screws on fan Clean motor housing D with only a soft brush or lint free cloth to avoid scratching the finish Clean blades J with a lint free cloth You may occasionally apply a ligh...

Page 19: ... an approved speed control device 4 Allow fan a break in period of a few days especially when running the fan at Medium and High speeds Excessive wobbling 1 Blades are loose 2 Unbalanced blades 3 Fan not securely mounted 4 Fan too close to vaulted ceiling 5 Set screw s on motor housing yoke is are not tightened properly 1 Tighten all blade screws 2 Switch one blade with a blade from the opposite s...

Page 20: ...warranty does not cover changes in brass finish rusting pitting tarnishing corroding or peeling Brass finish fans maintain their beauty when protected from varying weather conditions Any glass provided with this fan is not covered by the warranty Any replacement of defective parts for the ceiling fan must be reported within the first year from the date of purchase For the balance of the warranty c...

Page 21: ...TE SU RECIBO AQUÍ Fecha de compra Preguntas problemas piezas faltantes Antes de volver a la tienda llame a nuestro Departamento de Servicio al Cliente al 1 800 527 1292 de lunes a viernes de 8 30 a m a 5 p m hora estándar del Centro 21 MODELO TG44LW3D1RS TG44OSB3D1RC ...

Page 22: ...reparación 26 Instalación inicial 26 Montaje del ventilador en estilo de varilla 29 Montaje del ventilador en estilo cerrado 31 Cableado 33 Instalación final 35 Instrucciones de funcionamiento 36 Cuidado y mantenimiento 38 Solución de problemas 39 Garantía limitada de por vida 40 ...

Page 23: ...tilador incluidas las aspas Las modificaciones que no estén aprobadas por la parte responsable del cumplimiento podrían anular la autorización del usuario para utilizar el equipo NOTA este equipo ha sido probado y se ha verificado que cumple con los límites para un dispositivo digital clase B conforme a la sección 15 de las reglas de la FCC Estos límites se han diseñado para proporcionar una prote...

Page 24: ...cuál es el tamaño adecuado de los conectores de cables que debe utilizar Para reducir el riesgo de incendios o descargas eléctricas no use el ventilador con dispositivos de control de velocidad para ventiladores de estado sólido ni controle la velocidad del ventilador con un regulador de intensidad de rango completo Para reducir el riesgo de incendio descarga eléctrica o lesiones personales no dob...

Page 25: ... 1 E Cubierta de la horquilla 1 F Kit de iluminación LED 1 preensamblado G Tornillo de montaje de la base 4 preensamblado H Tornillo del motor 6 preensamblado I Arandela de seguridad 6 preensamblada J Aspa 3 DESCRIPCIÓN PIEZA CANTIDAD K A D B F C M L J I E O H G N K Pantalla de vidrio 1 L Pasador preensamblado 1 M Sujetador preensamblado 1 N Receptor del control remoto 1 O Paquete remoto 1 DESCRIP...

Page 26: ...no se incluyen Cinta aislante destornillador Phillips pinzas gafas de seguridad escalera de tijera y pinzas pelacables Herramientas útiles no se incluyen Luz de prueba CA cinta métrica manual de cableado Hágalo usted mismo y pinzas cortacables PREPARACIÓN Arandela para aspa de fibra Cant 9 1 adicional CC Tornillo para aspa Cant 9 1 adicional Conector de cables Cant 4 AA BB CC INSTALACIÓN INICIAL O...

Page 27: ...montaje en ángulo es el mejor para los techos en ángulo o de bóveda En ocasiones es necesaria una varilla más larga para asegurar una adecuada separación de las aspas El estilo de montaje cerrado es más adecuado para los techos de menos de 2 44 m de alto Compruebe que las aspas J estén al menos a 76 2 cm de cualquier obstáculo y al menos a 2 13 m sobre el piso 3 4 Temporalmente suba la base B hast...

Page 28: ...las aspas J con los 3 tornillos para aspa AA y arandelas para aspa BB Repita para el resto de las aspas J Nota Asegúrese de fijar completamente cada aspa J antes de proceder con la siguiente 6 7 Vuelva a fijar la placa superior de la carcasa del motor y la placa de la horquilla a la carcasa del motor D con las arandelas de seguridad I y los tornillos del motor H que retiró previamente en el paso 5...

Page 29: ...el soporte de montaje C esté instalado en dirección hacia el punto más alto del techo y asegúrese de que el ángulo del techo no sea superior a 19º 8 Para realizar el MONTAJE DEL VENTILADOR EN ESTILO DE VARILLA proceda al paso 1 descrito a continuación Para realizar el MONTAJE DEL VENTILADOR EN ESTILO CERRADO siga a la página 31 Retire el pasador L y el sujetador M de la varilla A Afloje parcialmen...

Page 30: ...letamente a través de la parte superior de la varilla Comience en la parte SUPERIOR de la bola para colgar en la varilla y mida 20 32 cm de cable conductor y corte el exceso de cable con las pinzas cortacables no se incluyen NOTA Si no va a cortar los cables conductores los pasos 4 y 5 no son necesarios y puede proceder con el paso 6 en su lugar Deslice la varilla A en la horquilla alinee los orif...

Page 31: ...miento del extremo de cada cable BLANCO NEGRO VERDE Y AZUL Tuerza los extremos pelados de cada filamento de cable dentro del aislamiento con pinzas no se incluyen Instale la bola para colgar en la varilla A en la abertura del soporte de montaje C Alinee una de las ranuras en la bola para colgar con la lengüeta del soporte de montaje C PELIGRO Si no alinea la ranura de la bola para colgar con la le...

Page 32: ...e la carcasa del motor D 2 Pase los cables hacia arriba a través del orificio en el centro de la base B Alinee los orificios grandes de la base B con los 3 tornillos en la parte superior de la carcasa del motor D Fije la base B a la carcasa del motor D con los tres tornillos del motor H y las arandelas de seguridad I retiradas anteriormente D 3 B D 2 D D H I Lengüeta H I C 4 B Sin ranura MONTAJE D...

Page 33: ...onamiento del control remoto de acuerdo con el dibujo que se detalla a continuación Para cada conexión de cables utilice uno de los conectores de cables CC y asegúrese de atornillar el conector de cables CC en dirección de las manecillas del reloj PRECAUCIÓN Para este paso se recomienda solicitar ayuda a otra persona Conecte juntos todos los conductores de PUESTA A TIERRA VERDES si corresponde des...

Page 34: ...nte el receptor del control remoto N con el lado plano hacia arriba en el soporte de montaje C Gire los cables empalmados o cubiertos con cinta hacia arriba y empuje suavemente los cables y los conectores de cables CC hacia dentro de la caja de salida Deje que la antena del receptor del control remoto N cuelgue por el costado NOTA El control remoto que se incluye con este ventilador cumple los sig...

Page 35: ...antalla de vidrio K con protuberancias en la parte inferior de la carcasa del motor D Gire la pantalla de vidrio K en dirección de las manecillas del reloj hasta que ya no gire NOTA Jale suavemente de la pantalla de vidrio K para asegurarse de que esté completamente fija ranura K D 1 B G D G D B Opción de varilla Opción de montaje cerrado Si desea usar la abrazadera de control remoto del paquete r...

Page 36: ...suario que intente corregir la interferencia con una o más de las siguientes medidas Reoriente o reubique la antena de recepción Aumente la separación entre el equipo y el receptor Conecte el equipo a un tomacorriente de un circuito distinto al que usa el receptor Solicite ayuda al distribuidor o a un técnico con experiencia en radio TV Retire la cubierta de la batería desde la parte posterior del...

Page 37: ...otón 2 para la velocidad MEDIA del ventilador botón 1 para la velocidad BAJA del ventilador botón 0 para APAGAR el ventilador botón para ENCENDER o APAGAR la luz Toque rápidamente el botón para encender o apagar la luz Presione el botón hacia abajo para aumentar o disminuir la luz Si presiona el botón durante más de 0 7 segundos se convierte en un regulador Las luces varían de manera cíclica en 8 ...

Page 38: ...r de reversa en la posición a la DERECHA creará un flujo de aire ascendente que puede ayudar a mover el aire caliente estancado fuera del área del techo Al menos dos veces al año baje la base B para revisar el ensamble de la varilla A y luego apriete todos los tornillos en el ventilador Limpie la carcasa del motor D solo con un cepillo suave o un paño que no produzca pelusas para evitar rayar el a...

Page 39: ...1 Apriete todos los tornillos de las aspas 2 Reemplace el aspa 3 Reemplace por un dispositivo de control de velocidad autorizado 4 Permita que el ventilador tenga un período de asentamiento de un par de días especialmente al encender el ventilador a velocidades media y alta Hay un tambaleo excesivo 1 Las aspas están flojas 2 Las aspas no están equilibradas 3 El ventilador no está bien colocado 4 E...

Page 40: ...mbios en el acabado de latón el óxido las picaduras el deslustre la corrosión o el descascarado Los ventiladores con acabado de latón mantienen su belleza cuando se los protege de las condiciones climáticas cambiantes La garantía no cubre los elementos de vidrio incluidos con este ventilador Cualquier reemplazo de piezas defectuosas para el ventilador de techo debe informarse dentro del primer año...

Reviews: