background image

GASKIN CEILING FAN

ITEM #2889555

MODEL 

#

GAT24MBK6LOD

Questions, problems, missing parts?

 Before returning to your retailer, call our customer 

service department at 

1-888-251-1003

, 8 a.m. - 8 p.m., EST, Monday - Sunday. You could 

also contact us at partsplus@lowes.com or visit www.lowespartsplus.com

Purchase Date

1

Español p. 16

ATTACH YOUR RECEIPT HERE

ADJUNTE SU RECIBO AQUÍ

Harbor Breeze® and logo design are 
trademarks or registered trademarks 
of LF, LLC. All Rights Reserved.

JS20025

4007498

APPROVED FOR USE IN

WET LOCATIONS

Summary of Contents for 2889555

Page 1: ...at 1 888 251 1003 8 a m 8 p m EST Monday Sunday You could also contact us at partsplus lowes com or visit www lowespartsplus com Purchase Date 1 Espa ol p 16 ATTACH YOUR RECEIPT HERE ADJUNTE SU RECIBO...

Page 2: ...ng the equipment off and on the user is encouraged to try to correct the interference by one or more of the following measures Reorient or relocate the receiving antenna Increase the separation betwee...

Page 3: ...personal injury and the danger of electrical shock or fire Secure the eye bolt directly to the building structure The eye bolt and its support must be able to support the moving weight of the fan at...

Page 4: ...ug If it still does not fit contact a qualified electrician NEVER use with an extension cord unless the plug can be fully inserted DO NOT alter the plug To reduce the risk of personal injury use only...

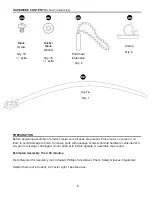
Page 5: ...1 C Yoke Cover 1 D LED Light Kit 1 E Blade 6 F Switch Housing 1 G Shade 1 H Pin preassembled 1 DESCRIPTION PART QUANTITY PACKAGE CONTENTS 5 C K DESCRIPTION PART QUANTITY I Clip preassembled 1 J Blade...

Page 6: ...ware contents list If any part is missing or damaged do not attempt to install operate or assemble the product Estimated Assembly Time 60 minutes Tools Required for Assembly not included Phillips Scre...

Page 7: ...Block Remove pin H and clip I from downrod A Partially loosen preassembled set screws and nut in motor housing yoke at top of motor housing B 2a 2a H I 2b A Set Screw Sideview B Yoke 2b 3 Insert downr...

Page 8: ...mp x 6 DD 5 Clip downrod A to secured eye bolt Check the length of the power cord from the outlet to the fan do NOT plug in the fan Using the zip tie EE secure power cord slack to the side of the down...

Page 9: ...J Attach blade arms J to the bottom of motor housing B with motor screws lock washers M previously removed Step 1 page 6 Tighten motor screws lock washers M securely NOTE Make sure to completely secu...

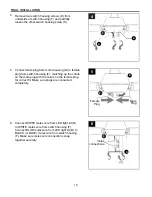
Page 10: ...HITE molex wire from switch housing F Connect BLUE molex wire from LED light kit D to BLACK or BLUE molex wire from switch housing F Make sure molex wire connections snap together securely 6 F 5 Conne...

Page 11: ...all three switch housing screws K securely 7 3 7 K Align slots on shade G with protrusions on the inside of the switch housing F Turn shade G to the right clockwise until it no longer turns NOTE Pull...

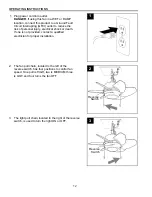
Page 12: ...fan speed One pull is HIGH two is MEDIUM three is LOW and four turns the fan OFF 2 2 Reverse Switch Plug power cord into outlet DANGER If using this fan in a WET or DAMP location connect this product...

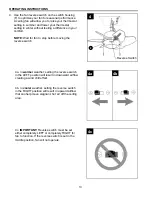
Page 13: ...oving the reverse switch 4 Reverse Switch F 4 4a 4b 4a In warmer weather setting the reverse switch in the LEFT position will result in downward airflow creating a wind chill effect 4b In cooler weath...

Page 14: ...nning the fan at Medium and High speeds Excessive wobbling 1 Blades are loose 2 Blade arms incorrectly attached 3 Unbalanced blades 4 Fan not securely mounted 5 Fan too close to vaulted ceiling 6 Set...

Page 15: ...iling fan must be reported within the first year from the date of purchase For the balance of the warranty call our customer service department at 1 888 251 1003 for return authorization and shipping...

Reviews: