background image

7

Lowes.com/harborbreeze

ASSEMBLY INSTRUCTIONS

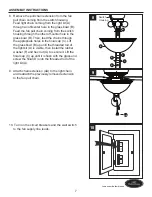
8.  Remove the pull chain extension from the fan 

pull chain coming from the switch housing. 

Feed light chain coming from the light kit (A) 

through an off-center hole in the glass bowl (B). 

Feed the fan pull chain coming from the switch 

housing through the other off-center hole in the 

glass bowl (B). Then, feed the chains through 

the appropriate holes in the finial cap (C). Lift 

the glass bowl (B) up until the threaded rod of 

the light kit (A) is visible, then install the rubber 

washer (F) and hex nut (G) to secure it. Lift the 

finial cap (C) up until it is flush with the glass and 

screw the finial (D) onto the threaded rod of the 

light kit (A). 

9.  Attach chain extension (AA) to the light chain 

and reattach the previously removed extension 

to the fan pull chain.

10.  Turn on the circuit breakers and the wall switch 

to the fan supply line leads.

H

arbor Breez

e

H

arbor Breez

e

8

9

Switch 

Housing

A

B

F

G

C

D

AA

10

Summary of Contents for 41182

Page 1: ...department at 1 800 643 0067 8 a m 6 p m EST Monday Thursday 8 a m 5 p m EST Friday ATTACH YOUR RECEIPT HERE Serial Number ____________ Purchase Date ____________ EB15503 Harbor Breeze is a registere...

Page 2: ...b 3 F Rubber Washer preassembled to Light Kit Fitter A 1 G Nut preassembled to Light Kit Fitter A 1 H Hex Nut preassembled to Light Kit Fitter A 1 I Lock Washer preassembled to Light Kit Fitter A 1 AA...

Page 3: ...yone coming in contact with the fixture will receive electrical shock which could cause serious injury or death DO NOT damage or cut the wire insulation covering during installation of the fixture DO...

Page 4: ...fire PREPARATION Before beginning the assembly of this product ensure all parts are present Compare all parts with the package contents list and hardware contents list If any part is missing or damage...

Page 5: ...tton Plug Button Switch Housing Cap Switch Housing Cap Switch Housing Cap Switch Housing Screw Switch Housing Screw H H A A I I 4 Remove the hex nut H and lock washer I from the rod on the top of the...

Page 6: ...ng cap with the reverse switch 7 Install bulbs E Switch Housing Switch Housing Cap Switch Housing Cap Switch Housing Screw A A 5 Use the wire connectors BB to connect the fan wires with the wires in t...

Page 7: ...he appropriate holes in the finial cap C Lift the glass bowl B up until the threaded rod of the light kit A is visible then install the rubber washer F and hex nut G to secure it Lift the finial cap C...

Page 8: ...not allow exclusions of limitations on an implied warranty the above exclusion and limitation may not apply This warranty gives you specific rights and you may also have other rights which may vary f...

Reviews: