FAN ALIGNMENT AND HANGER BRACKET INSTALLATION (Continued)
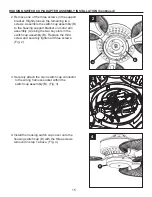
2. To begin mounting the hanger bracket (C), drill
a 1/4 in. pilot hole through the center of the
junction box, into the ceiling joist or structural
member, independent of the junction box.
Loosely attach the hanger bracket (C) to the
ceiling structure using the long lag bolt (HH)
and flat washer (EE). Do not fully tighten the
long lag bolt (HH) yet. Hanger bracket (C)
should be free to rotate. (Fig. 2)
Hardware Used
GG
x 1
EE
JJ
x 1
x 1
Steel
Washer
Ceiling
Support Cable
Hardware Used
HH
x 1
Long Lag
Bolt
EE
x 1
Steel
Washer
1. To attach ceiling support cable (JJ), drill a
1/4 in. pilot hole, located independently from
the junction box (not included), into the ceiling
joist or structural member. Securely attach the
ceiling support cable (JJ) with the short lag
bolt (GG) and steel washer (EE). (Fig. 1)
WARNING
Failure to follow these hanger bracket
installation procedures may result in
damage to hanger bracket.
NOTE: Ceiling support cable must be fastened in
the ceiling joists with 2 in. lag bolt.
JJ
EE
GG
1
NOTE: No lubrication to be used on screw. Pilot
hole for lag screw to be no larger than 1/4 in
diameter. Screw must have at least 1-1/2 in of
thread engagement into structure joist.
2
C
EE
HH
1½ in.
Minimum
Short Lag
Bolt
10


