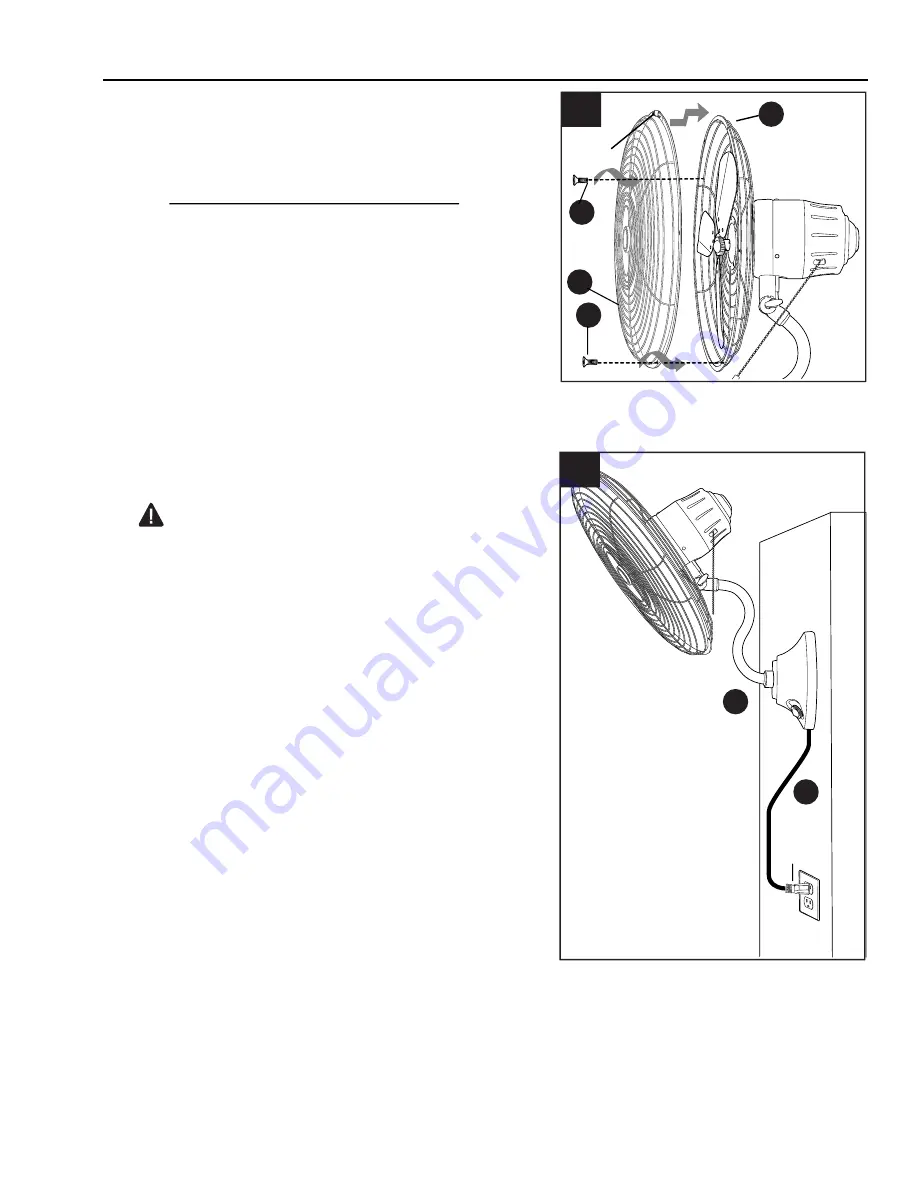
background image

Plug

Insert power cord (J) preassembled on fan 
assembly (A) into proper wall outlet.

       WARNING: 

The power cord is equipped 

with a three-prong grounded plug that must 
be inserted into a matching receptacle. Under 
no circumstances must the grounding prong 
be cut off the plug. Where a two-prong wall 
receptacle is encountered, it must be 
replaced with a properly grounded 

three

-prong receptacle installed in 

accordance with the National Electrical Code 
and all applicable local codes and 
ordinances.This work must be done only by a 
qualified electrician, using copper wire only.


C

13

Hook

H

E

Remove all six front cage screws (H) from edge of 
back cage (E). 

Place hook at top of front cage (C) over edge at top 
of back cage (E). 

NOTE

: Make sure hook engages  

and all front and back cage holes match up; this will 
allow the front cage (C) and the back cage (E) to 
hang together while you re-insert the front cage 
screws (H) into the the front and back cage holes.

Insert front cage screws (H) into both holes at top of 
front cage (C), then tighten. Insert remaining front 
cage screws (H). Tighten front cage screws (H), 
alternating from one side of front cage (C) to the 
other until all front cage screws (H) are completely 
secured.

 13. 

A

10

H

ASSEMBLY INSTRUCTIONS

 14. 

14

J

Summary of Contents for MARINA COVE II

Page 1: ...JP18TI3 ATTACH YOUR RECEIPT HERE Purchase Date RR20391 Espa ol p 14 MARINA COVE II Questions problems missing parts Before returning to your retailer call our customer service department at 1 888 251...

Page 2: ...rical Code and ANSI NFPA 70 1999 Hire a qualified electrician or consult a do it yourself wiring handbook if you are unfamiliar with installing electrical wiring Make sure the installation site you ch...

Page 3: ...electrical shock the fan should be installed where it will be out of reach of children The fan is NOT a toy DO NOT play with the fan or allow anyone else to play with the fan To reduce the risk of per...

Page 4: ...sembly 1 B Wall Mounting Bracket 1 C Front Cage 1 D Blade Assembly 1 E Back Cage 1 F Blade Assembly Nut 1 preassembled G Back Cage Screw 3 preassembled DESCRIPTION PART QUANTITY DESCRIPTION PART QUANT...

Page 5: ...der Helpful Tools not included Level Pencil Do It Yourself and Wiring Handbook DANGER Make sure the wall mounting bracket is securely attached to the building structure and can support the full weight...

Page 6: ...he blade CAUTION If you are going to attach the fan assembly A to a wood stud or wood post the stud or wood post must be wide enough and thick enough to sustain the wall mounting bracket B and the wei...

Page 7: ...the wall and able to support the fan assembly A you are now ready to hang the fan assembly A Grab the fan assembly A firmly with two hands Align the four slots in the middle of the back of the fan ass...

Page 8: ...ack cage E to secure back cage E to motor on fan assembly A 9 9 7 7 G ASSEMBLY INSTRUCTIONS Align the three holes on the outer edge of the motor on fan assembly A with the three holes in the center of...

Page 9: ...secure 12 9 D F 12 Motor ASSEMBLY INSTRUCTIONS Partially loosen preassembled set screw on blade assembly D Place blade assembly D over motor shaft and lock pin making sure to align gap on the blade a...

Page 10: ...nly by a qualified electrician using copper wire only C 13 Hook H E Remove all six front cage screws H from edge of back cage E Place hook at top of front cage C over edge at top of back cage E NOTE M...

Page 11: ...fan to MEDIUM M Three turns will set the fan to LOW L OPERATING INSTRUCTIONS 1 2 2 2 2 1 A Test the oscillation function with the preassembled pull chain I Pull the chain I to start and stop If fan d...

Page 12: ...ure 2 Remove front cage screws and tighten blade assembly set screw securely Plug Fuse Cover The three prong plug is installed with a fuse L that is a vital safety device A filament inside the fuse L...

Page 13: ...climatic conditions this warranty does not cover changes in brass finish rusting pitting tarnishing corroding or peeling Brass finish fans maintain their beauty when protected from varying weather con...

Reviews: