background image

6

7

ASSEMBLY INSTRUCTIONS

ASSEMBLY INSTRUCTIONS

1

4

5

3

6

2

A

B

A

outlet box

E

clip

pin

E

C

B

D

E

H

pin

clip

set screw

tab

slot

A

E


Outlet box

Clip

Pin

Clip

Tab

Slot

Set screw

Pin

Lowes.com/harborbreeze

Lowes.com/harborbreeze

ON

ON / OFF

switch

NO Variable

speed wall

control

NO Dimmer

switch

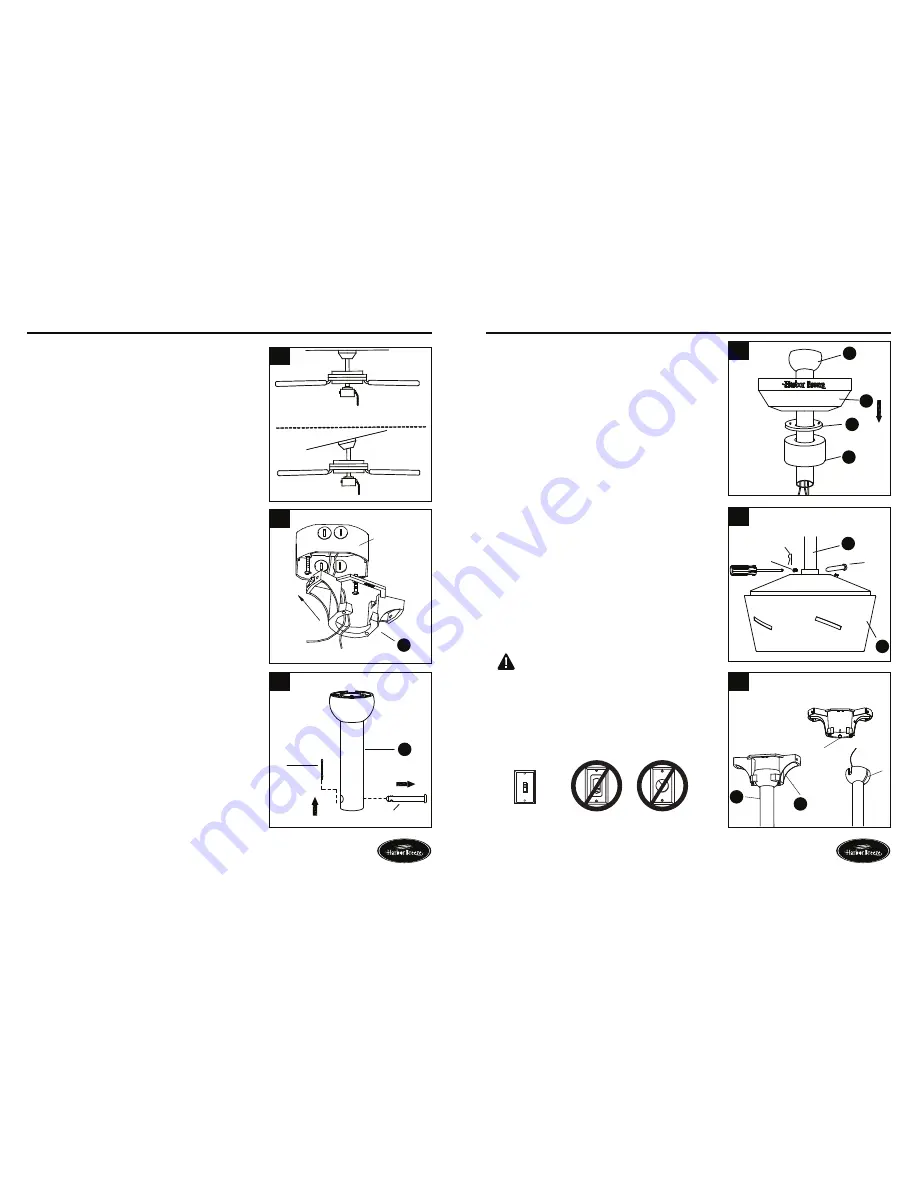
1.  Determine mounting method.

  A-Downrod Mount (standard or angled ceiling)

  B-Angle Mount (standard ceiling only)


IMPORTANT:

 If angle mounting, check to make 

sure the ceiling angle is not steeper than 20˚. 

2.  Install mounting bracket (A) to outlet box (not included) 

by sliding mounting bracket (A) over the two outlet box 

screws (not included). Securely tighten two outlet box 

screws. 


IMPORTANT:

 If angle mounting, make sure open end 

of mounting bracket (A) is installed facing the ceiling. 

3.  Remove preassembled pin and clip from downrod (E). 

Save for later use.

4.  Insert downrod (E) through canopy (B), canopy cover (C), 

and yoke cover (D). Thread wires from fan motor 

assembly through downrod (E).

5.  Loosen preassembled set screws from yoke on fan motor 

assembly (H). Slip downrod (E) into housing yoke, 

aligning holes on both parts. Insert previously removed 

pin through holes on yoke and downrod (E), then insert 

previously removed clip into pin until it snaps into place. 

Tighten set screws. 

6.  Install hanger ball on top of downrod (E) into mounting 

bracket (A) opening. Rotate fan until slot on hanger ball 

engages the tab on mounting bracket (A).


DANGER:

  Be careful when aligning tab to 

slot. If not fully engaged, the fan could fall, which 

could result in serious injury or death.

IMPORTANT: 

Do NOT use this fan with a dimmer switch 

or variable speed wall control. Using a dimmer switch or 

variable speed wall control will damage the fan.   

Summary of Contents for SARATOGA 00798

Page 1: ...e Harbor Breeze is a registered trademark of LF LLC All Rights Reserved Questions problems missing parts Before returning to your retailer call our customer service department at 1 800 643 0067 8 a m...

Page 2: ...nce received including interference that may cause undesired operation When using an existing outlet box be sure the box is securely attached to the building structure and can support the full weight...

Page 3: ...AA Wire Connector Qty 4 Blade Screw Qty 16 Blade Arm Screw Qty 11 Decorative Screw Qty 15 Lowes com harborbreeze Lowes com harborbreeze 5 PREPARATION Estimated Assembly Time 45 minutes Before beginnin...

Page 4: ...led facing the ceiling 3 Remove preassembled pin and clip from downrod E Save for later use 4 Insert downrod E through canopy B canopy cover C and yoke cover D Thread wires from fan motor assembly thr...

Page 5: ...r wiring 8 Twist wire ends together and screw wire connectors AA on in a clockwise direction Tape wire connectors AA and wires together with electrical tape not included Note Wires should be spread ap...

Page 6: ...acket below fan motor assembly H 15 Place the fitter plate I over two screws and turn clockwise until it locks Install previously removed screw Step 13 page 10 and securely tighten all screws 16 Loose...

Page 7: ...he battery from the remote pack M into the remote ensure polarity of battery matches the polarity indicated in the battery compartment positive to positive and negative to negative Replace the battery...

Page 8: ...ns will turn the fan off automatically after a 2 hour 4 hour or 8 hour duration Turn the fan on at the desired speed Tap 2H 4H or 8H key The fan will turn off automatically after desired time has expi...

Page 9: ...factory for lifetime limited from the date of purchase This warranty applies only to the original purchaser The manufacturer agrees to correct such defect at no charge or at our option replace the cei...

Reviews: