background image

2

Safety Information ................................................................................................................. 2

Package Contents ................................................................................................................  4              

Hardware Contents ........................................................................................................................... 5

Preparation ........................................................................................................................... 5

Initial Installation ................................................................................................................... 5

Downrod-Style Fan Mounting ............................................................................................... 8

Closemount-Style Fan Mounting ..........................................................................................10

Wiring ...................................................................................................................................12

Final Installation .................................................................................................................. 14

Operating Instructions ......................................................................................................... 15

Care and Maintenance ........................................................................................................ 17

Troubleshooting .................................................................................................................. 18

Limited Lifetime Warranty ................................................................................................... 19

Replacement Parts List ....................................................................................................... 19
 

TABLE OF CONTENTS

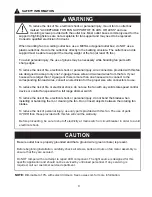
SAFETY INFORMATION

READ AND SAVE THESE INSTRUCTIONS

• Do not discard fan carton or foam inserts. Should this fan need to be returned to the factory for 

repairs, it must be shipped in its original packaging to ensure proper protection against damage 
that might exceed the initial cause for return.

• Make sure all electrical connections comply with local codes, ordinances, the National Electrical 

Code and ANSI/NFPA 70-1999. Hire a qualified electrician or consult a do-it-yourself wiring 
handbook if you are unfamiliar with installing electrical wiring.

 • Make sure the installation site you choose allows a minimum clearance of 7 ft. from the blades to 

the floor and at least 30 in. from the end of the blades to any obstruction.

•  After you install the fan, make sure all connections are secure to prevent the fan from falling.
•  The net weight of this fan is: 14.74 lbs.

Summary of Contents for TG44BNK3D1RC

Page 1: ...RE Serial Number Purchase Date Questions problems missing parts Before returning to your retailer call our customer service department at 1 800 643 0067 8 a m 6 p m EST Monday Thursday 8 a m 5 p m EST...

Page 2: ...t must be shipped in its original packaging to ensure proper protection against damage that might exceed the initial cause for return Make sure all electrical connections comply with local codes ordin...

Page 3: ...ponding fan lead wires consult an electrician for the proper size wire connectors to use To reduce the risk of fire or electrical shock do not use the fan with any solid state speed control device or...

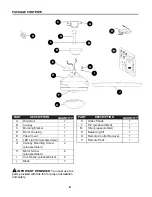
Page 4: ...ting Screw 4 preassembled H Motor Screw 6 preassembled I Lock Washer preassembled 6 J Blade 3 DESCRIPTION PART QUANTITY DESCRIPTION PART QUANTITY K Glass Shade 1 L Pin preassembled 1 M Clip preassembl...

Page 5: ...ls Required for Assembly not included Electrical Tape Phillips Screwdriver Pliers Safety Glasses Stepladder and Wire Strippers Helpful Tools not included AC Tester Light Tape Measure Do It Yourself Wi...

Page 6: ...luded Angle style mounting is best suited for angled or vaulted ceilings A longer downrod is sometimes necessary to ensure proper blade clearance Closemount mounting is more suitable for ceilings lowe...

Page 7: ...holes in blade arm located inside of motor Attach blade J with 3 blade screws AA and fiber washers BB Repeat for remaining blades J Note Make sure to completely secure each blade J before proceeding...

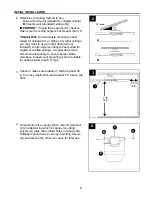
Page 8: ...ANT If using the angle mount make sure open end of mounting bracket C is installed facing the higher point of the ceiling and ensure the ceiling angle is not steeper than 19 8 For DOWNROD STYLE FAN MO...

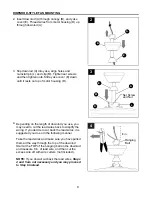
Page 9: ...anner Take the lead wires and make sure you have pulled them all the way through the top of the downrod Start at the TOP of the hanging ball on the downrod and measure 8 in of lead wire and then cut t...

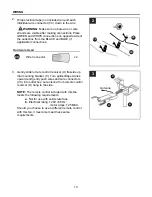
Page 10: ...in Step 4 strip 1 2 in of insulation from end of each wire WHITE BLACK GREEN and BLUE Twist stripped ends of each strand of wire within the insulation with pliers not included Install hanging ball of...

Page 11: ...D Remove every other motor screw H and lock washer I from top of motor housing D 2 Pull wires up through hole in the middle of the canopy B Align larger holes in canopy B with 3 screws in top of moto...

Page 12: ...ections for remote control operation as detailed below and in the figure For each wire connection use one of the wire connectors CC making sure to screw wire connector CC on in a clockwise direction C...

Page 13: ...r x 4 CC 3 Gently slide remote control receiver O flat side up into mounting bracket C Turn spliced taped wires upward and gently push wires and wire connectors CC into outlet box Let antenna from rem...

Page 14: ...on Closemount Option 2 Align slots on glass shade K with protrusions on underside of motor housing D Turn glass shade K clockwise until it no longer turns NOTE Pull down gently on the glass shade K to...

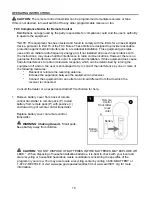
Page 15: ...ned by turning the equipment off and on the user is encouraged to try to correct the interference by one or more of the following measures Reorient or relocate the receiving antenna Increase the separ...

Page 16: ...fan MEDIUM speed 1 button for fan LOW speed 0 button to turn fan OFF button to turn light ON or OFF Tap button quickly to turn lights off or on Hold button down to increase or decrease lights If you...

Page 17: ...g the reverse switch in the RIGHT position will result in upward airflow that can help move stagnant hot air off the ceiling area At least twice each year lower canopy B to check downrod A assembly an...

Page 18: ...speed control device 4 Allow fan a break in period of a few days especially when running the fan at Medium and High speeds Excessive wobbling 1 Blades are loose 2 Unbalanced blades 3 Fan not securely...

Page 19: ...e warranty Any service performed by an unauthorized person will render the warranty invalid Due to varying climatic conditions this warranty does not cover changes in brass finish rusting pitting tarn...

Reviews: