background image

4

Lowes.com/harborbreeze

HARDWARE CONTENTS

AA

BB

CC

DD

EE

FF

Blade Screw

Qty. 15 plus 1 

extra

Fiber Blade 

Washer

Qty. 15 plus 1 

extra

Wire 

Connector

Qty. 4

Downrod Pin 

(preassembled 

to Downrod 

(A))

Qty. 1

 Downrod Clip

(preassembled 

to Downrod 

(A))

Qty. 1

Canopy  

Mounting 

Screw

(preassembled 

to Canopy (B))

Qty. 4

GG

HH

II

JJ

KK


Switch 

Housing Screw 

(preassembled 

to Switch 

Housing (F)) 

Qty. 3  

Motor Housing 

Set Screw 

(preassembled 

to Motor 

Housing (E))

Qty. 2

Closemount 

Screw 

Qty. 3 + 1 

Extra

Fitter Plate 

Screw 

(preassembled 

to Switch 

Housing (F)) 

Qty. 3

 Pull Chain Extension 

Qty. 2

Summary of Contents for URBANIA

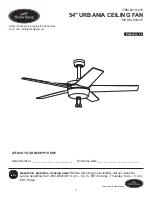
Page 1: ...to your retailer call our customer service department at 1 800 643 0067 8 a m 6 p m EST Monday Thursday 8 a m 5 p m EST Friday 1 ATTACH YOUR RECEIPT HERE Serial Number _________________________ Purch...

Page 2: ...tents 4 Safety Information 5 Preparation 6 Initial Installation 7 Standard or Angle Mounting Instructions 9 Closemount Instructions 12 Wiring 13 Final Installation 16 Operating Instructions 22 Care an...

Page 3: ...1 B Canopy 1 C Mounting Bracket 1 D Yoke Cover 1 E Motor Housing 1 F Switch Housing 1 G Blade 5 H Light Kit Fitter 1 I Bulb 3 J Canopy Cover preassembled to Canopy B 1 K Finial 1 L Finial Plate 1 M G...

Page 4: ...led to Downrod A Qty 1 Downrod Clip preassembled to Downrod A Qty 1 Canopy Mounting Screw preassembled to Canopy B Qty 4 GG HH II JJ KK Switch Housing Screw preassembled to Switch Housing F Qty 3 Moto...

Page 5: ...se a full range dimmer switch to control the fan speed WARNING To reduce the risk of fire electric shock or personal injury mount the fan to an out let box marked ACCEPTABLE FOR FAN SUPPORT and use th...

Page 6: ...at all parts are present Compare all parts with the package contents list and hardware contents list If any part is missing or damaged do not attempt to assemble the product After opening the top of t...

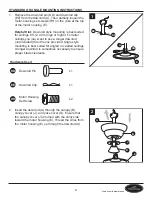
Page 7: ...serious injury or death 1 2 Determine the mounting methods to use Note Flushmount installation is not available for this item Important If using the angle mount check to ensure the ceiling angle is n...

Page 8: ...ws spring washers and flat washers provided with the outlet box Note Remove the mounting bracket C from the canopy B before installing the bracket to the outlet box Important If using the angle mount...

Page 9: ...t to use a longer downrod not included than the one provided Angle style mounting is best suited for angled or vaulted ceilings A longer downrod is sometimes necessary to ensure proper blade clearance...

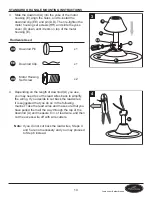
Page 10: ...E x 1 HH Motor Housing Set Screw HH x 2 D A EE E 3 HH DD 4 Depending on the length of downrod A you use you may need to cut the lead wires back to simplify the wiring If you decide to cut back the lea...

Page 11: ...the insulation with pliers Repeat this step for black blue if applicable and green wires 5 6 Install the ball end of the downrod A into the mounting bracket C opening Align the slot in the ball with...

Page 12: ...od hanging ball and canopy cover are not used in this type of installation 1 J B 2 Align the canopy B with the holes in the top of the motor housing E Secure the canopy B to the top of the motor housi...

Page 13: ...Blue wires from the fan to the Black wire from the ceiling Connect the White wire from the fan to the White wire from the ceiling Connect all Ground Green wires together from the fan to the Bare Gree...

Page 14: ...all Ground Green wires together from the fan to the Bare Green wire from the ceiling Secure all wiring connections together with wire connectors CC Note The Black wire is hot power for the fan The Bl...

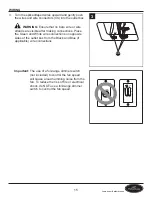
Page 15: ...making connections Place the Green and White wire connections on opposite sides of the outlet box from the Black and Blue if applicable wire connections CC 3 Important The use of a full range dimmer...

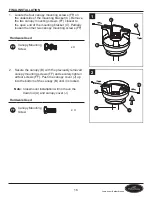
Page 16: ...y loosen the other two canopy mounting screws FF Hardware Used FF Canopy Mounting Screw FF x 4 B C FF 1 2 Secure the canopy B with the previously removed canopy mounting screws FF and securely tighten...

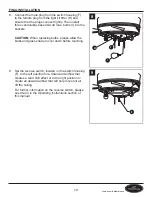
Page 17: ...ime Saver Fiber blade washers BB can be set on each blade screw AA prior to installing the blades G Hardware Used AA Blade Screw AA x 15 BB Fiber Blade Washer BB x 15 3 E AA G BB 4 Remove the three sw...

Page 18: ...crews JJ on the underside of the switch housing F rim Remove the fitter plate screw JJ with a red dot and save it for later use Partially loosen the other two fitter plate screws JJ Hardware Used JJ F...

Page 19: ...AUTION When replacing bulbs please allow the bulbs and glass shade to cool down before touching F H I 8 9 Set the reverse switch located on the switch housing F to the left position for a downward air...

Page 20: ...n remove the switch housing F and check that the 9 wire plugs inside the switch housing F are connected properly Replace the switch housing F per the instructions in Steps 4 and 5 and continue with St...

Page 21: ...ch the pull chain extensions KK to the pull chains on the fan When facing the fan the pull chain on the left operates the fan and the pull chain on the right operates the light Note This fan is remote...

Page 22: ...fan for seasonal performance A ceiling fan will allow you to raise your thermostat setting in summer and lower your thermostat setting in winter without feeling a difference in your comfort Note Wait...

Page 23: ...LEFT or completely RIGHT for the fan to function properly If the reverse switch is set in the middle position the fan will not operate 3C CARE AND MAINTENANCE At least twice each year lower the canopy...

Page 24: ...eck that the 9 wire plugs in the switch housing are connected properly The fan is noisy 1 The blades are loose 2 There is a cracked blade 3 The wall control is not compatible with the fan 4 The break...

Page 25: ...inst the outlet box 4 Use a longer downrod or move the fan to another location 5 Tighten the yoke set screw s securely 6 Carefully loosen and lower the canopy and verify that the set screw on the hang...

Page 26: ...alid Due to varying climate conditions this warranty does not cover any changes in brass finish including rusting pitting corroding tarnishing or peeling Brass finishes of this type give their longest...

Page 27: ...cement parts call the customer service department at 1 800 643 0067 8 a m 6 p m EST Monday Thursday 8 a m 5 p m EST Friday PART DESCRIPTION PART DESCRIPTION A Downrod H Light Kit Fitter B Canopy J Can...

Page 28: ...o de Servicio al Cliente al 1 800 643 0067 de lunes a jueves de 8 a m a 6 p m y los viernes de 8 a m a 5 p m hora est ndar del Este 28 ADJUNTE SU RECIBO AQU N mero de serie ________________________ Fe...

Page 29: ...ad 32 Preparaci n 33 Instalaci n inicial 34 Instrucciones est ndares y de montaje en ngulo 36 Instrucciones para montaje cerrado 39 Cableado 40 Instalaci n final 43 Instrucciones de funcionamiento 49...

Page 30: ...ierta de la horquilla 1 E Carcasa del motor 1 F Carcasa del interruptor 1 G Aspa 5 H Soporte del kit de iluminaci n 1 i Bombilla 3 j Cubierta de la base preensamblada en la base B 1 k Remate 1 l Placa...

Page 31: ...samblado en la varilla A Cant 1 Tornillo de montaje de la base preen samblado en la base B Cant 4 GG HH II JJ KK Tornillo de la carcasa del interruptor preen samblado en la carcasa del interruptor F...

Page 32: ...para controlar la velocidad del ventilador ADVERTENCIA Para reducir el riesgo de incendios descargas el ctricas o lesiones personales instale el ventilador en una caja de salida marcada como APTA PAR...

Page 33: ...ese de tener todas las piezas Compare todas las piezas con la lista del contenido del paquete y con la lista de aditamentos No intente ensamblar el producto si falta alguna pieza o si estas est n da a...

Page 34: ...s graves o la muerte 1 2 Determine los m todos de instalaci n que utilizar Nota La instalaci n de montaje al ras no est disponible para este art culo Importante Si realiza el montaje en ngulo verifiqu...

Page 35: ...e y las arandelas planas que se proporcionan con la caja de salida Nota Retire la abrazadera de montaje C de la base B antes de instalar la abrazadera en la caja de salida Importante Si realiza el mon...

Page 36: ...a m s larga no incluida que la provista El montaje en ngulo es mejor para los techos en ngulo o de b veda En ocasiones es necesaria una varilla m s larga para asegurar una adecuada separaci n de las a...

Page 37: ...1 EE Sujetador de la varilla EE x 1 HH Tornillo de ajuste de la carcasa del motor HH x 2 D A EE E 3 HH DD 4 Dependiendo del largo de la varilla A que utilice es posible que necesite cortar los cables...

Page 38: ...iento con pinzas Repita este paso para los cables negro azul si corresponde y verde 5 6 Instale el extremo con la bola de la varilla A en la abertura de la abrazadera de montaje C Alinee la ranura de...

Page 39: ...ta de la base no se utilizan en este tipo de instalaci n 1 J B 2 Alinee la base B con los orificios de la parte superior de la carcasa del motor E Fije la base B a la parte superior de la carcasa del...

Page 40: ...ma de cableado adecuado PRECAUCI N Aseg rese de que la caja de salida cuente con la puesta a tierra adecuada o de que haya un conductor verde o desnudo de puesta a tierra De las tres opciones que se m...

Page 41: ...NTILADOR Y LUZ CONTROLADOS POR DOS INTERRUPTORES DE PARED Para controlar el ventilador y la luz con interruptores de pared separados conecte el cable negro del ventilador al cable negro del interrupto...

Page 42: ...udos ni filamentos de cables visibles despu s de realizar las conexiones Coloque las conexiones de cables verde y blanco en el lado opuesto de la caja de salida con respecto a las conexiones de cables...

Page 43: ...tornillos de montaje de la base FF Aditamentos utilizados FF Tornillo de montaje de la base FF x 4 B C FF 1 2 Asegure la base B con los tornillos de montaje de la base FF que retir anteriormente y apr...

Page 44: ...ibra BB se pueden fijar en cada tornillo del aspa AA antes de instalar las aspas G Aditamentos utilizados AA Tornillo para aspa AA x 15 BB Arandela para aspa de fibra BB x 15 3 E AA G BB 4 Quite los t...

Page 45: ...rde de la carcasa del interruptor F Quite el tornillo de la placa de soporte JJ que posee un punto rojo y gu rdelo para utilizarlo luego Afloje parcialmente los otros dos tornillos de soporte JJ Adita...

Page 46: ...billas deje que estas y las pantallas de vidrio se enfr en antes de tocarlas F H I 8 9 Coloque el interruptor de reversa ubicado en la carcasa del interruptor F en la posici n izquierda para conseguir...

Page 47: ...go retire la carcasa del interruptor F y verifique que los enchufes de 9 cables dentro de la carcasa del interruptor F est n conectados apropiadamente Reemplace la carcasa del interruptor F de acuerdo...

Page 48: ...cadena de tiro KK a las cadenas de tiro del ventilador Al mirar al ventilador podr ver que la cadena de tiro de la izquierda es para el ventilador y la de la derecha es para la l mpara Nota Este vent...

Page 49: ...de la pantalla de vidrio M para optimizar el rendimiento del ventilador seg n la estaci n del a o Un ventilador de techo le permitir elevar la configuraci n de su termostato en verano y disminuirla en...

Page 50: ...completamente en la posici n RIGHT DERECHA para que el ventilador funcione correctamente Si el interruptor de reversa se configura en la posici n del medio el ventilador no funcionar 3C Cuidado y mant...

Page 51: ...ifique que los enchufes de 9 cables de la carcasa del interruptor est n bien conectados El ventilador hace ruido 1 Las aspas est n sueltas 2 Hay una aspa partida 3 El control de pared no es compatible...

Page 52: ...dor a otra ubicaci n 5 Apriete firmemente los tornillos de ajuste de la horquilla 6 Afloje y baje cuidadosamente la base y verifique que el tornillo de ajuste de la bola para colgar est bien apretado...

Page 53: ...arant a Debido a las cambiantes condiciones clim ticas esta garant a no cubre cambios en el acabado de lat n incluidos la oxidaci n las picaduras la corrosi n el deslustre o el descascarado Los acabad...

Page 54: ...cio al Cliente al 1 800 643 0067 de lunes a jueves de 8 00 a m a 6 p m y los viernes de 8 a m a 5 p m hora est ndar del Este PIEZA DESCRIPCI N PIEZA DESCRIPCI N A Varilla H Soporte del kit de iluminac...

Reviews: