background image

Page 5

For technical questions, please call 1-800-444-3353.

Item 60239

NOTICE

Clean the Spray Gun IMMEDIATELY after use. 

Delayed or inadequate cleaning will permanently clog the Spray Gun.

SAFETY

Op

ERA

TION

M

AINTENANCE

SETU

p

5.  Industrial applications must 

follow OSHA requirements.

6.  Spraying hazardous materials may 

result in serious injury or death.  

Do not spray pesticide, acid, corrosive 

material, fertilizer, or toxic chemicals.

7.  Paints and solvents may be harmful or fatal if 

swallowed or inhaled.  Avoid prolonged skin 

contact with solvents or paints as they will 

irritate skin.  After any contact, immediately 

wash off exposed area with hot, soapy water.

8.  Attach all accessories properly to the 

tool before connecting the air supply.  

A loose accessory may detach 

or break during operation.

9.  Install an in-line shutoff valve 

to allow immediate control over 

the air supply in an emergency, 

even if a hose is ruptured.

10. Air hose fittings may get hot during use.  

Allow fittings to cool before disconnecting.

11. WARNING:  Some dust created by power 

sanding, sawing, grinding, drilling, and 

other construction activities, contains 

chemicals known [to the State of California] 

to cause cancer, birth defects or other 

reproductive harm.   

Some examples of these chemicals are: 

•  Lead from lead-based paints 

•  Crystalline silica from bricks and cement or 

other masonry products 

•  Arsenic and chromium from 

chemically treated lumber 

Your risk from these exposures varies, 

depending on how often you do this type 

of work.  To reduce your exposure to these 

chemicals: work in a well ventilated area, and 

work with approved safety equipment, such as 

those dust masks that are specially designed 

to filter out microscopic particles.   

(California Health & Safety Code 

§ 25249.5, 

et seq.

)

WARNING:  The brass components of 

this product contain lead, a chemical 

known to the State of California to cause 

birth defects (or other reproductive harm).  

(California Health & Safety Code 

§ 25249.5, 

et seq.

)

Specifications

Item

Detail Gun

Large Gun

Air Pressure Range

25 – 40 PSI

30 – 40 PSI

Maximum Air Pressure

40 PSI

Air Consumption

9 CFM @ 40 PSI

12 CFM @ 40 PSI

Cup Capacity

4.2 fl. oz.

20 fl. oz.

Air Inlet

1/4"–18 NPS

Summary of Contents for 60239

Page 1: ......

Page 2: ...ious injury Indicates a hazardous situation which if not avoided could result in minor or moderate injury Addresses practices not related to personal injury IMPORTANT SAFETY INSTRUCTIONS INSTRUCTIONS PERTAINING TO A RISK OF FIRE ELECTRIC SHOCK OR INJURY TO PERSONS The warnings and precautions discussed in this manual cannot cover all possible conditions and situations that may occur It must be und...

Page 3: ...ol Use the correct tool for the application The correct tool will do the job better and safer at the rate for which the tool is designed b Disconnect the tool from the air source before making any adjustments changing accessories or storing the tool Such preventive safety measures reduce the risk of starting the tool unintentionally Turn off and detach the air supply safely discharge any residual ...

Page 4: ...et per Minute flow SCFM Cubic Feet per Minute flow at standard conditions NPT National pipe thread tapered Symbol Property or Statement NPS National pipe thread straight WARNING marking concerning Risk of Eye Injury Wear ANSI approved eye protection WARNING marking concerning Risk of Respiratory Injury Wear NIOSH approved respirator WARNING marking concerning Risk of Explosion Specific Safety Inst...

Page 5: ... to cool before disconnecting 11 WARNING Some dust created by power sanding sawing grinding drilling and other construction activities contains chemicals known to the State of California to cause cancer birth defects or other reproductive harm Some examples of these chemicals are Lead from lead based paints Crystalline silica from bricks and cement or other masonry products Arsenic and chromium fr...

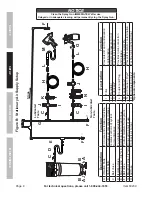
Page 6: ...valve and quick coupler for best service as shown on Figure A on page 7 and Figure B on page 8 An in line shutoff ball valve is an important safety device because it controls the air supply even if the air hose is ruptured The shutoff valve should be a ball valve because it can be closed quickly Note Do not use an automatic oiler system or add oil to airline The oil will contaminate the material b...

Page 7: ...airflow at tool Optional components 6 Adjust the air compressor s output regulator so that the air output is enough to properly power the tool but the output will not exceed the tool s maximum air pressure at any time Adjust the pressure gradually while checking the air output gauge to set the right pressure range 7 Inspect the air connections for leaks Repair any leaks found 8 If the tool will no...

Page 8: ...n place C Ball Valve Isolates sections of system for maintenance D Isolation Hose For vibration reduction E Main Air Line 3 4 min Distributes air to branch lines F Ball Valve To drain moisture from system G Branch Air Line 1 2 min Brings air to point of use H Air Hose Connects air to tool Description Function I Filter Prevents dirt and condensation contamination J Regulator Adjusts air pressure to...

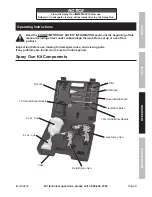
Page 9: ...TANT SAFETY INFORMATION section at the beginning of this manual including all text under subheadings therein before set up or use of this product Inspect tool before use looking for damaged loose and missing parts If any problems are found do not use tool until repaired Spray Gun Kit Components Filter Soft Brush Round Bristle Brush Flat Bristle Brush 1 8mm Additional Needle Large Spray Gun Detail ...

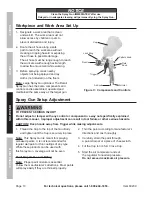
Page 10: ...luid Knob Pattern Knob Air Inlet Air Knob Cup Figure C Components and Controls Spray Gun Setup Adjustment TO PREVENT SERIOUS INJURY Do not adjust or tamper with any control or component in a way not specifically explained within this manual Improper adjustment can result in tool failure or other serious hazards CAUTION Keep hands away from Trigger while making adjustments 1 Thread the Cup to the t...

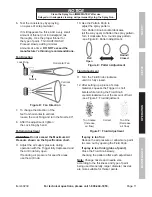
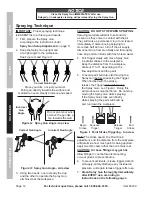
Page 11: ...re during operation with the Trigger fully depressed and the Air Knob fully open If reducing air pressure for specific areas use the Air Knob 10 Use the Pattern Knob to adjust the spray pattern Turn Pattern Knob counterclockwise all the way open to flatten the spray pattern Turn it clockwise for a round spray pattern see Figure E Pattern Adjustment Figure E Pattern Adjustment Flat Open Round Close...

Page 12: ...continuing spraying for more than half an hour turn off the air supply disconnect Cup from Gun Body and thoroughly rinse Cup and Gun Body with fresh clean water 4 Pull Trigger slowly and move Spray Gun in parallel strokes to the workpiece Keep the distance from the workpiece at about 6 to 9 depending on the flow adjustment and the paint 5 To avoid paint build up start moving the Spray Gun before s...

Page 13: ...ure in the tool before performing any inspection maintenance or cleaning procedures TO PREVENT SERIOUS INJURY FROM TOOL FAILURE Do not use damaged equipment If abnormal noise vibration or leaking air occurs have the problem corrected before further use Inspection Note These procedures are in addition to the regular checks and maintenance explained as part of the regular operation of the air operat...

Page 14: ...ith the solvent 2 Fill the Cup with solvent and spray it through the Spray Gun into a container while shaking the Spray Gun Once the Cup is empty repeat the process until the solvent comes out clean 3 Disconnect from the air source 4 After disconnecting point the Spray Gun into the spent solvent container and squeeze the Trigger again to make sure no air remains 5 Remove Nozzle and soak it in solv...

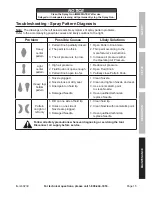
Page 15: ...cturer s instructions 3 Increase air pressure within the Operating Air Pressure Light center pattern 1 High air pressure 2 Fluid Knob not open enough 3 Pattern Knob open too far 1 Reduce air pressure 2 Open Fluid Knob 3 Partially close Pattern Knob Heavy top bottom pattern 1 Nozzle plugged 2 Nozzle loose or dirty seal 3 Dried paint on fluid tip 4 Damaged Needle 1 Clean Nozzle 2 Clean and tighten N...

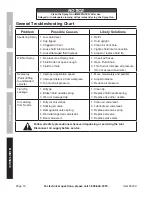
Page 16: ... Check air hoses 2 Open Fluid Knob 3 Thin fluid or increase air pressure Do not exceed maximum Overspray Paint drifting to unintended objects 1 Improper application speed 2 Improper distance from workpiece 3 Too much air pressure 1 Move moderately and parallel 2 Adjust distance 3 Reduce air pressure Fluid Tip Leakage 1 Dirty tip 2 Broken fluid needle spring 3 Worn or damaged tip 1 Clean tip 2 Repl...

Page 17: ...D OR DISTRIBUTOR HAS PROVIDED THE PARTS LIST AND ASSEMBLY DIAGRAM IN THIS MANUAL AS A REFERENCE TOOL ONLY NEITHER THE MANUFACTURER OR DISTRIBUTOR MAKES ANY REPRESENTATION OR WARRANTY OF ANY KIND TO THE BUYER THAT HE OR SHE IS QUALIFIED TO MAKE ANY REPAIRS TO THE PRODUCT OR THAT HE OR SHE IS QUALIFIED TO REPLACE ANY PARTS OF THE PRODUCT IN FACT THE MANUFACTURER AND OR DISTRIBUTOR EXPRESSLY STATES T...

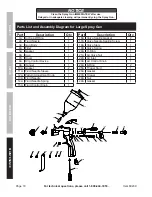
Page 18: ...Gasket 2 11A Fluid Needle Sleeve 1 12A Pattern Adjustment Knob 1 13A Fluid Needle 1 14A Fluid Needle Spring 1 15A Fluid Control Knob 1 Part Description Qty 16A Valve Sealing Gasket 2 17A Valve Needle Sealing Screw 1 18A Valve Stem 1 19A Valve Spring 1 20A O Ring 1 21A Air Valve Nut 1 22A Air Inlet 1 23A Air Control Knob 1 24A E Ring 2 25A Trigger Stud 1 26A Gasket 2 27A Trigger 1 28A Nut 1 29A Gas...

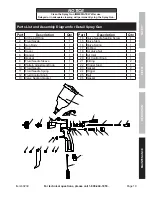
Page 19: ... 7 Gasket 2 8 Fluid Needle Sleeve 1 9 Pattern Adjustment Knob 1 10 Fluid Needle 1 11 Fluid Needle Spring 1 12 Fluid Control Knob 1 13 Valve Sealing Gasket 2 Part Description Qty 14 Valve Needle Sealing Screw 1 15 Valve Stem 1 16 Valve Spring 1 17 O Ring 1 18 Air Valve Nut 1 19 Air Inlet 1 20 Air Control Knob 1 21 E Ring 2 22 Trigger Stud 1 23 Gasket 2 24 Trigger 1 25 Nut 1 26 Gasket 1 Parts List a...

Page 20: ... the exclusion or limitation of incidental or consequential damages so the above limitation of exclusion may not apply to you THIS WARRANTY IS EXPRESSLY IN LIEU OF ALL OTHER WARRANTIES EXPRESS OR IMPLIED INCLUDING THE WARRANTIES OF MERCHANTABILITY AND FITNESS To take advantage of this warranty the product or part must be returned to us with transportation charges prepaid Proof of purchase date and...

Reviews: