background image

SKU 65003 

For technical questions, please call 1-800-444-3353. 

Page 8

Double insulated tools may be used 

2. 

in either of the 120 volt outlets shown 

in the preceding illustration.  

(See 

Outlets for 2-prong plug.)

Extension Cords

Grounded

1. 

 tools require a three wire 

extension cord.  

Double Insulated


tools can use either a two or three 

wire extension cord.
As the distance from the supply outlet 

2. 

increases, you must use a heavier 

gauge extension cord.  Using exten-

sion cords with inadequately sized 

wire causes a serious drop in voltage, 

resulting in loss of power and pos-

sible tool damage. 

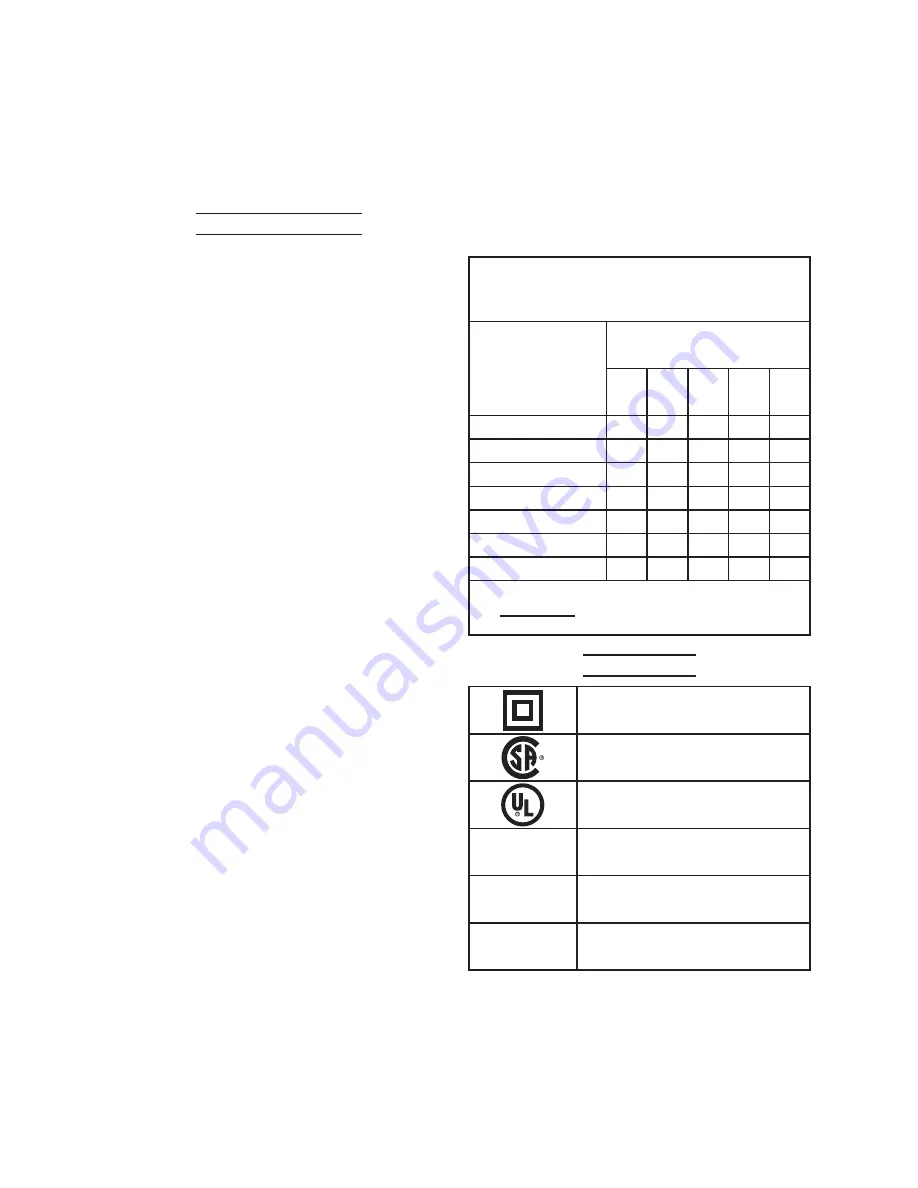
(See table a.)

The smaller the gauge number of the 

3. 

wire, the greater the capacity of the 

cord.  For example, a 14 gauge cord 

can carry a higher current than a 16 

gauge cord.  

(See table a.)

When using more than one exten-

4. 

sion cord to make up the total length, 

make sure each cord contains at 

least the minimum wire size required.  

(See table a.)

If you are using one extension cord 

5. 

for more than one tool, add the 

nameplate


amperes and use the sum 

to determine the required minimum 

cord size.  

(See table a.)

If you are using an extension cord 

6. 

outdoors, make sure it is marked with 

the suffix “W-A” (“W” in Canada) to 

indicate it is acceptable for outdoor 

use.
Make sure the extension cord is prop-

7. 

erly wired and in good electrical con-

dition.  Always replace a damaged 

extension cord or have it repaired by 

a qualified electrician before using it.

Protect the extension cords from 

8. 

sharp objects, excessive heat, and 

damp or wet areas.

RECOmmEnDED minimum WiRE 

gaugE FOR EXtEnSiOn CORDS* 

(120/240 VOLt)

namEpLatE

ampERES

(at full load)

EXtEnSiOn CORD 

LEngtH

25’

50’

75’

100’

150’

0 – 2.0

18

18

18

18

16

2.1 – 3.4

18

18

18

16

14

3.5 – 5.0

18

18

16

14

12

5.1 – 7.0

18

16

14

12

12

7.1 – 12.0

18

14

12

10

-

12.1 – 16.0

14

12

10

-

-

16.1 – 20.0

12

10

-

-

-

taBLE a

* Based on limiting the line 

voltage drop to five volts at 

150% of the rated amperes.

Symbology

Double Insulated

Canadian Standards Association

Underwriters Laboratories, Inc.

V~

Volts Alternating Current

a

Amperes

n0 xxxx/min.

No Load Revolutions per Minute 

(RPM)

Summary of Contents for 65003

Page 1: ...opyright 2008 by Harbor Freight Tools All rights reserved No portion of this manual or any artwork contained herein may be reproduced in any shape or form without the express written consent of Harbor...

Page 2: ...afety alert symbol indicates a hazardous situation which if not avoided could result in minor or moderate injury NOTICE is used to address practices not related to personal injury CAUTION without the...

Page 3: ...s hard hat or hearing protection used for appropri ate conditions will reduce personal injuries Prevent unintentional starting d Ensure the switch is in the off po sition before connecting to power so...

Page 4: ...battery pack Use power tools only with specifi b cally designated battery packs Use of any other battery packs may create a risk of injury and fire When battery pack is not in use c keep it away from...

Page 5: ...15 tures below 0 C or above 40 C 32 F 104 F The batteries are Ni CD nickel cad 16 mium Follow all local regulations in regards to disposing of Ni CD batter ies This product is not a toy Keep it out 1...

Page 6: ...g vibrating tools regu 1 larly or for an extended period should first be examined by a doctor and then have regular medical check ups to ensure medical problems are not being caused or worsened from u...

Page 7: ...ing provides a low resistance path to carry electricity away from the user reducing the risk of electric shock See 3 Prong Plug and Outlet The grounding prong in the plug is 2 connected through the gr...

Page 8: ...u are using one extension cord 5 for more than one tool add the nameplate amperes and use the sum to determine the required minimum cord size See Table A If you are using an extension cord 6 outdoors...

Page 9: ...bling or making any adjustments to the tool Note For additional information regarding the parts listed in the following pages refer to the Assembly Diagram near the end of this manual Installing Remov...

Page 10: ...slide Tube off housing Operating Instructions Read the entire Important Safety Information section at the beginning of this manual including all text under subheadings therein before set up or use of...

Page 11: ...nt or binding of moving parts cracked or broken parts and any other condition that may affect its safe operation After Use 2 clean external surfaces of the tool with clean cloth Do not use harsh solve...

Page 12: ...EFULLY The manufacturer and or distributor has provided the parts list and assembly diagram in this manual as a reference tool only Neither the manufacturer or distributor makes any representation or...

Reviews: