ASSEMBLY
Your Workbench comes completely disassembled. It is important that you read the entire manual to become familiar with
the unit
before
you use it. Before assembling your Workbench, lay out all the parts on a workspace or clear area of the
ÀRRU%HVXUHWKDW\RXKDYHDOOSDUWVGHVFULEHGLQWKH3DUWV/LVW
To help with assembly, please refer to assembly diagrams and photos.
Note: The Right Side panel (1) has hinges for the Door (7). This will be the front of the Workbench.
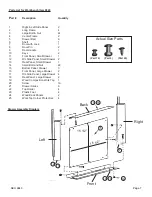
See Body Assembly Diagram page 8.
Step 1-Drawer Rails
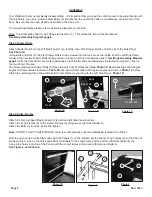
Attach Drawer Rail (5) to the Left Side Panel (1) so that the end of the Drawer Rail is under the lip of the Side Panel.
See Photo 1A
8VLQJ%ROWVDQG1XWVWKH¿UVW'UDZHU5DLOLVWREHVFUHZHGLQWRWKHWRSKROHRQWKHLQVLGHOLSRIWKH/HIW6LGH3DQHO
Screw in the next two Drawer Rails making certain to leave an empty hole between each.
See Body Assembly Diagram
page 8.
With the front Center Frame (4) positioned so that the two tabs are facing the side for the Door (part 7), line up
the two Center Frames.
The arrow stamped on Drawer Rails (5) faces towards front of Workbench.
See Photo 1A
. Bend back tabs at 90 degree
angles on Drawer Rails as shown in
Photo 1B
and bend Center tabs at 20 degree angles as shown in
Photo 1C
below.
Attach the remaining three Drawer Rails to Center Frame as you did with the Left Side Panel.
Photo 1D.
Step 2-Sides-Frames
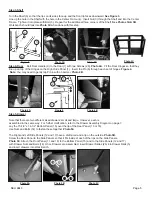
Attach the four L-shaped Plastic Feet (23) to right and left Side Panel bottoms.
Attach the Long Frames (2) to the Center Frames (4) using two Large Nuts & Bolts (3)
Attach the Bolts (3) from the inside and tighten.
Note:
DO NOT FULLY TIGHTEN BOLTS at the rear of Workbench until Wood Backing is attached in Step 7.
:LWKWKHRSHQSRUWLRQRIWKH5LJKWDQG/HIW6LGH3DQHOVRQWKHERWWRPVHWWKHERWWRP/RQJ)UDPHVVRWKDWWKH\¿W
inside of notch. Line up the holes and attach the Panels to the Long Frames at the bottom with Nuts and Bolts (3).
Line up the holes in the top of the Panels with the Long Frames and secure with Nuts and Bolts (3)
See Figure 2, and Photo 2.
Photo 1B
Back
4
5
3
Back Tab
Photo 1C
5
Center Tab
Photo 2
1
2
3
Photo 1A
Front
5
1
3
Arrow
Photo 1D
Figure 2
3
1
2
Page 4
SKU 6843


