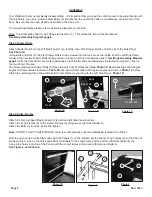
Step 3-Shelf
Turn the Shelf (6) so that the lips on its sides face up and the front lip faces downward.
See Figure 3.
Line up the hole in the Shelf with the hole in the Center Frame (4). Insert Nut (3) through the Shelf and into the Center
Frame. Tighten it into place with Bolt (3). Repeat for the additional three corners of the Shelf.
See Photos 3A & 3B.
Workbench should look like
Photo 3C
when done with this step.
Step 4-Door
Bolt Door Handle (9) to the Door (7) with two Screws (20).
Photo 4A
. Fit the Door Hinges so that they
line up on top of the Hinges on the Right Side Panel (1). Insert the Pin (8) through each set of hinges.
Figure 4.
Note:
You may need to gently tap Pin in with a hammer.
Photo 4B
.
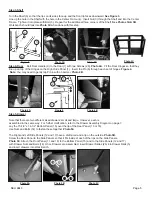
Step 5-Drawer
Note that there are two different sized drawers; small and large. However, each is
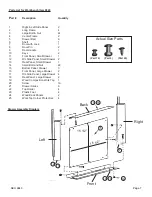
DVVHPEOHGLQWKHVDPHZD\)RUIXUWKHUFODUL¿FDWLRQUHIHUWRWKH'UDZHU$VVHPEO\'LDJUDPRQSDJH
Lay the 15-1/2” x 16-1/2” Bottom Panel (15) over the lip of the Rear Panel (13 or 18).
Use Nuts and Bolts (14) to fasten these together.
Photo 5A
The Right and Left Side Panels (12 and 17) have a sliding rail and a lip on the outside.
Photo 5B.
6FUHZWKH5HDU3DQHOWRWKH6LGH3DQHOVVRWKDWLW¿WVLQVLGHRIHDFKRIWKHOLSVRQWKH6LGH3DQHOV
Photo 5C.
Attach the Front Panel (11 and 16) to the Bottom Panel (15) and to the Side Panels (12 and 17)
with Drawer Nuts and Bolts (14). Once Drawers are assembled, insert Drawer Slides (26) into Drawer Rails (5)
and insert drawers into Work Bench.
Figure 4
Photo 3A
Photo 4A
Photo 4B
Photo 3B
Photo 3C
Photo 5A
Photo 5B
Photo 5C
Figure 3
3
4
6
1
8
2
7
12
17
13
18
SKU 6843
Page 5


