Photo 6A
Photo 6B
Photo 6D
Photo 6C
Photo 7A
Photo 7B
Photo 7C
22
Top Holder
1
Step 6-Top
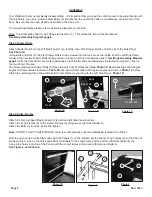
Attach the Top Holder (22) to the Side Panels (1) by inserting the Bolt (3) through each Top Holder and into the Side
Panel, and securing with Nut (3)
Photo 6A.
Lay the Wood Composition Work Top (19) squarely on top of the Workbench.
Install Work Top Corner Protectors (25) by bending around edge of Work Top.
Photo 6B.
Drill 7/64” holes in sides of
Work Top as shown in
Photo 6C .
Use screws (20) to screw Corner Protectors into place. From underneath the Top
Holders (22), screw the Top Panel Screws (20) into the Work Top (19).
Photo 6D.
Step 7-Back
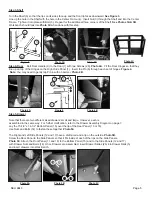
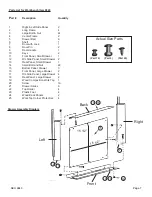
Line up the four holes in each Wood Back Panel (24) with the four holes in the rear Long (2) and Center (4) Frames.
Insert Bolt (3) through each hole and secure with the Nut from the inside of the Workbench.
Photo 7A.
Tighten bolts left loose in
STEP 2.
Your Workbench is now complete as shown in
Photo 7B
back and
Photo 7C
front.
1
Side Panel
Work Top
25
Corner
Protector
22
Top Holder
Corner
Protector
25
1
Side Panel
Corner
Protector
25
Page 6
SKU 6843


