background image

SKU 90552

      PAGE 3

ASSEMBLY INSTRUCTIONS

1.

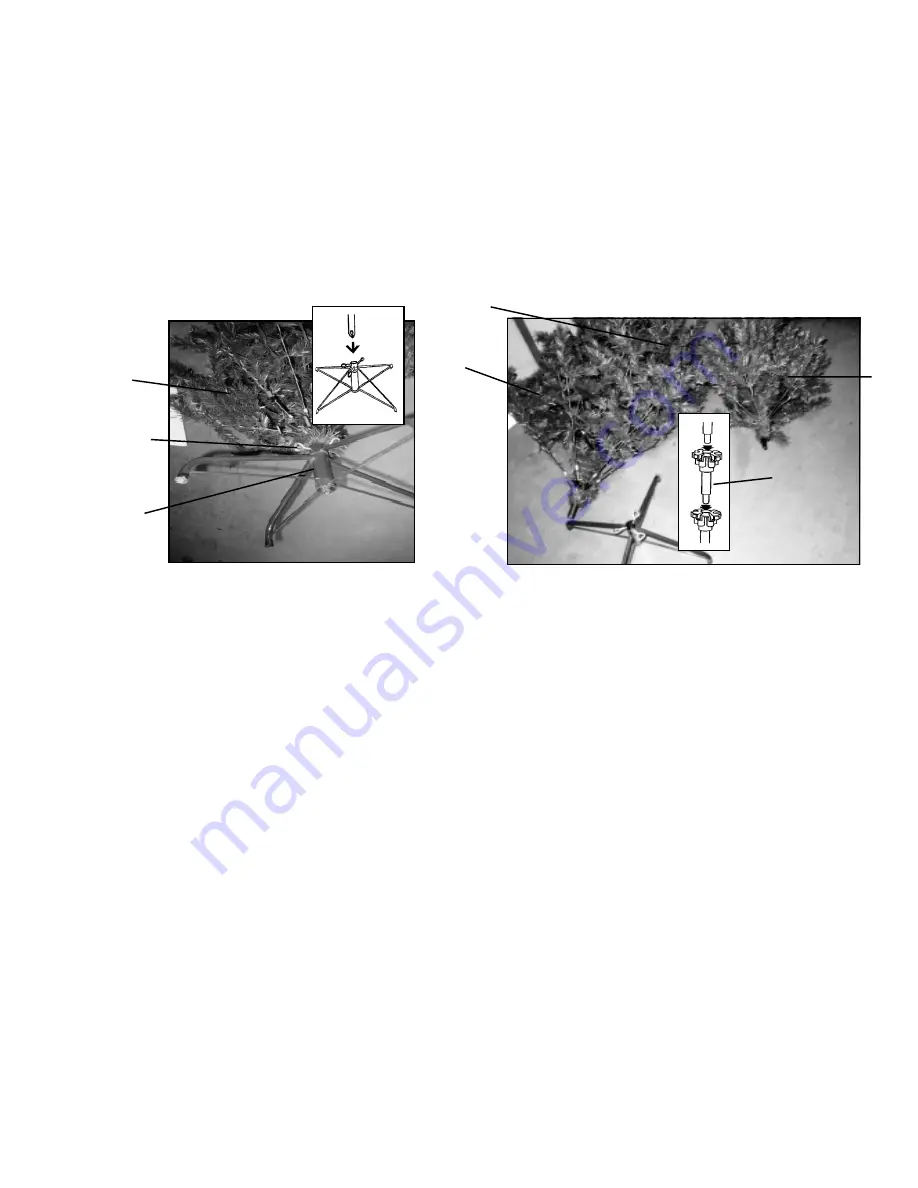
Remove the three tree sections of tree boughs (#1,#2, #3) and the Metal Stand (#6) from
the container. Each section has pre-assembled Branches. Each Section has a “trunk”
down the center with a hole and, or a peg. Place the Bottom Section (#3-“E, F, & G”) “trunk”
in the hole in the Tree Stand (#5) and tighten the three Thumb Screws (#4).

See Figure A & B.

3.

When each section is connected at the “trunk”, adjust Thumb Screws (#4) until the tree
stands straight. When this is done, you can string a strand of decorative Christmas lights
on your tree (not included). Plug an extension cord (not  included) into an electrical
connection and plug into a power source. 

See Figure A.  READ Warnings on page 2.

4.

Spread branches of the Christmas Tree down to form an attractive tree. It is now ready
to decorate with Christmas ornaments. Caution: Do not use candles on the tree.

5.

When storing your Christmas Tree, unplug all electrical connections, remove ornaments
and lights, disconnect the Sections #1, #2, #3 and remove the Stand (#5). Bend the
hinged boughs of the tree limbs in close to the trunk for compact storage. Suggestion:
May be wrapped with plastic bubble-wrap for protection (not included).

#4

Thumb

Screws

#5

Stand

#3

Largest

Tree

Section

#3

 #2

#1

Figure A

Figure B

Trunk

2.

Connect the Middle Section (#2-“C & D”) by placing the ”trunk” peg of that section into the
hole of the Bottom Section (#3-“E, F, & G”). Repeat this step with the Top Section (#1-“A & B”)

See Figure B.

Summary of Contents for 90552

Page 1: ...rfreight com Copyright 2003 by Harbor Freight Tools All rights reserved No portion of this manual or any artwork contained herein may be reproduced in any shape or form without the express written consent of Harbor Freight Tools For technical questions please call 1 800 444 3353 CHRISTMAS TREE 7 Foot ...

Page 2: ...d function Check for damaged parts and any other conditions that may affect its operation Replace or repair damaged or worn parts immediately 4 REPLACEMENT PARTS AND ACCESSORIES When servicing use only identical replacement parts 5 WEAR SAFETY GOGGLES Must comply with ANSI at all times when assembling 6 AVOID SHARP EDGES WHEN ASSEMBLING Wire Branches can damage eyes or puncture skin 7 DO NOT ALLOW...

Page 3: ...rical connection and plug into a power source See Figure A READ Warnings on page 2 4 Spread branches of the Christmas Tree down to form an attractive tree It is now ready to decorate with Christmas ornaments Caution Do not use candles on the tree 5 When storing your Christmas Tree unplug all electrical connections remove ornaments and lights disconnect the Sections 1 2 3 and remove the Stand 5 Ben...

Page 4: ...R THAT HE OR SHE IS QUALIFIED TO MAKE ANY REPAIRS TO THE PRODUCT OR THAT HE OR SHE IS QUALIFIED TO REPLACE ANY PARTS OF THE PRODUCT IN FACT THE MANUFACTURER AND OR DISTRIBUTOR EXPRESSLY STATES THAT ALL REPAIRS AND PARTS REPLACEMENTS SHOULD BE UNDERTAKEN BY CERTIFIED AND LICENSED TECHNICIANS AND NOT BY THE BUYER THE BUYER ASSUMES ALL RISK AND LIABILITY ARISING OUT OF HIS OR HER REPAIRS TO THE ORIGI...

Reviews: