background image

SKU 91286

PAGE 16

25.

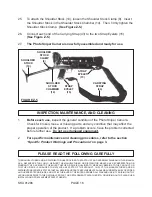
To attach the Shoulder Stock (10), loosen the Shoulder Stock Clamp (9).  Insert
the Shoulder Stock in the Shoulder Stock Chamber (14).  Then, firmly tighten the
Shoulder Stock Clamp.  (See Figure Z-5.)

26.

Connect each end of the Carrying Strap (43) to the two Strap Eyelets (15).
(See Figure Z-5.)

27.

The Photo Sniper Camera is now fully assembled and ready for use.

CARRYING

STRAP

(43)

FIGURE Z-5

SHOULDER

STOCK

(10)

SHOULDER

STOCK

CLAMP

(9)

SHOULDER

STOCK

CHAMBER

(14)

STRAP

EYELET

(15)

STRAP

EYELET

(15)

INSPECTION, MAINTENANCE, AND CLEANING

1.

Before each use, inspect the general condition of the Photo Sniper Camera.
Check for broken, loose, or missing parts, and any condition that may affect the
proper operation of the product.  If a problem occurs, have the problem corrected
before further use.  Do not use damaged equipment.

2.

For specific maintenance and cleaning procedures, refer to the section
“Specific Product Warnings and Precautions” on page 3.

PLEASE READ THE FOLLOWING CAREFULLY

THE MANUFACTURER AND/OR DISTRIBUTOR HAS PROVIDED THE PARTS LIST AND ASSEMBLY DIAGRAM IN THIS MANUAL
AS A REFERENCE TOOL ONLY.  NEITHER THE MANUFACTURER OR DISTRIBUTOR MAKES ANY REPRESENTATION OR
WARRANTY OF ANY KIND TO THE BUYER THAT HE OR SHE IS QUALIFIED TO MAKE ANY REPAIRS TO THE PRODUCT, OR
THAT HE OR SHE IS QUALIFIED TO REPLACE ANY PARTS OF THE PRODUCT.  IN FACT, THE MANUFACTURER AND/OR
DISTRIBUTOR EXPRESSLY STATES THAT ALL REPAIRS AND PARTS REPLACEMENTS SHOULD BE UNDERTAKEN BY CERTIFIED
AND LICENSED TECHNICIANS, AND NOT BY THE BUYER.  THE BUYER ASSUMES ALL RISK AND LIABILITY ARISING OUT OF
HIS OR HER REPAIRS TO THE ORIGINAL PRODUCT OR REPLACEMENT PARTS THERETO, OR ARISING OUT OF HIS OR HER
INSTALLATION OF REPLACEMENT PARTS THERETO.

Summary of Contents for 91286

Page 1: ...it our Web site at http www harborfreight com Copyright 2004 by Harbor Freight Tools All rights reserved No portion of this manual or any artwork contained herein may be reproduced in any shape or for...

Page 2: ...2 GENERAL SAFETY WARNINGS AND PRECAUTIONS 1 Use this product only in clean and dry areas Cluttered damp or wet areas invite injuries 2 Do not allow children to handle this product This product contai...

Page 3: ...duct and do not use this product for a purpose for which it was not intended 7 WARNING The warnings precautions and instructions discussed in this manual cannot cover all possible conditions and situa...

Page 4: ...in doors Avoid direct sunlight 8 The Camera s Exposure Meter will not operate without Batteries not in cluded When not in use over a long period the Film Rewind Knob 49 should not be in its V positio...

Page 5: ...FOCUSING DRUM 20 DISTANCE SCALE 21 DISTANCE SETTING INDEX 22 STRAP EYELET 15 FIGURE B SHUTTER COCKING FILM ADVANCE LEVER 28 FRAME COUNTER 27 SHUTTER BUTTON 29 SHUTTER SPEED DIAL 30 FILM SPEED DIAL 26...

Page 6: ...in nature shots under a clouded blue sky and in any landscape photography at short exposure in the evening See Figure D A yellow Filter 35 for use in landscape photography at short exposure in the eve...

Page 7: ...the Battery Chamber with their positive ends facing out ward Then replace the Battery Cap and turn it clockwise to lock it in place See Figure E FIGURE E FIGURE F FIGURE G 2 Before taking pictures th...

Page 8: ...e Take Up Spool Then close the Rear Cover of the Camera See Figure H FIGURE H FIGURE I 5 Make blind exposures until the Frame Counter 27 is set to the position of 1 between 0 and 2 See Figure I 6 The...

Page 9: ...URE L FIGURE M 7 By adjusting the shutter speed you can control the movement of the subject being photographed A fast shutter speed will freeze the subject and a slow shutter speed will make it look b...

Page 10: ...ass See Figure N 10 By making use of various combinations of aperture and shutter speed values you can set the exposure depending upon the brightness of an object and the speed of film being used with...

Page 11: ...t the Camera on a tripod not included Press the Shutter Button 29 until a definite stop is felt and turn the Shutter Button clock wise to the V position This will enable you to set the aperture manual...

Page 12: ...to ensure that it is engaged NOTE Do not attempt to take more than 36 pictures if using a 36 exposure film cartridge However if it has happened and the Film is stuck in the cassette preventing full Sh...

Page 13: ...crew the Push Screw Re lease 17 on the Pistol Grip into the tap hole at the bottom of the Lens See Figure V FIGURE V PUSH SCREW RELEASE 17 18 Screw the Clamping Screw 8 on the Pistol Grip 41 into the...

Page 14: ...era with the 300MM Lens 3 is basically the same as when operating the Camera with the 58MM Lens 31 However when the aperture is set on the 300MM Lens the Aperture Setting Knob 11 has to be turned firs...

Page 15: ...6 24 To focus use the Focusing Drum 20 in combination with the Distance Scale 21 located at the bottom of the 300MM Lens 3 See Figure Z 4 FIGURE Z 4 FOCUSING DRUM 20 DEPTH OF FIELD TABLE OF THE MC TAI...

Page 16: ...rected before further use Do not use damaged equipment 2 For specific maintenance and cleaning procedures refer to the section Specific Product Warnings and Precautions on page 3 PLEASE READ THE FOLLO...

Page 17: ...1 Aperture Setting Knob 1 33 Aperture Ring 1 12 Aperture Setting Ring 1 34 Light Yellow Filter 1 13 Diaphragm Scale 1 35 Yellow Filter 1 14 Shoulder Stock Chamber 1 36 Green Filter 1 15 Strap Eyelet 2...

Reviews: