SKU 99861
For technical questions, please call 1-800-444-3353.
Page 6
aSSemBly
read the enTIre ImPorTanT
SaFeguardS section at
the beginning of this manual
including all text under
subheadings therein before set
up or use of this product.
To PreVenT
SerIouS Injury
This unit must only be used
with an approved, ul listed
lP regulator. do noT use
this item without a regulator!
Close the valve on the propane tank
1.
(not included) before assembly, main-
tenance, or adjustment.
This product is machine manufac-
2.
tured. Be aware of sharp edges.
Use heavy duty work gloves and
ANSI-approved safety impact eye
goggles when assembling.
Turn the Propane Stove upside down,
3.
and attach a Rubber Foot to each
corner of the unit.
(See available
parts list on page 9.)
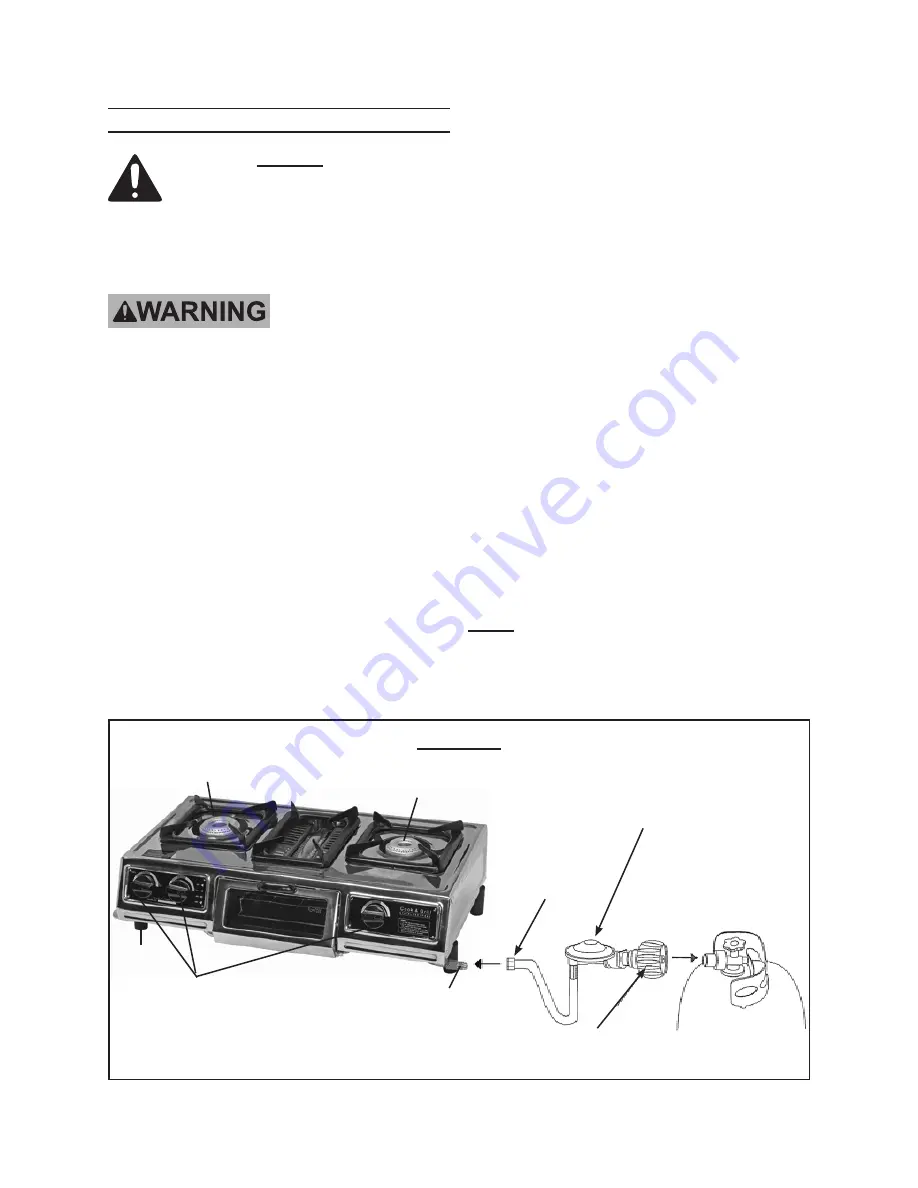
To attach the three Temperature Con-
4.
trol Knobs,
insert the knob onto the
Burner Control Shaft by aligning the
flat edge of the knob and shaft. Make
sure the knobs are seated properly.
(See Figure a.)
noTe:
5.
The Propane Stove requires
the attachment and use of a LP regu-
lator & hose kit (Model 97333), sold
separately by Harbor Freight Tools.
(See Figure a.)
a lP regulator muST be used:
6.
To
attach the LP Regulator & Hose Kit
to the Propane Stove, remove the
plastic protective cap from the Inlet
Connection Nozzle on the Propane
Stove. Then, screw the Hose Con-
nector firmly onto the Inlet Connec
-
tion Nozzle.
(See Figure a.)
note:
Do not use thread seal tape on con-
nections.
ProPane
TanK
(noT InCluded)
lP regulaTor & HoSe KIT
(noT InCluded)
gaS ValVe
HoSe
ConneCTor
InleT
ConneCTIon
noZZle
TemPeraTure
ConTrol KnoB
FIgure a
Large Burner
Small Burner
Broiler
Rubber
Leg
REV 08i


