background image

Page 7

For technical questions, please call 1-888-866-5797.

Item 57230 
        

Sa

FE

ty

Op

E

ra

ti

O

n

Maint

E

nanc

E

S

E

tup

Operating instructions

read the EntirE iMpOrtant SaFEty inFOrMatiOn section at the beginning of this manual 
including all text under subheadings therein before set up or use of this product.

charging Battery pack

Charge Battery Pack according to the instructions included with the 20 V Bauer 

Battery Charger.  Battery Pack and Charger sold separately.

General Operation

WarninG!  tO prEVEnt SEriOuS inJury:  
Follow all guidelines regarding chemicals sprayed, 
including MSDS instructions and Epa regulations. 

1.  Before operating the gardening appliance, 

put on ANSI-approved safety goggles and 
other safety gear.   
Safety goggles and other safety gear 
are sold separately.

2.  Assemble Sprayer according to Assembly 

Instructions on page 6.

3.  Unscrew and remove Measuring Cup and fill 

Tank with up to one gallon of premixed spray 
solution.  Replace Cup and tighten securely. 

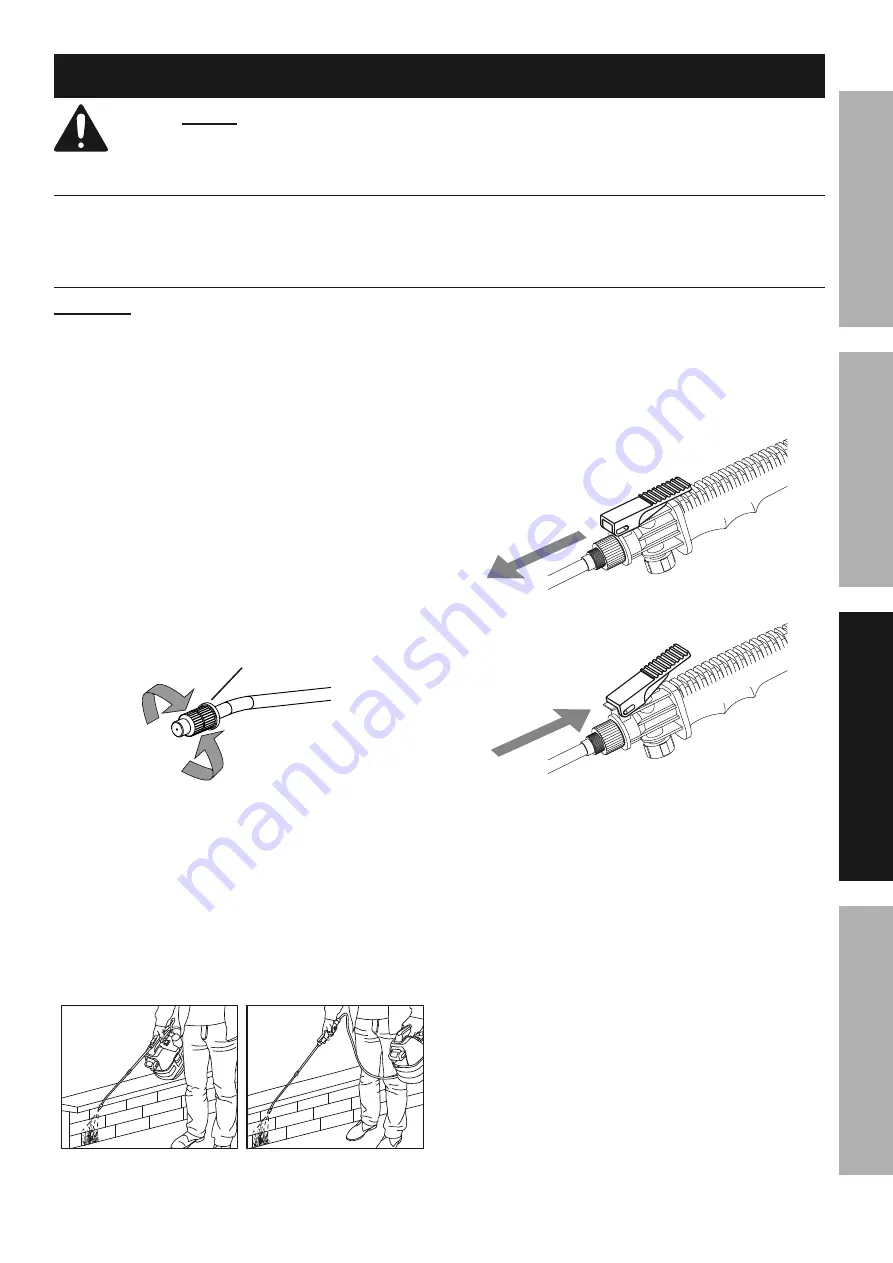
4.  Adjust the Nozzle for a fan spray or stream.  

For a fan spray tighten the Nozzle or loosen 
it for a steady stream.  Refer to Figure D.

Stream

Fan Spray

nozzle

Figure D

5.  Make sure the ON/OFF Switch is in the 

off-position, then slide the Battery Pack 
into the battery receptacle on the front of 
the Sprayer until it clicks into place.

6.  Press the ON/OFF Switch to start the Sprayer.

7.  Operate either with the Spray Wand secured 

in the handle storage area on the Sprayer or 
with the Wand held in your hand as shown.

Wand mounted on Sprayer

Wand held in hand

8.  Point the Nozzle toward the area to be sprayed, 

then depress the Trigger to begin spraying.  

9.  For continuous spray, press the Trigger down 

and push it forward, then release the Trigger.  To 
stop continuous spray, press the Trigger down 
and pull it back, then release the Trigger.  

trigger in 

Locked position

trigger in 

unlocked position

Figure E

10. 

When finished spraying:

a. 

turn off Sprayer and remove its Battery pack.

b. 

point Wand is safe direction and depressurize 
the tank by pressing down on the trigger.

c. 

Dispose of liquid according to 
manufacturer guidelines.

d. 

clean the Sprayer according to 
Maintenance instructions. 

Summary of Contents for Bauer 19116C-B

Page 1: ...rence 20c When unpacking make sure that the product is intact and undamaged If any parts are missing or broken please call 1 888 866 5797 as soon as possible Copyright 2020 by Harbor Freight Tools All rights reserved No portion of this manual or any artwork contained herein may be reproduced in any shape or form without the express written consent of Harbor Freight Tools Diagrams within this manua...

Page 2: ...s practices not related to personal injury iMpOrtant SaFEty inStructiOnS When using electric gardening appliances basic safety precautions should always be followed to reduce the risk of fire electric shock and personal injury including the following rEaD aLL inStructiOnS Battery precautions 1 Do not charge appliance in rain or in wet locations 2 Do not use battery operated appliance in rain 3 Use...

Page 3: ...re tired Gardening appliance use and care 1 avoid Dangerous Environment Do not use appliances in damp or wet locations 2 Do not use in rain 3 Keep children away all visitors should be kept at a distance from work area 4 When servicing use only identical replacement parts 5 Use Right Appliance Do not use appliance for any job except that for which it is intended 6 Do not Force Appliance It will do ...

Page 4: ...eriods each day of work 6 Grip appliance as lightly as possible while still keeping safe control of it Let the appliance do the work 7 To reduce vibration maintain the appliance as explained in this manual If any abnormal vibration occurs stop use immediately General Safety 1 use only for water or water based fertilizers herbicides pesticides and sealers Do not use to spray combustible or corrosiv...

Page 5: ...s manual including all text under subheadings therein before set up or use of this product tO prEVEnt SEriOuS inJury FrOM acciDEntaL OpEratiOn Make sure that the power Switch trigger is in the off position and remove the Battery pack before performing any procedure in this section note For additional information regarding the parts listed in the following pages refer to the Assembly Diagram near t...

Page 6: ... nozzle Extension Spray Wand Figure a attaching the Hose 1 To attach the Hose to the Tank insert the end of the Hose into the threaded outlet on the Tank Make sure the Hose is pushed in as far as it will go Refer to Figure B threaded threaded Outlet Outlet Hose tank nut Figure B 2 Slide the Nut on the Hose over the threaded outlet and Hose end and hand tighten Make sure the Hose is securely attach...

Page 7: ...just the Nozzle for a fan spray or stream For a fan spray tighten the Nozzle or loosen it for a steady stream Refer to Figure D Stream Fan Spray nozzle Figure D 5 Make sure the ON OFF Switch is in the off position then slide the Battery Pack into the battery receptacle on the front of the Sprayer until it clicks into place 6 Press the ON OFF Switch to start the Sprayer 7 Operate either with the Sp...

Page 8: ...E clean the Sprayer a Drain any remaining solution from the Tank through the fill area and dispose of properly b Fill Tank one third full with clean water Install Battery Pack point Wand in safe direction and run Sprayer until Tank is empty c Repeat previous step as necessary until Sprayer is clean Disconnect Battery Pack and drain the Tank of residual water d Lift the two Latches and remove the M...

Page 9: ... with the Sprayer It may become necessary to replace the seals in the Spray Wand at some point as they can become hard and damaged over time causing leaks to occur 2 Before replacing seals thoroughly clean the Sprayer as described on page 8 Refer to Figure G for seal location and placement Replace seals when needed to correct any leaks that appear Figure G ...

Page 10: ...al Ring 1 24 O Ring 1 25 Suction Tube 1 26 Filter 1 27 Block 1 28 Check Valve 1 29 Measuring Cup 1 30 Measuring Cup Seal Ring 1 31 Carry Strap 1 32 Replacement Seals not shown 6 parts List and Diagram pLEaSE rEaD tHE FOLLOWinG carEFuLLy THE MANUFACTURER AND OR DISTRIBUTOR HAS PROVIDED THE PARTS LIST AND ASSEMBLY DIAGRAM IN THIS MANUAL AS A REFERENCE TOOL ONLY NEITHER THE MANUFACTURER OR DISTRIBUTO...

Page 11: ...1 For technical questions please call 1 888 866 5797 Item 57230 SaFEty OpEratiOn MaintEnancE SEtup assembly Diagram 1 2 3 6 4 4 7 8 7 9 6 31 11 12 17 18 19 20 21 24 22 23 25 26 27 28 29 30 16 15 14 13 10 4 5 ...

Page 12: ...damages so the above limitation of exclusion may not apply to you THIS WARRANTY IS EXPRESSLY IN LIEU OF ALL OTHER WARRANTIES EXPRESS OR IMPLIED INCLUDING THE WARRANTIES OF MERCHANTABILITY AND FITNESS To take advantage of this warranty the product or part must be returned to us with transportation charges prepaid Proof of purchase date and an explanation of the complaint must accompany the merchand...

Reviews: