background image

UNPACKING

When unpacking, check to make sure all the parts shown on


the 

Parts List (page 7) 

are

included.  If any parts are missing or broken, please call Harbor Freight Tools at the
number shown on the cover of this manual as soon as possible.

ASSEMBLY INSTRUCTIONS

NOTE:

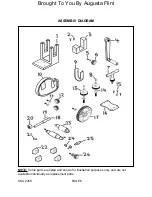
  For additional references to the parts listed below, refer to the 

Assembly

Diagram (page 8)

.

To Mount The Mini Rolling Mill On A Workbench:

1.

Caution:

 Make sure the Mini Rolling Mill is securely mounted on a flat, level,

sturdy, workbench capable of supporting the weight of the Mini Rolling Mill, tools,
accessories, and workpiece.

2.

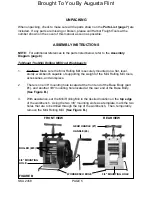
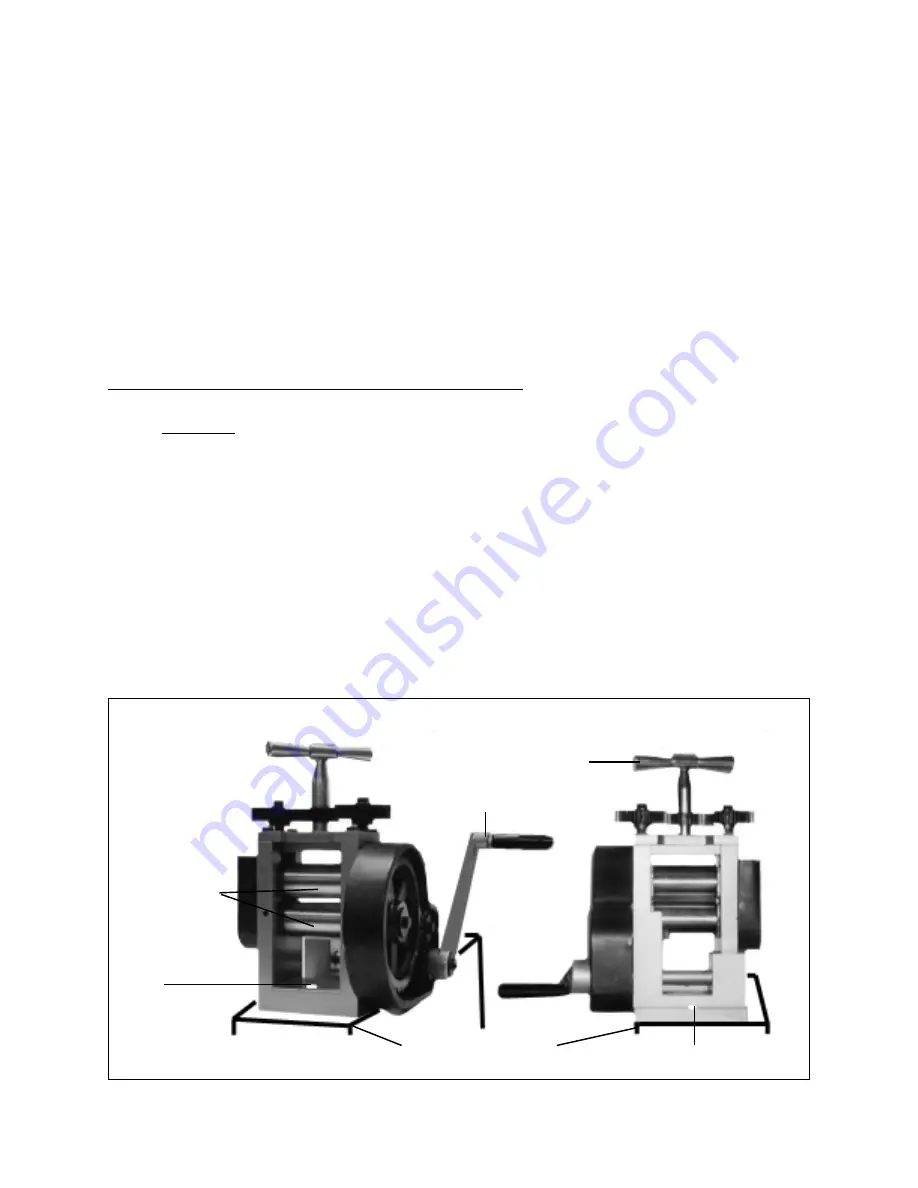
There is one 3/8” mounting hole located at the 

front

 end of the Base Body (part

#1), and another 3/8” mounting hole located at the 

rear

 end of the Base Body.

(See Figure B.)

3.

With assistance, set the Mini Rolling Mill in the desired location on the 

top


edge

of the workbench.  Using the two 3/8” mounting slots as a template, mark the two
holes that are to be drilled through the top of the workbench.  Then, temporarily
remove the Mini Rolling Mill.  

(See Figure B.)

FRONT VIEW

REAR VIEW

FIGURE B

HANDLE (#4)

WORKBENCH EDGE

ROLLER (#23)

GEAR HANDLE (#7)

3/8” MOUNTING
HOLE

3/8” MOUNTING HOLE

SKU 2458

PAGE 5

Brought To You By Augusta Flint

Summary of Contents for CEN-TECH 2458

Page 1: ...at http www harborfreight com Copyright 2002 by Harbor Freight Tools All rights reserved No portion of this manual or any artwork contained herein may be reproduced in any shape or form without the express written consent of Harbor Freight Tools For technical questions please call 1 800 444 3353 Brought To You By Augusta Flint ...

Page 2: ...to handle this product 3 STORE IDLE EQUIPMENT When not in use tools and equipment should be stored in a dry location to inhibit rust Always lock up tools and equipment and keep out of reach of children 4 DO NOT USE THIS PRODUCT IF UNDER THE INFLUENCE OF ALCOHOL OR DRUGS Read warning labels on prescriptions to determine if your judgement or reflexes are impaired while taking drugs If there is any d...

Page 3: ... Approved accessories are available from Harbor Freight Tools 12 MAINTAIN THIS PRODUCT WITH CARE Keep this product clean and dry for better and safer performance 13 MAINTENANCE For your safety service and maintenance should be performed regularly by a qualified technician 14 USE THE RIGHT TOOL FOR THE JOB Do not attempt to force a small tool or attachment to do the work of a larger industrial tool...

Page 4: ...13 FIGURE A 4 MAINTAIN A SAFE WORKING ENVIRONMENT Keep the work area well lit Make sure there is adequate surrounding workspace Always keep the work area free of obstructions grease oil trash and other debris 5 AVOID TOUCHING ROLLERS Oils and acids from your body can damage the Rollers leaving behind tiny pits 6 DO NOT OVER EXERT PRESSURE ON THE ROLLERS 7 WHENEVER POSSIBLE USE THE CENTER OF THE RO...

Page 5: ...apable of supporting the weight of the Mini Rolling Mill tools accessories and workpiece 2 There is one 3 8 mounting hole located at the front end of the Base Body part 1 and another 3 8 mounting hole located at the rear end of the Base Body See Figure B 3 With assistance set the Mini Rolling Mill in the desired location on the top edge of the workbench Using the two 3 8 mounting slots as a templa...

Page 6: ...ve it and rinse it with clean water 3 Feed the metal into the front end of the Mini Rolling Mill by inserting the metal between the two Rollers part 23 Then turn the Handle part 4 clockwise Apply snug but not overpowering pressure on the Rollers NOTE To apply greater pressure on the Rollers turn the Gear Handle part 7 clockwise To apply less pressure turn the Gear Handle counterclockwise See Figur...

Page 7: ...LY THE MANUFACTURER AND OR DISTRIBUTOR HAS PROVIDED THE PARTS LIST AND ASSEMBLY DIAGRAM IN THIS MANUAL AS A REFERENCE TOOL ONLY NEITHER THE MANUFACTURER OR DISTRIBUTOR MAKES ANY REPRESENTATION OR WARRANTY OF ANY KIND TO THE BUYER THAT HE OR SHE IS QUALIFIED TO MAKE ANY REPAIRS TO THE PRODUCT OR THAT HE OR SHE IS QUALIFIED TO REPLACE ANY PARTS OF THE PRODUCT IN FACT THE MANUFACTUER AND OR DISTRIBUT...

Page 8: ...ASSEMBLY DIAGRAM NOTE Some parts are listed and shown for illustration purposes only and are not available individually as replacement parts SKU 2458 PAGE 8 Brought To You By Augusta Flint ...
Reviews: