background image

SKU 93432 

For technical questions, please call 1-800-444-3353.


Page 13

2. 

Before each use,

 inspect the general condition of the Screwdriver and its 

Charger (50).  Check for loose screws, misalignment or binding of moving parts, 
cracked or broken parts, damaged electrical wiring, and any other condition 
that may affect safe operation.  If abnormal noise or vibration occurs, have the 
problem corrected before further use.  

Do not use damaged equipment.

3. 

To clean the Screwdriver, 

use only a clean cloth and mild detergent.  Do not use 

solvents.  Do not immerse any part of the tool in liquids.

4. 

When storing, 

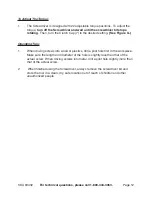
make sure to store the tool in a clean, dry, safe location out of 

reach of children and other unauthorized people.

5. 

CAUTION!  All maintenance, service, or repairs not mentioned in this 

manual must only be performed by a qualified service technician.

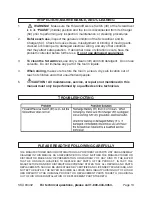
TROUBLESHOOTING

PLEASE READ THE FOLLOWING CAREFULLY

THE MANUFACTURER AND/OR DISTRIBUTOR HAS PROVIDED THE PARTS LIST AND ASSEMBLY 
DIAGRAM IN THIS MANUAL AS A REFERENCE TOOL ONLY.  NEITHER THE MANUFACTURER OR 
DISTRIBUTOR  MAKES  ANY  REPRESENTATION  OR WARRANTY  OF  ANY  KIND TO THE  BUYER 
THAT  HE  OR  SHE  IS  QUALIFIED TO  REPLACE  ANY  PARTS  OF THE  PRODUCT.    IN  FACT, THE 
MANUFACTURER AND/OR DISTRIBUTOR EXPRESSLY STATES THAT ALL REPAIRS AND PARTS 
REPLACEMENTS SHOULD BE UNDERTAKEN BY CERTIFIED AND LICENSED TECHNICIANS, AND 
NOT BY THE BUYER.  THE BUYER ASSUMES ALL RISKS AND LIABILITY ARISING OUT OF HIS OR 
HER REPAIRS TO THE ORIGINAL PRODUCT OR REPLACEMENT PARTS THERETO, OR ARISING 
OUT OF HIS OR HER INSTALLATION OF REPLACEMENT PARTS THERETO.

INSPECTION, MAINTENANCE, AND CLEANING

1. 

         WARNING! 

 Make sure the Forward/Reverse Switch (49) of the Screwdriver 

is in its 

“PAUSE” 

(middle) position and the tool is disconnected from its Charger 

(50) prior to performing any inspection, maintenance, or cleaning procedures.  

Summary of Contents for Chicago Electric 93432

Page 1: ... Tools 3491 Mission Oaks Blvd Camarillo CA 93011 Visit our website at http www harborfreight com Read this material before using this product Failure to do so can result in serious injury Save this manual Copyright 2005 by Harbor Freight Tools All rights reserved No portion of this manual or any artwork contained herein may be reproduced in any shape or form without the express written consent of ...

Page 2: ...NG READ AND UNDERSTAND ALL INSTRUCTIONS Failure to follow all instructions listed below may result in electric shock fire and or serious injury SAVE THESE INSTRUCTIONS WORK AREA 1 Keep your work area clean and well lit Cluttered benches and dark areas invite accidents 2 Do not operate power tools in explosive atmospheres such as in the presence of flammable liquids gases or dust Power tools create...

Page 3: ...wet conditions Water entering a power tool will increase the risk of electric shock 8 Do not abuse the Power Cord Never use the Power Cord to carry the tools or pull the Plug from an outlet Keep the Power Cord away from heat oil sharp edges or moving parts Replace damaged Power Cords immediately Damaged Power Cords increase the risk of electric shock 9 When operating a power tool outside use an ou...

Page 4: ...ot be controlled with the Power Switch is dangerous and must be replaced 19 Disconnect the Power Cord Plug from the power source before making any adjustments changing accessories or storing the tool Such preventive safety measures reduce the risk of starting the tool accidentally 20 Store idle tools out of reach of children and other untrained persons Tools are dangerous in the hands of untrained...

Page 5: ...nvironment Keep the work area well lit Make sure there is adequate surrounding workspace Always keep the work area free of ob structions grease oil trash and other debris Do not use a power tool in areas near flammable chemicals dusts and vapors Do not use this product in a damp or wet location 4 Avoid unintentional starting Make sure you are prepared to begin work before turning on the Screwdrive...

Page 6: ...rd Reverse Switch 49 is in its PAUSE middle position prior to performing any inspection maintenance or cleaning procedures SAVE THESE INSTRUCTIONS GROUNDING WARNING Improperly connecting the grounding wire can result in the risk of electric shock Check with a qualified electrician if you are in doubt as to whether the outlet is properly grounded Do not modify the power cord plug provided with the ...

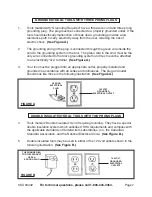
Page 7: ...to an electrically live terminal See Figure A 3 Your tool must be plugged into an appropriate outlet properly installed and grounded in accordance with all codes and ordinances The plug and outlet should look like those in the following illustration See Figure A 3 PRONG ELECTRICAL PLUG 120 VOLT GROUNDED ELECTRICAL OUTLET FIGURE A DOUBLE INSULATED TOOLS TOOLS WITH TWO PRONG PLUGS 4 Tools marked Dou...

Page 8: ...her current than a 16 gauge cord See Figure C 4 When using more than one extension cord to make up the total length make sure each cord contains at least the minimum wire size required See Figure C 5 If you are using one extension cord for more than one tool add the nameplate amperes and use the sum to determine the required minimum cord size See Figure C 6 If you are using an extension cord outdo...

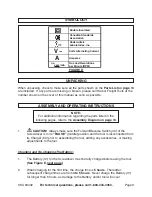
Page 9: ...S NOTE For additional information regarding the parts listed in the following pages refer to the Assembly Diagram on page 13 1 CAUTION Always make sure the Forward Reverse Switch 49 of the Screwdriver is in its PAUSE middle position and the tool is disconnected from its Charger 50 prior to assembling the tool adding any accessories or making adjustments to the tool Charging and Re Charging The Bat...

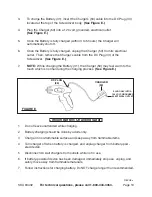
Page 10: ... the Charger s cable from the DC Plug 33 of the Screwdriver See Figure E 7 NOTE While charging the Battery 31 the Charger 50 may feel warm to the touch which is normal during the charging process See Figure E Lithium Battery Charging Safety Do not leave unattended while charging 1 Battery charging should be done by adults only 2 Charge on non flammable surface and keep away from flammable items 3 ...

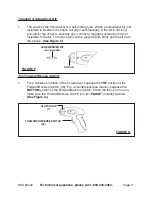
Page 11: ...od not included to the bit To remove a bit with a gloved hand firmly pull the bit from the Chuck See Figure F FIGURE F SCREWDRIVER BIT NOT INCLUDED CHUCK The Forward Reverse Switch 1 For a clockwise rotation of the Screwdriver squeeze the TOP portion of the Forward Reverse Switch 49 For a counterclockwise rotation squeeze the BOTTOM portion of the Forward Reverse Switch When the tool is not in use...

Page 12: ...sired setting See Figure G Operating Tips 1 When driving screws into wood or plastics drill a pilot hole first in the workpiece Make sure the length and diameter of the hole is slightly less than that of the actual screw When driving screws into metal drill a pilot hole slightly more than that of the actual screw 2 When finished using the Screwdriver always remove the screwdriver bit and store the...

Page 13: ...lified service technician TROUBLESHOOTING PLEASE READ THE FOLLOWING CAREFULLY THE MANUFACTURER AND OR DISTRIBUTOR HAS PROVIDED THE PARTS LIST AND ASSEMBLY DIAGRAM IN THIS MANUAL AS A REFERENCE TOOL ONLY NEITHER THE MANUFACTURER OR DISTRIBUTOR MAKES ANY REPRESENTATION OR WARRANTY OF ANY KIND TO THE BUYER THAT HE OR SHE IS QUALIFIED TO REPLACE ANY PARTS OF THE PRODUCT IN FACT THE MANUFACTURER AND OR...

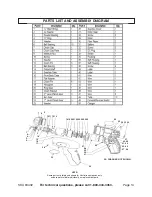
Page 14: ...BLY DIAGRAM NOTE Some parts are listed and shown for illustration purposes only and are not available individually as replacement parts 1 2 4 5 3 6 7 8 9 101112 13 14 15 16 17 1819 20 21 22 23 24 25 26 27 28 29 30 31 32 33 34 35 40 41 42 37 45 46 43 44 47 48 39 38 36 49 50 CHARGER NOT SHOWN ...

Page 15: ...ncidental or consequential damages so the above limitation of exclusion may not apply to you This warranty is express ly in lieu of all other warranties express or implied including the warranties of merchantability and fitness To take advantage of this warranty the product or part must be returned to us with transportation charges prepaid Proof of purchase date and an explanation of the complaint...

Reviews: