background image

For technical questions, please call 1-888-866-5797

21

Additional Functions 

SYSTEM TEST MENU 

22

O2 Sensor Test 

OBD2 regulations require that applicable vehicles monitor and test operation 

of  the  oxygen  (O2)  sensors  to  identify  problems  that  can  affect  fuel 

efficiency and vehicle emissions.  These  tests are  performed  automatically 

when  engine  operating  conditions  are  within  predefined  limits.  Results  of 

these tests are stored in the on-board computer's memory. 
The 

O2  Sensor  Test

  function  lets  you  retrieve  and  view  O2  sensor 

monitor  test  results  for  the  most  recently  completed  tests  from  your 

vehicle's on-board computer. 

The scan tool does not perform O2 sensor tests, but retrieves 

results from the most recently performed O2 sensor tests from 

the on-board computer's memory. You may retrieve O2 sensor 

test results for only one test of one sensor at any given time. 

1.

From the System Test menu, select 

O2

Sensor Test,

 then press 

ENTER


2.

A  "One  moment  please..."  message

displays,  followed  by  the  select  sensor

screen.

„


The  Select  Sensor  screen  displays.

The  screen  shows  all  O2  sensors

applicable to the vehicle under test.

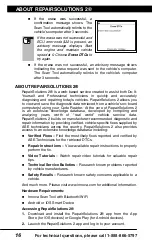
If  O2  sensor  test  data  is  not  presently  stored  in  the  vehicle’s 
computer, an advisory message displays. Press 

M

 to return to 

the Main Menu. 
If O2 sensor tests are not supported by the vehicle under test, 
an advisory message displays. Press 

M

 to return to the Main 

Menu. 

3.

Select  the  O2  sensor  for  which  you

wish  to  view  test  results,  then  press

ENTER


 to display the test results.

4.

When  test  results  have  been  retrieved,

data  for  the  selected  sensor  test  will

show on the diagnostic tool's display.

5.

When  you  have  finished  viewing  the

retrieved test data: 

„


To view test results for the next sensor, select 

Next

, then press

ENTER 

.

„


To return to the Select Sensor screen, select 

Back

, then press

ENTER 

.

6.

When  you  have  finished  viewing  test  data  for  all  desired  sensors,
select 

Back

,  then  press 

ENTER


 to  return  to  the  System  Test

menu; or, press 

M

 to return to the Main Menu.

Additional Functions 

SYSTEM TEST MENU 

21

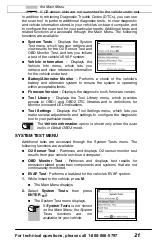
In addition to retrieving Diagnostic Trouble Codes (DTCs), you can use 

the  scan  tool  to  perform  additional  diagnostic  tests,  to  view  diagnostic 

and vehicle information stored in your vehicle's on-board computer, and 

to configure the scan tool for your particular needs. Additional tests and 

related  functions  are  accessed  through  the  Main  Menu.  The  following 

functions are available: 

„


System  Tests

  –  Displays  the  System

Test menu, which lets your retrieve and

view results for the O2 Sensor Test and

OBD  Monitor  Test,  and  lets  you  initiate

a test of the vehicle’s EVAP system.

„


Vehicle  Information

  –  Displays  the

Vehicle  Info  menu,  which  lets  you

retrieve  and  view  reference  information

for the vehicle under test.

„


Battery/Alternator  Monitor

  –  Performs  a  check  of  the  vehicle’s

battery  and  alternator  system  to  ensure  the  system  is  operating

within acceptable limits.

„


Firmware Version

 – Displays the diagnostic tool’s firmware version.

„


Tool  Library

  –  Displays  the  Tool  Library  menu,  which  provides

access  to  OBD1  and  OBD2  DTC  libraries  and  to  definitions  for

Monitor icons and LED indications.

„


Tool  Settings

  –  Displays  the  Tool  Settings  menu,  which  lets  you

make  several  adjustments  and  settings  to  configure  the  diagnostic

tool to your particular needs.

The 

Vehicle Information

 option is shown only when the scan 

tool is in Global OBD2 mode. 

SYSTEM TEST MENU 

Additional  tests  are  accessed  through  the  System  Tests  menu.  The 

following functions are available: 

„


O2  Sensor  Test

  -  Retrieves  and  displays  O2  sensor  monitor  test

results from your vehicle's on-board computer.

„


OBD  Monitor  Test

  -  Retrieves  and  displays  test  results  for

emission-related  powertrain  components  and  systems  that  are  not

continuously monitored.

„


EVAP Test

 - Performs a leak test for the vehicle's EVAP system.

1.

While linked to the vehicle, press 

M

.

„


The Main Menu displays.

2.

Select 

System  Tests

,  then  press

ENTER


.

„


The System Test menu displays.

If 

System  Tests

  is  not  shown 

on the Main Menu, the System 

Tests 

functions 

are 

not 

available for your vehicle. 

Summary of Contents for ZURICH OBD2

Page 1: ......

Page 2: ...MEASUREMENT 19 WARRANTY AND SERVICING LIMITED ONE YEAR WARRANTY 21 SERVICE PROCEDURES 21 SAFETY PRECAUTIONS IMPORTANT SAFETY INFORMATION SCAN TOOL CONTROLS CONTROLS AND INDICATORS DISPLAY FUNCTIONS INITIAL ADJUSTMENTS USING THE SCAN TOOL CODE RETRIEVAL PROCEDURE THE SYSTEM MENU VIEWING OEM ENHANCED DTCs Except Ford Mazda VIEWING OEM ENHANCED DTCs Ford Mazda Only VIEWING ABS DTCs ERASING DIAGNOSTIC...

Page 3: ...XV ZHWEV ZHKF V CDDL V C C b WB KCV CA H HM _ED HLL DYWKX DE ZDC KXWK BHEC 4 C CZ CEHK W WDK WK O _DE H CD HCWA CEHK W WDKJ DE 4 1 _DE HK HL CEHK W WDKJ HKF H E CZ BHE WKX EH W KXHX F 5 C LDA WK _EDKC D_ HKF ZWKF CZ FEWY Z L 6 HF Y ZWAL EYWA HK HL _DE WK B ACWKXV HWKCHWKWKXV DE E BHWEWKX H Y ZWAL 7 HE cHBBEDY F H_ CM XDXXL 8 Y E L HY CZ Y ZWAL KHCC KF F ZWL E KKWKX C C 9 O B H _WE CWKX W Z E WCH L...

Page 4: ...ugh 14 below 1 ERASE button Erases Diagnostic Trouble Codes DTCs and Freeze Frame data from your vehicle s computer and resets Monitor status 2 SYSTEM MENU button When pressed displays the System Menu 3 DTC FF button Displays the DTC View screen and or scrolls the LCD display to view DTCs and Freeze Frame data 4 LINK button When connected to a vehicle links the Scan Tool to the vehicle s PCM 14 8 ...

Page 5: ...on the vehicle are active and performing their diagnostic testing and no DTCs are present 11 YELLOW LED Indicates there is a possible problem A Pending DTC is present and or some of the vehicle s emission monitors have not run their diagnostic testing 12 RED LED Indicates there is a problem in one or more of the vehicle s systems The red LED is also used to show that DTC s are present DTCs are sho...

Page 6: ... a STORED or PERMANENT DTC YELLOW Indicates the currently displayed DTC is a PENDING DTC GREEN In cases where no codes are retrieved a No DTCs are presently stored in the vehicle s computer message is shown in green 7 Code Number Sequence The scan tool assigns a sequence number to each DTC that is present in the computer s memory starting with 1 This number indicates which code is currently displa...

Page 7: ...ts if not repaired as soon as possible 3 Stop and repair vehicle immediately to prevent interrelated failures Harmful and damaging to essential system components 14 Bluetooth icon Indicates communication status with a compatible Innova mobile application please visit www innova com apps for more information A solid blue icon indicates an active Bluetooth connection has been established A solid gre...

Page 8: ...connecting to the DLC 3 Connect the Scan Tool to the vehicle s DLC The cable connector is keyed and will only fit one way If you have problems connecting the cable connector to the DLC rotate the connector 180 If you still have problems check the DLC on the vehicle and on the Scan Tool 4 Turn the ignition on DO NOT start the engine 5 When the Scan Tool is properly connected to the vehicle s DLC th...

Page 9: ...Press LINK to continue If the Scan Tool cannot link to the vehicle s computer after three attempts the message Contact Technical Support displays Press the SYSTEM MENU button to return to the System Menu Turn the ignition off and discon nect the Scan Tool Contact Technical Support for as sistance 7 If the Scan Tool can decode the Vehicle Identification Number VIN for the vehicle under test the Con...

Page 10: ...codes are present If no codes are present the message No Powertrain DTCs or Freeze Frame Data presently stored in the vehicle s computer displays The Scan Tool is capable of retrieving and storing up to 32 codes in memory for immediate or later viewing 11 Refer to DISPLAY FUNCTIONS on page 3 for a description of display elements In the case of long code definitions or when viewing Freeze Frame Dat...

Page 11: ...esting all Monitor icons that are solid have run and completed their diagnostic testing Red LED Indicates there is a problem with one or more of the vehicle s systems The red LED is also used to show that DTC s are present In this case the Malfunction Indicator Check Engine lamp on the vehicle s instrument panel will light steady on DTC s that start with P0 P2 and some P3 are considered Generic Un...

Page 12: ...ns to the Priority Code 15 Determine engine system s condition by viewing the display for any retrieved Diagnostic Trouble Codes code definitions and Freeze Frame data and interpreting the green yellow and red LEDs If DTC s were retrieved and you are going to perform the repairs yourself proceed by consulting the Vehicle s Service Repair Manual for testing instructions testing procedures and flow ...

Page 13: ...e System Menu Turn the ignition off and disconnect the Scan Tool Contact Technical Support for assistance 2 Refer to DISPLAY FUNCTIONS on page 3 for a description of LCD display elements If the definition for the cur rently displayed code is not available an advisory mes sage shows I M MONITOR STATUS icons are not displayed when viewing enhanced DTCs In the case of long code definitions a small ar...

Page 14: ...TER Proceed to step 3 2 If KOEO or Continuous Memory is selected an instructional message shows Turn the ignition OFF then back ON Press ENTER Proceed to step 3 3 A One moment please message displays while the test is in progress If the Scan Tool fails to link to the vehicle s computer a Communication Error message shows Ensure your vehicle is OBD2 compliant Verify the connection at the DLC and ve...

Page 15: ...en viewing enhanced DTCs In the case of long code definitions a small arrow is shown in the upper lower right hand corner of the code display area to indicate the presence of additional information If no codes are present a System Pass displays Press any Hotkey 6 If more than one code was retrieved press DTC FF to display additional codes one at a time 7 When the last retrieved DTC has been displa...

Page 16: ...ption of LCD display elements If the definition for the currently displayed code is not available an advisory message shows I M MONITOR STATUS icons are not displayed when viewing ABS DTCs In the case of long code definitions a small arrow is shown in the upper lower right hand corner of the code display area to indicate the presence of additional information If no codes are present the message No...

Page 17: ...ive Cycle must be performed 1 If not connected already connect the Scan Tool to the vehicle s DLC and turn the ignition On If the Scan Tool is already connected and linked to the vehicle s computer proceed directly to step 3 If not continue to step 2 2 Perform the Code Retrieval procedure as described on page 6 To erase OBD2 DTCs Wait until the codes are displayed then proceed to step 3 To erase O...

Page 18: ... of RepairSolutions 2 is an extensive knowledge database developed by compiling and analyzing years worth of real world vehicle service data RepairSolutions 2 builds on manufacturer recommended diagnostic and repair information by providing verified vehicle specific fixes supplied by ASE technicians across the country RepairSolutions 2 also provides access to an extensive knowledge database includ...

Page 19: ...ions 2 app an follow the prompts to establish Bluetooth and optionally WiFi connections as follows 1 Launch the RepairSolutions 2 app Select Wifi Tools Settings from the menu Power on your Code Reader then select from the list of available devices 2 When Bluetooth pairing is complete a confirmation screen displays Click Continue If a Bluetooth connection cannot be established an advisory message d...

Page 20: ... that is supported by the vehicle under test WARNING If the vehicle must be driven in order to perform a troubleshooting procedure ALWAYS have a second person help you One person should drive the vehicle while the other person observes the Scan Tool data Trying to drive and operate the Scan Tool at the same time is dangerous and could cause a serious traffic accident VIEWING LIVE DATA 1 While link...

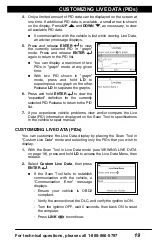
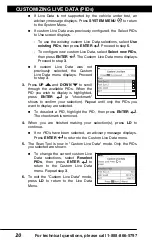
Page 21: ...rate the graphs 6 Press and hold ENTER to view the expanded definition for the currently selected PID Release to return to the PID list 7 If you experience vehicle problems view and or compare the Live Data PID information displayed on the Scan Tool to specifications in the vehicle s repair manual CUSTOMIZING LIVE DATA PIDs You can customize the Live Data display by placing the Scan Tool in Custom...

Page 22: ... Custom Live Data menu displays Proceed to step 3 3 Press UP and DOWN to scroll through the available PIDs When the PID you wish to display is highlighted press ENTER a checkmark shows to confirm your selection Repeat until only the PIDs you want to display are selected To deselect a PID highlight the PID then press ENTER The checkmark is removed 4 When you are finished making your selection s pre...

Page 23: ... and view results for the O2 Sensor Test and OBD Monitor Test and lets you initiate a test of the vehicle s EVAP system Vehicle Information Displays the Vehicle Info menu which lets you retrieve and view reference information for the vehicle under test Battery Alternator Monitor Performs a check of the vehicle s battery and alternator system to ensure the system is operating within acceptable limi...

Page 24: ...the System Test menu select O2 Sensor Test then press ENTER 2 A One moment please message displays followed by the select sensor screen The Select Sensor screen displays The screen shows all O2 sensors applicable to the vehicle under test If O2 sensor test data is not presently stored in the vehicle s computer an advisory message displays Press M to return to the Main Menu If O2 sensor tests are n...

Page 25: ...continuous tests If OBD monitor test data is not presently stored in the vehicle s computer an advisory message displays Press M to return to the Main Menu If OBD monitor tests are not supported by the vehicle under test an advisory message displays Press M to return to the Main Menu 3 Select the desired test then press ENTER to display the test results The display shows the following information ...

Page 26: ...P Test is not supported by the vehicle under test an advisory message shows on the diagnostic tool s display Press the M button to return to the Main Menu VIEWING VEHICLE INFORMATION The Scan Tool offers three options for retrieving reference information for the vehicle under test Vehicle ID Available Modules and IPT In use Performance Tracking Retrieving Vehicle ID Information The Vehicle ID func...

Page 27: ...Information then press ENTER The Vehicle Information menu dis plays 3 Select Available Modules then press ENTER 4 When the retrieval process is completed a complete list of modules supported by the vehicle under test displays 5 When you have finished viewing the list of available modules press M to exit Viewing In use Performance Tracking IPT The Scan Tool can retrieve In use Performance Tracking ...

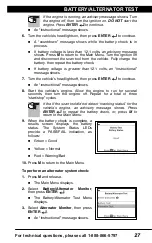
Page 28: ...e system is operating within acceptable limits You can perform a battery check only or an alternator system battery and alternator check To perform a battery check ONLY 1 Press M and release The Main Menu displays 2 Select Battery Alternator Test then press ENTER The Battery Alternator Monitor Menu displays 3 Select Battery Test then press ENTER An instructional message displays showing the proced...

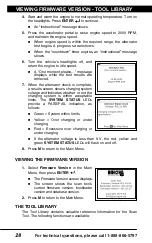
Page 29: ...l message shows 7 Turn the vehicle s headlights off then press ENTER to continue An instructional message shows 8 Start the vehicle s engine Allow the engine to run for several seconds then turn the engine off Repeat for a total of three start stop cycles If the If the scan tool did not detect cranking status for the vehicle s engine an advisory message shows Press ENTER to repeat the battery chec...

Page 30: ...re retrieved 7 When the alternator check is complete a results screen shows charging system voltage and indicates whether or not the charging system is within acceptable limits The SYSTEM STATUS LEDs provide a PASS FAIL indication as follows Green System within limits Yellow Over charging or under charging Red Excessive over charging or under charging If the alternator voltage is less than 9 V the...

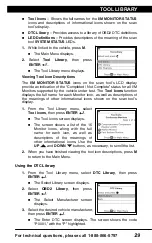
Page 31: ...der test The Tool Icons function displays the full name for each Monitor icon as well as descriptions of the meanings of other informational icons shown on the scan tool s display 1 From the Tool Library menu select Tool Icons then press ENTER The Tool Icons screen displays The screen shows a list of the 15 Monitor icons along with the full name for each icon as well as descriptions of the meaning...

Page 32: ... M to return to the Main Menu Viewing LED Definitions The SYSTEM STATUS LEDs on the scan tool provide a visual indication of the I M Readiness status of the vehicle under test The LED Definitions function provides a description of the meanings of the green yellow and red SYSTEM STATUS LEDs 1 From the Tool Library menu select LED Definitions then press ENTER The LED Meaning screen displays The scre...

Page 33: ...ehicle press and release the M button The Main Menu displays 2 Select Tool Settings then press ENTER The Tool Settings menu displays 3 Make adjustments and settings as follows Adjusting Display Brightness 1 Select Adjust Brightness in the Tool Settings menu then press ENTER The Adjust Brightness screen displays 2 Press UP and DOWN to make the display lighter or darker then press ENTER to save your...

Page 34: ...n of each of the scan tool s hotkeys 2 When you have finished viewing the Hotkey Legend press ENTER to return to the Tool Settings menu Selecting the Display Language 1 Select Language Selection in the Tool Settings menu then press ENTER The Language Selection screen dis plays 2 Select the desired display language then press ENTER to save your changes To return to the Tool Settings menu without ma...

Page 35: ... WCHCWDK D_ AL WDK HM KDC HBBLM CD MD 1 1 4 11 V 1 2V 0142 0 1 2 D CH HFYHKCHX D_ CZW HEEHKCMV CZ BEDF AC DE BHEC C E C EK F CD WCZ CEHK BDECHCWDK AZHEX BE BHWF EDD_ D_ B EAZH FHC HKF HK BLHKHCWDK D_ CZ AD BLHWKC C HAAD BHKM CZ EAZHKFW _ D E WK B ACWDK Y EW_W CZ F _ ACV WLL WCZ E E BHWE DE E BLHA CZ BEDF AC HC D E L ACWDK DE HM L AC CD E _ KF CZ B EAZH BEWA W_ AHKKDC E HFWLM HKF b WA LM BEDYWF MD ...

Page 36: ...buted by Harbor Freight Tools Calabasas CA 57665 Copyright 2021 All rights reserved Distributed by Harbor Freight Tools Calabasas CA Harbor Freight Tools Calabasas CA 57665 Copyright 2021 All rights reserved ...

Reviews: