- 4 -
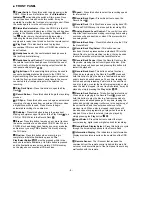
Power Switch : Press this switch to apply power to the
CDR 2. When the unit is firstturned on, the Status-Mode
Indicator
surrounding the switch will turn green. Once
the unit has been turned on with this switch, it may be
operated from either the front panel or remote control. Press
the switch again to turn the unit completely off.
Status-Mode Indicator : When the CDR 2 is in the ON
mode, this indicator will glow green. When the unit has been
placed in the Standby mode by pressing the Power-Off but-
ton
32
on the remote, the indicator will glow amber,
indicating that the unit is still connected to the AC main
supply and is ready to be turned on from the remote control.
Play Deck : This disc deck is used to play back
conventional CD discs and CD-R or CD-RW discs that have
been finalized.
Headphone Jack : Connect standard head-phones to
this jack for private listening.
Headphone Level Control : Turn this control to adjust
the volume level to the head-phones. Note that the use of
this control will not change the analog output levels at the
rear-panel audio outputs , .
Digital Input : This coaxial digital input may be used to
connect a portable digital audio player to the CDR 2 for
digital recording. When an active digital signal is connected
to both the front- and rear-panel coaxial inputs, the source
connected to the front-panel input will be selected for
recording.
Play-Deck Open : Press this button to open the Play
Deck .
Record Button : Press this button to begin the recording
process.
CD Sync : Press this button once to begin an automated
recording of a single track from an external CD player when
a digital connection is used. Press it twice to begin
automated recording of an entire disc.
Dubbing : Press this button to begin the process of
making a complete copy of the disc in the Play Deck to a
CD-R or CD-RW disc in the Record Deck .
Erase : Press this button to erase one or more tracks or
the entire contents of an unfi-nalized CD-RW disc. When a
CD-RW disc has already been finalized you may erase the
entire disc or you may TOC nfinalize” the disc by erasing
the TOC data.
Finalize : Press this button when a record-ing is
complete to initiate the finalization process. The
Play/Select Button
must be pressed within three
seconds to activate finalization. Until this button is pressed
and the finalization process is complete, CD-R discs may
not be played on conventional CD machines.
Speed : Press this button to select the recording speed
for internal dubs.
Record-Deck Open : Press this button to open the
Record Deck .
Record Deck : This Disc Deck is used to play back CD,
CD-R and CD-RW discs; it is also used for recording CDs
Analog-Record Level Control : The con-trol is used to
adjust the input level when making recordings from analog
sources such as cas-settes, or when CDs are recorded in
an analog mode.
Record-Deck Stop : Press this button to stop the CD in
the Record Deck.
Record-Deck Play/Select : This button has two
functions. It may be pressed when a standard CD is in the
Record Deck to put the machine in play, or it may be used
to enter a selection or start certain record functions.
Record-Deck Pause : When the Record Deck is in the
Play mode, pressing this button will pause the disc. If the
disc has previously been paused, pressing this button will
restart the playback.
Record-Deck Next : This button has two functions.
When a disc is playing in the Record Deck , press and
hold this button to play the disc in a fast-forward mode to
quickly locate a desired passage. At any time, tapping the
but-ton and quickly releasing it will move to the next track
on a disc in play, or enter the track for programming or play
when the disc is stopped. Once a track is entered, it may be
played by simply pressing the Play button .
Record Deck Previous : This button has two functions.
When a disc is playing in the Record Deck , press and
hold this button to play the disc in a fast reverse mode to
quickly locate a desired passage. At any time, tapping the
button and quickly releasing it will move to the beginning of
the current track, and the next press will move to the
previous track. When a disc is stopped, each press will
move back one for programming or play when the disc is
stopped. Once a track is entered, it may be played by
simply pressing the Play button .
Input Select : Press this button to select the input
source (analog, digital coax or digital optical) for recording.
Record-Deck Display Select : Press this button to cycle
through the time display options for the Record Deck.
Information Display : The indicators in the Information
Display provide status reports on the operation of the CDR
2.
Remote Sensor : The IR sensor that receives the
commands from the remote control is behind this area. Do
not cover or obscure this part of the front panel to avoid any
malfunction with the remote.
●
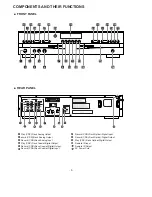
FRONT PANEL
1
2
2
3
4
5
6
7
8
9
10
11
15
12
18
13
14
15
15
18
18
15
15
16
17
18
19
20
21
22
23
24
25
➓
➊ ➋
➑
➑
3
3
Summary of Contents for CDR 2
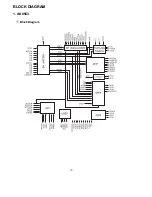
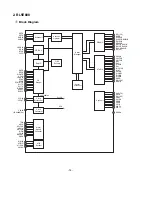
Page 13: ... 13 BLOCK DIAGRAM 1 AK8563 Block Diagram ...
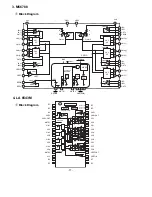
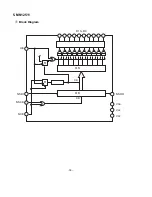
Page 18: ... 18 5 MN12511 Block Diagram D15 D0 NSDO VDD VSS VPP NCE NSCK NSDI CK CK OE OK R R OK ...
Page 19: ......
Page 20: ......
Page 21: ......
Page 22: ......
Page 23: ......
Page 24: ......
Page 25: ......
Page 29: ......
Page 30: ......
Page 31: ......
Page 32: ......
Page 33: ......
Page 34: ......
Page 35: ......
Page 36: ......
Page 37: ......
Page 38: ......
Page 39: ......
Page 40: ......
Page 41: ......
Page 42: ......
Page 43: ......
Page 44: ......
Page 45: ......
Page 46: ......
Page 47: ......
Page 48: ......
Page 49: ......
Page 50: ......
Page 51: ......
Page 52: ......
Page 53: ... 53 ...
Page 54: ... 54 ...
Page 55: ... 58 ASIC IC 301 74 105 107 BITSTR 1 IC 301 80 86 88 107 105 74 80 86 88 ...
Page 56: ... 59 U COM IC 202 12 14 16 12 14 16 ...
Page 60: ......
Page 61: ......
Page 62: ......
Page 63: ......
Page 64: ......
Page 65: ......
Page 66: ......
Page 67: ......
Page 68: ......
Page 69: ......
Page 70: ......
Page 71: ......
Page 72: ......
Page 73: ......
Page 74: ......
Page 75: ......
Page 76: ... 69 PCB LAYOUT CD PLAY TOP SECTION ...
Page 77: ... 70 CD PLAY BOTTOM SECTION ...
Page 78: ... 71 CD RECORD TOP SECTION CD RECORD BOTTOM SECTION ...
Page 79: ... 72 AUDIO TOP SECTION AUDIO BOTTOM SECTION ...
Page 80: ... 73 FRONT SECTION ...
Page 81: ... 74 POWER SECTION ...
Page 82: ... 75 BLOCK DIAGRAM CD RECORD SECTION ...
Page 83: ... 76 CD PLAY SECTION ...
Page 85: ... 78 WIRING DIAGRAM ...


