background image

4

INTRODUCTION / SAFETY INFORMATION

Introduction / Safety Information

Only use the HS 250 controller with the loud-
speaker system supplied. Failure to do so may
cause damage to either the controller or the
loudspeakers and will invalidate any warranty.

All of the optional system settings have been
pre set at our factory for correct operation of the
system. All you have to do is insert a disc, sit
back, and enjoy a great home theater ex pe ri -
ence.

You may want to change some of the op tion al
set tings. A description of all the optional set tings
and in struc tions for changing them are found in
the second half of the manual.

This system was designed to provide you with
many years of reliable operation with a mini-
mum of care and main te nance. Every component
in your system was in perfect working con di tion
when it left our fac to ry. If you ex pe ri ence any
problems with the set-up or operation of this
system, please review the Troubleshooting Guide
at the end of this manual before you con tact
your authorized Harman Kardon dealer.

Important Safety Information

Verify Line Voltage Before Use

Your HS 250 has been designed for use with
220-240-Volt AC current. Connection to a line
voltage other than that for which it is intended
can create a safety and fire hazard and may
damage the unit.

If you have any questions about the voltage
requirements for your specific model, or about
the line voltage in your area, contact your dealer
before plugging the unit into a wall outlet.

Do Not Use Extension Cords

To avoid safety hazards, use only the power cord
attached to your unit. We do not recommend
that extension cords be used with this product.
As with all electrical devices, do not run power
cords under rugs or carpets or place heavy
objects on them. Damaged power cords should
be replaced immediately by an authorized serv-
ice depot with a cord meeting factory specifica-
tions.

Handle the AC Power Cord Gently

When disconnecting the power cord from an AC
outlet, always pull the plug, never pull the cord.
If you do not intend to use the unit for any
 considerable length of time, disconnect the plug
from the AC outlet.

Do Not Open the Cabinet

There are no user-serviceable components inside
this product. Opening the cabinet may present a
shock hazard, and any modification to the pro -
duct will void your guarantee. If water or any
metal object such as a paper clip, wire or a
 staple accidentally falls inside the unit, discon-
nect it from the AC power source immediately,
and  consult an authorized service station. 

Installation Location

I

To assure proper operation and to avoid the
potential for safety hazards, place the unit on
a firm and level surface. When placing the
unit on a shelf, be certain that the shelf and
any mounting hardware can support the
weight of the product.

I

Make certain that proper space is provided
both above and below the unit for ventilation.
If this product will be installed in a cabinet or
other enclosed area, make certain that there
is sufficient air movement within the cabinet.
Under some circumstances a fan may be
required.

I

Do not place the unit directly on a  carpeted
surface. 

I

Avoid installation in extremely hot or cold
locations, or an area that is exposed to direct
sunlight or heating equipment.

I

Avoid moist or humid locations.

I

Do not obstruct the ventilation slots on the
top of the unit, or place objects directly over
them.

Cleaning

When the unit gets dirty, wipe it with a clean,
soft, dry cloth. If necessary, wipe it with a soft
cloth dampened with mild soapy water, then a
fresh cloth with clean water. Wipe dry immedi-
ately with a dry cloth. NEVER use benzene,
aerosol  cleaners, thinner, alcohol or any other
volatile cleaning agent. Do not use  abrasive
cleaners, as they may damage the finish of metal
parts. Avoid spraying insecticide near the unit.

Moving the Unit

Before moving the unit, be certain to disconnect
any interconnection cords with other compo-
nents, and make certain that you disconnect the
unit from the AC outlet.

Unpacking

The carton and shipping materials used to
 protect your new receiver during shipment were
specially designed to cushion it from shock and
vibration. We suggest that you save the carton
and packing materials for use in shipping if you
move, or should the unit ever need repair.

To minimize the size of the carton in storage,
you may wish to flatten it. This is done by care-
fully slitting the tape seams on the bottom and
 collapsing the carton. Other cardboard inserts
may be stored in the same manner. Packing
materials that cannot be collapsed should be
saved along with the carton in a plastic bag. 

If you do not wish to save the packaging
 materials, please note that the carton and other
sections of the shipping protection are recycla-
ble. Please respect the environment and discard
those materials at a local recycling center.

Copyright

Audio-visual material may consist of copyright
works which must not be recorded without the
permission of the owner of the copyright. 
Please refer to relevant laws covering copyright
protection.

Copy protection

This DVD player supports Macro vision copy
 protection. On DVD discs that include a copy
 protection code, if the contents of the DVD disc
are copied using a VCR, the copy pro tecti on
code prevents the videotape copy from playing
 normally.

For Optimum Performance

The controller is a precision device that is
 constructed using extremely accurate technolo-
gy. Soiling or friction affecting the pickup lens or
disc drive can impair the image quality. In the
worst case, neither video nor audio will be
played back. To obtain optimum picture quality,
the player should be checked (cleaning and
replacement of some parts) every 1,000 hours.
Note that this period varies depending on the
environment (temperature, humidity, dust) in
which the player is used.

Do not attempt to clean the pickup lens
yourself.

0095CSK - HK HS 250 OM ENG.qxp:34138_HS250_UK  20/01/09  9:43  Side 4

Summary of Contents for Digital Lounge HS 250

Page 1: ...ENGLISH HS 250 Home Cinema System OWNER S MANUAL ...

Page 2: ... use this manual with the remote control front panel controls and rear panel connections certain conventions have been used EXAMPLE bold type indicates a specific remote control or front panel button or rear panel connection jack EXAMPLE OCR type indicates a message that is visible on the front panel information display number in a square indicates a specific front panel control 0 number in a circ...

Page 3: ...cks subti tles or aspect ratio while a parental lock func tion enables you to control which discs may be viewed by younger members of the household DVD players are among the fastest growing consumer electronics products ever brought to market but this may nevertheless be the first DVD player you ve owned Although many of the features of the DVD resemble those of standard CD players there are a num...

Page 4: ...is provided both above and below the unit for ventilation If this product will be installed in a cabinet or other enclosed area make certain that there is sufficient air movement within the cabinet Under some circumstances a fan may be required I Do not place the unit directly on a carpeted surface I Avoid installation in extremely hot or cold locations or an area that is exposed to direct sunligh...

Page 5: ...lution To conserve band width analog compression interlacing is employed first the odd numbered lines of a frame are displayed followed by the even num bered lines The result is that only half of the video image is drawn at one time the viewer s brain must reassemble the complete image This is acceptable if the monitor is not too large and if there is not too much motion in the image Large display...

Page 6: ...scs may include a mix of features that are not compatible with the DVD Similarly although the DVD is capable of a wide range of features not all discs include every capability of the DVD system For example although the DVD is compatible with multi angle discs that feature is only possible when the disc is specially encoded for multiple angle play In addition the DVD is capable of playing back both...

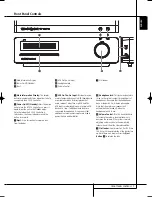
Page 7: ...k of audio image of video files or a USB hub The USB inputs are designed to power a single USB device at a time If additional hard disks are connected through a hub it is necessary that additional external power supplies are used to power the hub and hard disks 4 Headphone Jack This jack may be used to listen to the system s output through a pair of headphones Be certain that the headphones have a...

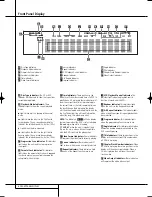
Page 8: ...rs will show the current track time time remaining in the current track or the total remaining time on the disc When an iPod is playing the display will show the elapsed and remaining time on the top line The bottom line will scroll information about the song title album and artist NOTE The Indicators NOE will also display text messages about the DVD s status including Reading when a disc is loadi...

Page 9: ... connector s video output signal 4 AC Power Cord Connect this plug to an AC outlet If the outlet is controlled by a switch make certain that it is in the ON position 5 FM Antenna Connect to the supplied FM antenna 6 Audio In Connect to a line level analog audio source TV tape player Minidisc PC etc 7 Subwoofer Output Connect to the SUB LFE input on the subwoofer 8 Coaxial Digital Input Connect the...

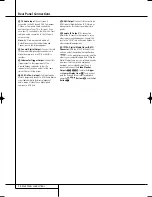
Page 10: ...used to temporarily connect a USB thumb device or portable hard disk for direct playback of audio image of video files a digital photo camera or a USB hub H HDMI Output Connect this output to the HDMI input of high definition LCD Plasma or video projector for the best possible picture quality I Remote IR Output This connection permits the IR sensor in the receiver to serve other remote controlled ...

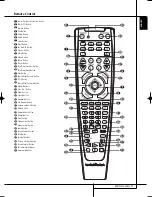
Page 11: ...us Button Skip Step Next Button Play Button Search Slow Reverse Button STOP Button Search Slow Forward Button Macro Buttons Pic Pic Button Zoom Button Playlist Button Random Button A B Repeat Button Volume up down Button Mode Button Numeric Keys Button Repeat Button Clear Button Video output Button Video format Button Learn Button Screen Power Buttons Info Button Teletext Buttons Picture in Pictur...

Page 12: ...lay from the begin ning J Search Slow Fwd Button Allows you to search forward through a disc while it is in play mode Each time you press this button the search speed changes as indicated by a number of arrows on the right top of your screen After pressing the PAUSE button each press of this button will change the slow down speed as indicated by a number of arrows in the right top of the screen K ...

Page 13: ...r ducts or leave it in a car parked in direct sunlight as there can be a considerable rise in temperature inside the car After playing store the disc in its case Do not write on the label side with a ball point pen or other writing utensils Be careful not to drop or bend the disc Disc cleaning precautions Before playing clean the disc with a cleaning cloth Wipe the disc from the center out Do not ...

Page 14: ...onents NOTE To be able to listen to the sound of a live TV show through the loudspeakers of your HS system you need a connection between the audio output of your TV and the HS controller to achieve this when using the supplied SCART cable you don t need to connect any additional wires the SCART cable transports audio and video signals in both directions But when using the HDMI Component S Video or...

Page 15: ...of a compatible computer sound card to the Optical and Coaxial Digital Inputs 89 Connect the Coaxial Digital Output E on the rear panel of the HS to the matching digital input connections on a CD R or MiniDisc recorder Notes when connecting the optical digital audio cable optional I Gently push the cable plug through the built in shutter that covers the optical digital audio output and connect the...

Page 16: ...ture at all not even the Harman Kardon screen check the setting of the video input used on your TV most SCART inputs on TVs can be configured in the TV s menu If this doesn t work connect your TV with different cables to the HS Controller e g via Composite yellow jacks or S Video cables rather than SCART to view the setup menus until all appropriate Video menu settings are made properly 4 Insert a...

Page 17: ... session DVD containing Windows Media Audio files may not be supported open session discs are not supported the DVD player does not support PC data this DVD player does not support an unfinalized disc with a closed session 1 Insert a disc into the Slot Loader 6 2 Press the OSD button of the remote control and select a folder by pressing the up down cursor buttons and press ENTER A list of files in...

Page 18: ...W Buttons 9 until the requested setting is shown and confirm this setting by pressing ENTER 6 Note that when you cycle though the options for this setting the cursor cycles though the options on the Lower Menu Line and the rest of the Display fades out A Main Menu Line B Submenus C Current Settings D Upper Menu Line with Brief Explanation E Lower Menu Line with Possible Options Set Up Menu The fir...

Page 19: ...UM does not make any changes to the original playback and should be used when the volume setting in the listening room may be as loud as you desire MEDIUM applies a moderate amount of compression so that louder passages are a little bit quieter MAXIMUM applies more compression so that louder passages are much softer Feel free to experiment with the settings at any time Tone Control Activates or De...

Page 20: ...he DVD and adjust the output accordingly Movie Choose this option for optimal play back of material that was shot on film even though you are viewing it on video via a DVD Video Choose this option for optimal playback of material that was shot directly to video such as concerts and sports programming Video Resolution Selects the resolution of the video output When the HS system is connected to eit...

Page 21: ...tting may be reduced when the surrounding light is dimmed usually improving the sharpness of a video a lot thereby 4 The grey scale in the middle line needs to have the same clear difference between each bar as before the contrast adjustment If not go back to the brightness adjustment and repeat step 3 and then the contrast adjustments making only minor adjustments each time for optimisation Color...

Page 22: ...til the icon is highlighted in light blue and the full Track list is visible on the screen In the same way the Disc list can be removed from the screen by de activating the PROGRAM Submenu When the HS 250 is in play mode pressing the PLAY button on the remote control will highlight the track being played Information Displays In DVD and MP3 mode activating the DISC INFO DVD or ID3 INFO MP3 Submenu ...

Page 23: ... 4 even if the cursor is highlighting preset 11 Pressing the Play button will always return the cursor to the current station played no matter were it was previously even when another menu is open Removing presets If you wish to remove presets from your preset list follow the steps below 1 Move the cursor in the left column in the station list to the preset you would like to remove 2 Press Enter 6...

Page 24: ...sibility to increase or decrease the input level of the analog input so that its sound will have the same level as the radio the DVD player or the other audio inputs DIGITAL IN MENU In addition to all analog audio and video sources the HS 250 also gives you the opportu nity to connect two digital audio sources for instance a digital set top box or satellite receiv er Connect these sources to eithe...

Page 25: ...an external USB hard drive You will need a FAT32 pre formatted external hard disk drive with USB connector If your disk is formatted with another file system like NTFS you will need to re format it Please contact your hard disk supplier for more information We recommend creating folders and sort the files by file type movies pictures or music This will allow you to quickly find the file you re loo...

Page 26: ...ress them as noted in Step 5 7 When all buttons to be erased have been pressed press the Learn button to complete the process To erase all codes within a single device follow these steps 1 Press and hold both the Input Selector 0 for which you wish to erase the codes and the Learn button 2 When the red LED under the Input Selector turns red and the Program Indicator flash es amber release the butt...

Page 27: ...ingala 7678 Lithuanian 7684 Macedonian 7775 Malagsy 7771 Malay 7783 Malayalam 7776 Maltese 7784 Maori 7773 Marathi 7782 Moldavian 7779 Mongolian 7778 Naru 7865 Nepali 7869 Norwegian 7879 Occitan 7967 Oriya 7982 Oromo Afan 7977 Panjabi 8065 Pashto Pushto 8083 Persian 7065 Polish 8076 Portuguese 8084 Quechua 8185 Language Code Rhaero Romance 8277 Romanian 8279 Russian 8285 Samoan 8377 Sangho 8371 Sa...

Page 28: ...inking on the front panel display The protective circuitry has been activated because of a short circuit Turn off the system eliminate the short circuit problem and turn on the power again The audio interconnect is damaged Replace it with a new one The system is in pause mode or in slow motion play mode or fast forward or fast reverse Press N to return to normal play mode Check the speaker setting...

Page 29: ...bited on the DVD In that case the audio language must be selected by the main menu on the DVD The subtitle language cannot be changed when you play a DVD Multilingual subtitles are not recorded on the DVD Changing the language for the subtitles by the Subtitle button on the remote or the Subtitle line in the Player Menu is prohibited on the DVD In that case the subtitle language must be selected b...

Page 30: ... all channels are recorded discretely and processed digitally Manufactured under license from Digital Theater Systems Inc US Pat No 5 451 942 and other worldwide patents issued and pending DTS and DTS Digital Surround are trademarks of Digital Theater Systems Inc 1996 Digital Theater Systems Inc All rights reserved MPEG AUDIO International standard coding system to com press audio digital signals ...

Page 31: ...86 Vp p 75 Ohms Audio line Outputs Audio L R 2 Vrms 1 kilohms General Power requirements AC 230 V 50 Hz Max power consumption 300 W Idle power consumption Less than 2 W Dimensions WxHxD 350mm x 84mm x 250mm Weight 3 8 kg Designs and specifications are subject to change without notice Depth measurement includes knobs buttons and terminal connections Height measurement includes feet and chassis All ...

Page 32: ...ive Woodbury New York 11797 516 422 HKHK 4545 Fax 516 682 3523 USA only www harmankardon com Harman Consumer Group Inc 2 route de Tours 72500 Château du Loir France 2008 Harman Kardon Incorporated Part No 01 00 YS SM1 E1378 ...

Reviews: