12
INSTALLATION AND CONNECTIONS
Installation
Connections will vary, depending on the type of
audio and video components used with your
DVD 50. However, regardless of the complexity
of your system, the installation guidelines on
pages 14–17 should always be followed to
ensure a safe installation and reliable operation
of the product.
Important Note:
To prevent possible damage
to your speakers or other components in your
home entertainment system, we strongly rec-
ommend that ALL system components, includ-
ing the DVD 50, be turned off and unplugged
from their AC power source when any connec-
tions are made or a new component is
installed.
Placement of the DVD 50
Since the laser transport mechanism and
carousel tray in the DVD 50 are precision
components designed and manufactured to
exact tolerances, they are subject to interfer-
ence from vibration. To minimize the possibility
of skipping during playback, it is recommended
that the unit be placed on a level, solid,
vibration-free surface.
When installing the DVD 50 in a cabinet or
tight space, always make certain that there is
enough room in front of the unit for the disc
tray to open fully, and that there is enough
space above the unit so that discs may easily
be inserted into the spaces in the tray.
As the disc drawer extends out about six inches
from the front of the unit when it is open, you
should also make certain that there is sufficient
clearance in front of the unit to accommodate
the disc drawer without it bumping into other
objects or getting in the way of anyone walking
in front of the unit.
In addition to the safety considerations outlined
on page 4, it is also recommended that the
DVD 50 not be placed in a location that is sub-
ject to direct sunlight or extreme heat or cold,
as these conditions may damage the discs used
in the player, or the player itself. Note that
audio amplifiers or high-power receivers, as
well as certain other electronic products, can
generate significant heat. For that reason, do
not place the DVD 50 directly on top of an
amplifier, receiver, or other heat source.
Always allow at least one inch of free space on
all sides of the DVD 50 as well as around other
electronic products to allow for proper
ventilation.
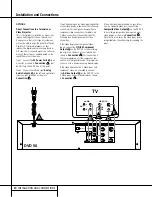
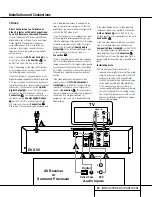
Installation Options
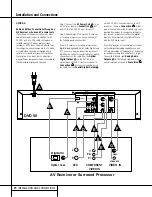
The diagrams on pages 14–17 describe the
three basic ways to connect the DVD 50 to your
system components.
■
Option #1: Use this setup if all audio and
video connections from the DVD 50 will go
directly to a television set or video projector
without the use of an A/V receiver or
surround processor.
■
Option #2: Use this setup if the video con-
nections will go directly to a television set or
video projector, but the audio connections
will be made to an A/V receiver or surround
processor.
■
Option #3: Use this setup if all audio and
video connections will be made through an
A/V receiver or a surround processor.
Important Notes on Installing the DVD 50
The following important notes apply to all three
installation options:
■
If your television has both standard compos-
ite video and S-Video inputs, you only need
to use one of the two connections. Where
possible, we recommend an S-Video connec-
tion, due to the higher picture quality.
■
Do not connect any of the video outputs of
the DVD 50 through a VCR. The use of
Macrovision encoding on most DVD discs
means that most discs will have a distorted
picture when connections are made through
a VCR.
■
Note that the volume level for DVD playback
may differ from the level for other input
sources to your receiver. This is normal and
does not indicate a problem with the DVD 50
or your receiver. Simply use the volume con-
trol on the receiver to set the desired level.
■
Depending on the product and brand, a
number of different descriptions are used to
label component video connections. You may
see them as Y/Pr/Pb, Y/Cr/Cb or Y/R-Y/B-Y.
For the purposes of connecting a DVD player,
all of these labels are normally identical. The
best guide is to connect the component
video connections using the green/red/blue
color coding of the inner rings of the con-
nection jacks.
■
If your television is high-definition or “digital
ready” television, you may take advantage
of the DVD 50’s progressive scan output for
the highest video resolution possible. Make
the component video connections shown or
you may connect the component video jacks
directly to the component video or HD com-
ponent inputs on your TV or video display.
Once the connection is made, the progres-
sive scan circuitry must be activated by
changing the setup menus as shown on
page 23. Note that progressive scan capabil-
ity is not operational with standard analog
component video connections.
■
Note that all cables shown for use in the
connection diagrams are optional. Consult
your dealer or installer for information on
the best cables for your specific system
application.
■
When the progressive scan output is
activated, there is no output from either
the
S-Video
§
or
Composite Video
∞
jack.
■
When the
Component Video Output
¢
is used for a standard video signal (that is
with the progressive scan output turned off),
there is no output from the
S-Video
§
jack, but the
Composite Video Output
∞
will function normally. See page 23 for
more information on video output settings.
Installation and Connections


