background image

Using the Remote Control

The included wireless remote lets you control the 

GPS-8

1

0

 from up to 2

0

 feet

away. The remote works by RF, so the remote does not need a clear ‘line of
sight’ between itself and the 

GPS-8

1

0

 for it to work.

Mounting the Remote

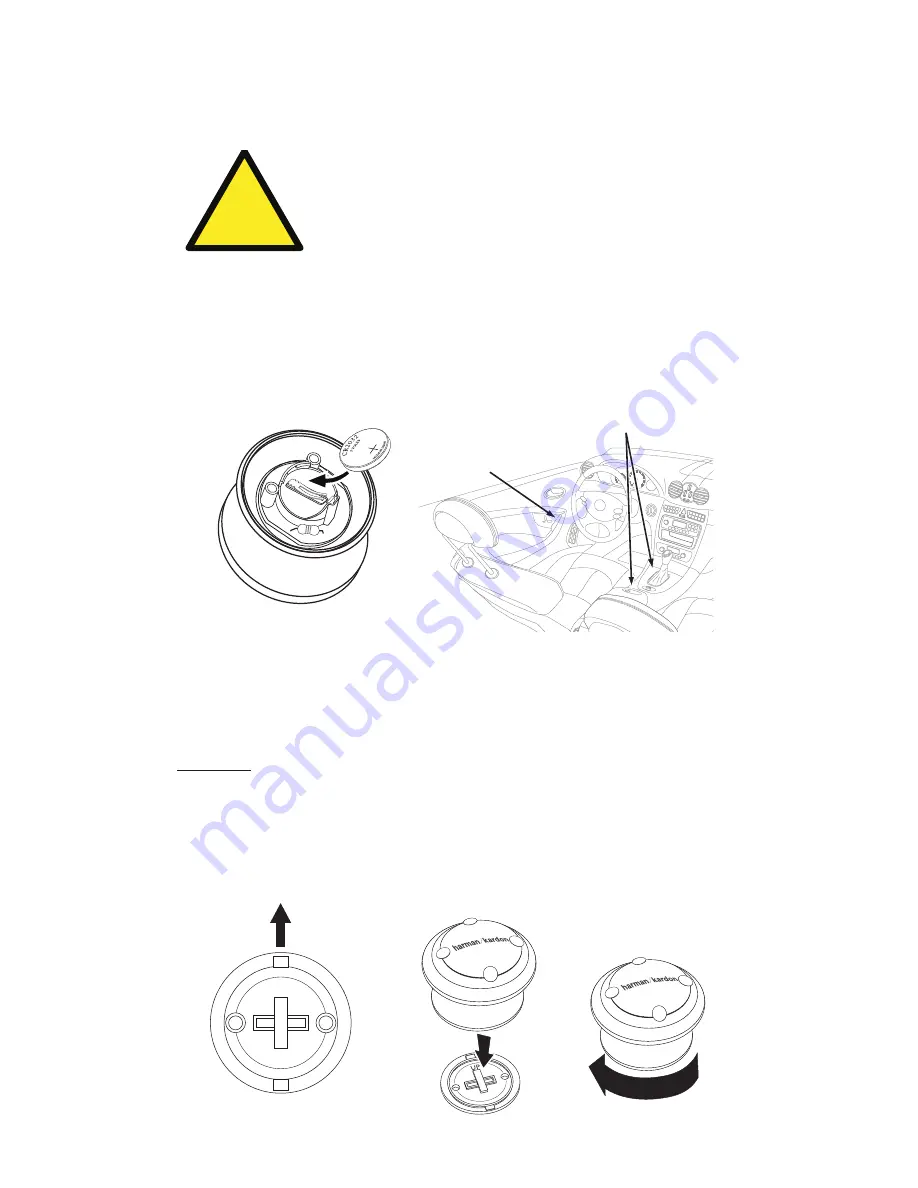
1. Use a coin to remove the remote’s bottom cover.

2. Insert the battery with the “+” terminal facing you (

below, left

). 

G

ently push

the battery down into the mount until it snaps into place.

3.

S

elect a mounting location for the remote (

below, right

).

4. Orient the remote’s bottom cover with the word “U

P

” facing towards the

front of the vehicle (

below, left

).

5. You can either screw the bottom cover to the mounting location or use

the supplied double

-

stick adhesive pad. 

IMPORTANT: If you use the adhesive pad you must first clean the mounting area with
the supplied alcohol swab.

6. 

P

ush the remote down onto the bottom cover and turn its base clockwise

to secure it (

below, right

). To remove the remote from the bottom cover

hold it by the base and turn it counter

-

clockwise.

U

ser Manual

34

e

d

i

u

g

+

y

a

l

p

GPS-8

1

0

On the

Center Console

On the

Side Console

UP

Towards Front of Vehicle

Attach Remote to 

Bottom Cover

Twist Remote

Base Clockwise

to Secure

!

Do not install this device in any manner that impairs the safe 
operation of the vehicle. Do not install this device on any airbag 
panels or in the deployment field of any airbags. Do not place the
device on the vehicle’s dashboard unsecured. Failure to observe the
installation or usage instructions may result in traffic accidents or 
personal injury.

Summary of Contents for GPS GPS-810

Page 1: ...Portable Touchscreen Navigation System and A V Media Player User Manual e d i u g y a l p 0 1 8 S P G For the latest software updates and other information visit www guideandplay com...
Page 2: ...ecifications 39 Battery Notes The Harman Kardon GPS 810 uses a lithium polymer battery To protect the performance of your GPS 810 and its battery please observe the following guidelines Do not operate...

Page 3: ...roughly Unpacking Your GPS 810 box should contain these items GPS 810 Unit Wall Charger Car Charger USB Cable Fold Flat Mounting Bracket Mounting Base Disc and Adhesive Pad for Dash Mounting Alcohol C...

Page 4: ...RIGHT SIDE Lock Switch Volume Brightness Control Headphone Audio Output Jack Mini USB Connector Charger Port GPS Antenna ON OFF Button SD Card Slot Reset Button Speaker Mounting Base Power Connection...

Page 5: ...the GPS 810 keeping the navigation maps loaded into the unit s memory for quicker turn on OFF mode Completely shuts the GPS 810 off requiring that the navigation maps be loaded back into memory when...

Page 6: ...mposed on the screen and you can change the screen s brightness by rotating the volume knob HEADPHONE AUDIO OUTPUT JACK Lets you connect headphones for person al listening You can also connect the hea...

Page 7: ...dplay com 3 Click on the Product Support link 4 Follow the instructions to download the latest firmware version into your GPS 810 After the GPS 810 s firmware has been updated 1 Make sure the LOCK swi...

Page 8: ...CHANGING SETTINGS on page 27 User Manual 8 e d i u g y a l p GPS 810 1 Touch the button for the screen language you want to use English French or Spanish Touch the NEXT button 2 Touch the button for t...

Page 9: ...ouch the appropriate button for the city you want to travel to If you select one of the city buttons the ENTER CITY NAME screen below appears If you select OTHER LOCATION the SELECT COUNTRY and SELECT...

Page 10: ...page 14 CHOOSING A PLACE FROM THE GPS 810 S DATABASE The GPS 810 has a built in point of interest database with millions of entries in many different categories SERVICES Gas stations car dealers and r...

Page 11: ...ou want to go The CONFIRM ADDRESS screen right appears 5 Touch GO to begin navigation The map screen will appear Once you start driving the GPS 810 will guide you to your destination See Navigating to...

Page 12: ...e of the second street The CONFIRM ADDRESS screen right appears 5 Touch the GO button to begin navigation The map screen will appear Once you start driving the GPS 810 will guide you to the intersecti...

Page 13: ...our home address the GPS 810 will have you do so NAVIGATING TO RECENTLY VISITED OR SAVED LOCATIONS The GPS 810 stores a list of your recently visited locations in a HISTORY page and also lets you save...

Page 14: ...ation and your direction of travel The route that the GPS 810 has calculated is indicated by the green line The map shows the distance to and direction of your next turn and also shows the remaining t...

Page 15: ...VIEW BUTTON Touching this button cycles the map view between 2D 2D north oriented and 3D See illustrations below right MAP ZOOM BUTTONS Repeatedly touching the and buttons zooms your view from a dista...

Page 16: ...Specific traffic hazards are indicated icons on the map screen TRAFFIC EVENT LIST BUTTON Displays a list of all the major highways in your area that have traffic hazards right Touching the ALL TRAFFI...

Page 17: ...icular leg of the trip third right Touching the CHANGE ROUTE BY AVOIDING button lets you alter your route bottom right This screen lets the GPS 810 recalculate a new route that avoids a particular tur...

Page 18: ...r turning the power back on you will need to go outside to receive the GPS signal again before the navigation functions will operate ROUTE PRIORITY When the GPS 810 calculates navigation routes you ca...

Page 19: ...ded from TMC tuning SUBSCRIPTION Shows when your current TMC subscription expires and has your GPS810 s unique TMC ID number MAP DISPLAY Allows you to enable or disable the display of traffic and even...

Page 20: ...bps data rate M4V MP4 3GP extensions only PHOTOS JPEG BMP and GIF formats up to 4096 x 3072 pixels Resizing images to the GPS 810 s native screen resolution of 480 x 272 will produce the best results...

Page 21: ...Select Windows Media Player s SYNC mode see below 8 Drag the files you want to transfer into the Windows Media Player SYNC LIST see below 9 Select START SYNC and wait for the process to finish see bel...

Page 22: ...USB MASS STORAGE see page 20 4 Connect the GPS 810 to your computer s USB hub see page 21 5 Launch Windows Explorer not Internet Explorer on your computer Find it at Start Programs Accessories Windows...

Page 23: ...ens all look and work the same as the ARTIST screen THE NOW PLAYING SCREEN The GPS 810 will display the NOW PLAYING screen below while songs are playing giving you control of and information about you...

Page 24: ...creen see page 23 play the song then play through the rest of the songs in that playlist NOTE Playlist contents are determined by the computer the songs were transferred from and cannot be changed by...

Page 25: ...l will display it third right To see the full photo fourth right touch the screen To see the next or previous photos in the folder touch the Skip Ahead Skip Backward buttons below To see a slide show...

Page 26: ...both the GPS 810 and the Bluetooth enabled phone 1 Turn your Bluetooth enabled phone ON and put it in Pairing or Discovery mode 2 Touch the PHONE button on the SOURCE screen see page 19 The CELL PHON...

Page 27: ...trongly recommend attaching the GPS 810 to the included mounting bracket and using the Guide Play hands free microphone model GPS MIC not included The microphone connects to the mounting bracket see p...

Page 28: ...ntrol knob in The BRIGHTNESS indicator will be superimposed on the screen and you can manually change the screen s brightness by rotating the volume knob or change the mode to AUTOMATIC Color Mode The...

Page 29: ...sound of your GPS 810 1 Turn your vehicle s radio on and tune through its FM channels to find one between 88 1MHz and 107 9MHz that is not broadcasting in your area 2 Once you have located an FM chann...

Page 30: ...ary time formats DAYLIGHT SAVINGS Selecting ON adds an hour to the current time Demo Content The DISPLAY SOURCE BUTTONS button on the DEMO CONTENT screen right lets you select between the standard SOU...

Page 31: ...l p GPS 810 31 On the Windshield On the Console On the Dashboard Do not install this device in any manner that impairs the safe operation of the vehicle Do not install this device on any airbag panels...

Page 32: ...t to the dash board ATTACHING THE GPS 810 TO THE BRACKET 1 Fit the bottom mounting slot into the bracket cradle 2 Snap the rear mounting slot into the bracket cradle Make sure that the unit is securel...

Page 33: ...fits a 3 5mm stereo mini plug LISTENING TO AUDIO IN YOUR VEHICLE There are three ways you can listen to audio from your GPS 810 in your vehicle 1 Through your vehicle s AUX IN audio connection see abo...

Page 34: ...supplied double stick adhesive pad IMPORTANT If you use the adhesive pad you must first clean the mounting area with the supplied alcohol swab 6 Push the remote down onto the bottom cover and turn its...

Page 35: ...y seek The screen will display a large alphabet display right Use the outer ring to seek through the alphabet and when the desired letter is displayed press the center button once to select it User Ma...

Page 36: ...g the Remote with the GPS 810 If the remote fails to operate the GPS 810 you will need to synchronize their RF frequencies bind the remote 1 Turn the GPS 810 on 2 Press the remote s top center and rig...

Page 37: ...ading Media on Your SD Card on page 19 Screen is too bright or too dim Adjust the screen brightness using the volume control see Volume Brightness Control on page 5 or adjust the screen brightness in...

Page 38: ...etooth mode is turned ON Turn the GPS 810 fully off and on Touch the SOURCE PHONE MANAGE CONNECTION CONNECT PHONE buttons See Using With a Bluetooth Phone on page 25 Unable to Voice Dial Bluetooth pho...

Page 39: ...Rechargeable internal lithium polymer battery Battery Life 4 Hours Dimensions HxWxD 27 8 x 4 x 73mm x 121mm x 19mm Harman Kardon is a trademark of Harman International Industries Incorporated register...

Page 40: ...Notes User Manual 40 e d i u g y a l p GPS 810...

Page 41: ...Notes User Manual e d i u g y a l p GPS 810 41...

Page 42: ...Notes User Manual 42 e d i u g y a l p GPS 810...

Page 43: ...au du Loir France declare in own responsibility that the product described in this manual is in compliance with technical standards EN 60950 1 2001 A11 EN 55022 1998 A1 2000 A2 2003 EN 55024 1998 A1 2...

Page 44: ...u g y a l p 250 Crossways Park Drive Woodbury New York 11797 2008 Harman International Industries Incorporated All rights reserved For the latest Guide Play product information visit www guideandplay...

Reviews: