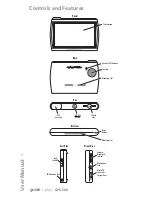
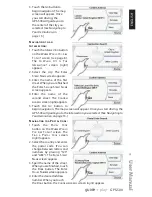


Controls and Features
Front:
T
OUCHSCREEN
:
480 x 272 pixel WQVGA LCD touchscreen.
Back:
S
PEAKER
:
Built-in speaker plays navigation voice guidance commands and
audio/video files that are stored on an SD memory card (see below).
M
OUNTING
S
LOT
:
Lets you lock the GPS-500 onto the included fold-flat
mounting bracket for use in a vehicle.
Top:
GPS A
NTENNA
:
Must have a clear “view” of the sky to receive signals from
GPS satellites.
ON/OFF B
UTTON
:
Hold down to turn the unit on; hold down again to turn
the unit off.
SD C
ARD
S
LOT
:
Accepts an SD memory card up to 4GB (not included).
The SD card is required to store audio and video media to be played on your
GPS-500.
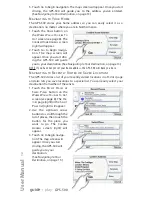
Bottom:
R
ESET
B
UTTON
:
Lets you reset the unit if it becomes unresponsive or won’t
power-off. Insert a paper clip or similar item into the small hole to press the
switch. (Resetting the unit does not erase information that you have entered,
such as your home location, etc.)
M
OUNTING
S
LOT
:
Lets you lock the GPS-500 onto the included fold-flat
mounting bracket for use in a vehicle.
TMC A
NTENNA
J
ACK
:
Connect the TMC antenna to receive FM traffic information
Left Side:
L
OCK
S
WITCH
:
Locks the GPS-500’s touchscreen and all of its contols. This
prevents accidental operation without your having to turn the unit’s power off,
so you can carry it in your pocket or purse.
Right Side:
V
OLUME
/B
RIGHTNESS
C
ONTROL
:
Adjusts the volume of the GPS-500’s built-in
speaker. The volume control will also adjust the volume of headphones or an
audio system that you have connected to the GPS-500’s headphone jack (see
below).
To adjust the brightness, press the volume control knob in. The Brightness
indicator will be superimposed on the screen and you can change the
screen’s brightness by rotating the volume knob.
H
EADPHONE
J
ACK
:
Lets you connect headphones for personal listening. You
can also connect the headphone jack to an auxiliary input on your vehicle’s
audio system.
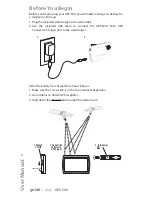
M
INI
USB C
ONNECTOR
/C
HARGER
P
ORT
:
Connects to your computer and to
the included wall charger using the included USB cable. Connects to your
vehicle’s cigarette lighter or accessory power port using the included car
charger.
User Manual
e
d
i
u
g
+
y
a
l
p
™
GPS-500
5
ENGLISH