Connections
Cassette Tape Deck
CD Recorder
Record Player
R
L
R
L
R
L
R
L
R
L
R
L
R
L
R
L
R
L
R
L
G
N
D
C
D
IN
C
D
R
O
U
T
A
U
X
TV
T
U
N
E
R
O
U
T
C
D
R
IN
A
U
X
TV
T
U
N
E
R
O
U
T
TAP
E
IN
IN
TAP
E
O
U
T
L
E
F
T
SP
E
AK
E
R
L
E
F
T
SP
E
AK
E
R
F
U
S
E
T
4
AL
/
250
V
L
E
F
T
RI
GH
T
L
E
F
T
RI
G H
T
PR
E
O
U
T
P
H
O
N
O
PR
E
O
U
T
P
H
O
N
O
C
D
R
EM
O
T
E
AC
INP
U
T
AC
230
V~
50
H
z
410
W
IN
O
U
T
O
U
T
IN
2
2
1
1
2
2
1
1
CA
U
TI
O
N
:
SP
E
AK
E
R
I
M
P
E
D
ANC
E
4
M
IN
:
S
Y
ST
EM
1
O
R
2
8
M
IN
:
S
Y
ST
EM
1
&
2
ATT
E
NTI
O
N
:
I
M
P
E
D
ANC
E
D
E
S
H
A
U
T-PARL
E
U
RS
4
M
IN
:
S
Y
ST
EM
1
O
U
2
8
M
IN
:
S
Y
ST
EM
1
E
T
2
S
H
O
CK
H
A
Z
AR
D:D
O
N
O
T
O
P
E
N
AVIS
:
RIS
O
U
E
D
E
C
H
O
C
E
L
E
CTRI
O
U
E
-N
E
PAS
O
U
VRIR
RI
GH
T
SP
E
AK
E
R
RI
GH
T
SP
E
AK
E
R
IN
TE REK
S
E
RIAL
N
O
.
N
O
RT
H
RI
DG
E
CALI
F
O
RNIA
,
U
SA
M
A
D
E
IN
P
.
R
.
C
.
M
O
D
E
L
N
O
.
:H
K
980
Video Player 2
Input
Output
Left
right
Left
right
Output
Left
right
L
R
AUDIO OUT
R
L
L
R
Output
Left
right
L
R
AUDIO OUT
R
L
L
R
Output
Left
right
L
R
L
R
L
R
Input
Output
Left
right
Left
right
L
R
L
R
Right channel
Speaker System 2
External Power Amp
Video Player 1
Tuner
Compact Disc Player
Left channel
Speaker System 2
Speaker System 1
Right channel
Speaker System 1
Left channel
To wall
outlet
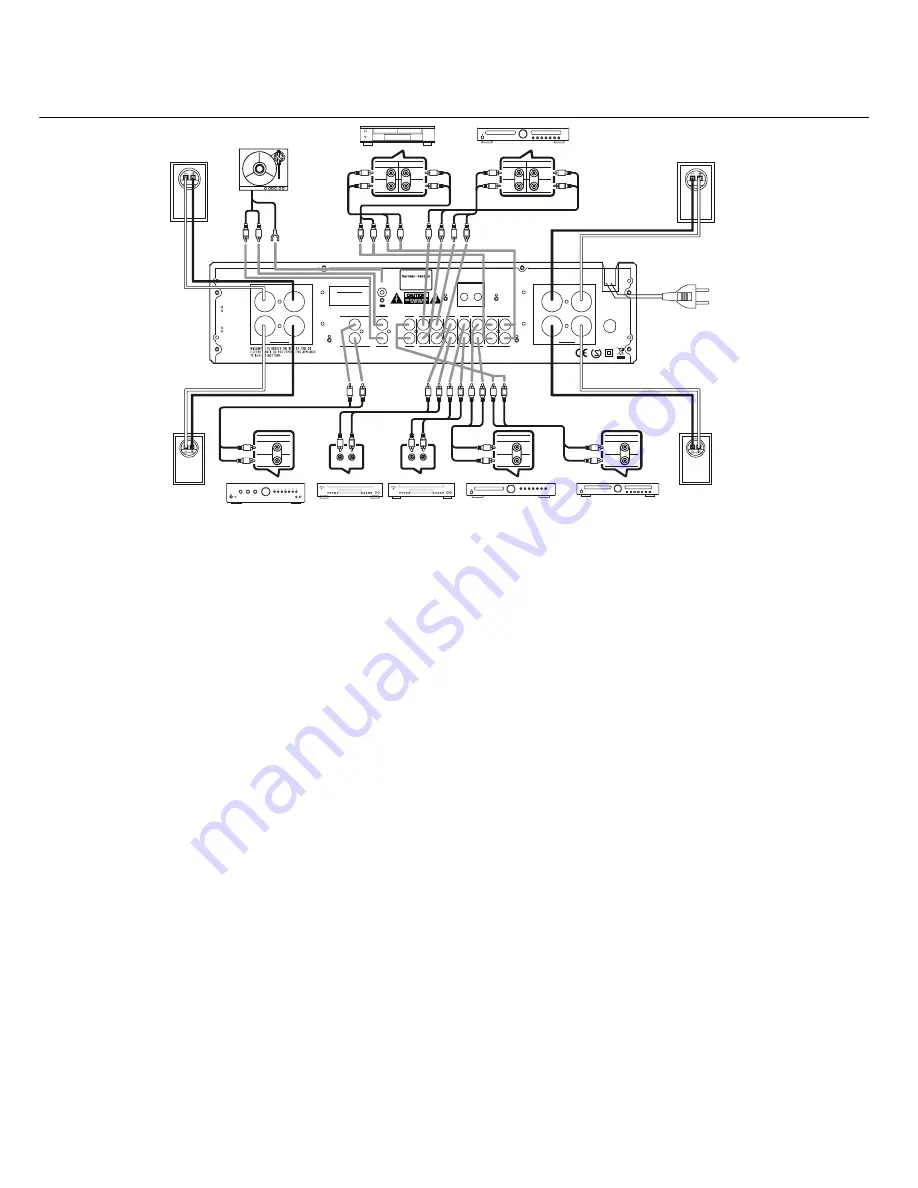
Connecting Other Components
1. Make sure your amplifier and other
components are turned off.
2. Connect each component's
Output/Play jacks to the corresponding
Input jacks on the back of your amplifier
and, if available, the component’s
Input/Record jacks to the Output jacks
of the HK 980. Use the white, black or
gray plugs to connect Left channel jacks;
use the red plugs for Right channel
jacks.
3. A record player with MM cartridge
must be connected to the Phono Input
jacks and a separate ground wire to the
ground terminal screw above.
Wired Remote Control
To control your amplifier with an
external infrared remote sensor,
connect the wire from the remote sensor
to the REMOTE IN jack on the back
panel. Or, if another stereo component
has a built-in infrared remote sensor
and a Remote Output jack, it may be
possible to connect this jack to the
REMOTE IN jack of your amplifier. All
Harman Kardon products with »Remote
In« and »Remote Out« jacks are
compatible with one another, except for
the Citation 22, 24 and 25.
Other manufacturers' remote sensors
and components may not be compatible,
but it will not hurt to experiment. A
second wire may be used to connect
your amplifier's REMOTE OUT jack to
the Remote Input of another stereo
component. Continue this process to
include additional components (if
compatible).
Connecting Speakers
1. For best performance, use high
quality speaker cables. However,
ordinary copper wire can be used if
the gauge meets the following
requirements:
Wire Min.
Length Diameter
Up to 2.5 meter 1 mm
Up to 4 meter 1.25 mm
Up to 6 meter 1.6 mm
Above 6 meter 2-2.5 mm
2. Avoid rolling excess wire with or near
signal interconnects.
External Power Amplifiers
For applications where higher power is
desired, connect the Pre-Out Jacks to
the Main In Jacks of an external power
amplifier. The level of the output can be
adjusted between -3 and +3 dB with an
internal button. To adjust the level,
gently insert a small screwdriver into the
button and turn clockwise to increase or
counter-clockwise to decrease the
output level.
IMPORTANT:
When connecting two
pairs of speakers, determine the
impedance of each pair by looking on
the back of the speakers, in your
owner's manual, or by contacting your
dealer or manufacturer.
You can listen to two pairs of
speakers at the same time ONLY if
the impedance of EACH speaker is
NOT LESS THAN 8 Ohms.
WARNING:
Do not play sets of
speakers simultaneously except as
recommended above. Amplifier may
overheat.
AC Power
Plug the cord into a 230 VAC wall
socket. Power indicator will light up to
indicate power ON. To completely
disconnect the power input, the main
plug must be disconnected from the
mains.
2
harman/kardon
HK 980/230 Service Manual
Page 3 of 50
Summary of Contents for HK 980/230
Page 6: ...harman kardon HK 980 230 Service Manual Page 6 of 50...
Page 13: ...harman kardon HK 980 230 Service Manual Page 13 of 50...
Page 17: ...16 harman kardon HK 980 230 Service Manual Page 17 of 50...
Page 18: ...harman kardon HK 980 230 Service Manual Page 18 of 50...
Page 19: ...harman kardon HK 980 230 Service Manual Page 19 of 50...
Page 20: ...harman kardon HK 980 230 Service Manual Page 20 of 50...
Page 21: ...harman kardon HK 980 230 Service Manual Page 21 of 50...
Page 24: ...harman kardon HK 980 230 Service Manual Page 24 of 50...
Page 25: ...harman kardon HK 980 230 Service Manual Page 25 of 50...
Page 26: ...harman kardon HK 980 230 Service Manual Page 26 of 50...
Page 27: ...harman kardon HK 980 230 Service Manual Page 27 of 50...
Page 28: ...harman kardon HK 980 230 Service Manual Page 28 of 50...
Page 29: ...harman kardon HK 980 230 Service Manual Page 29 of 50...
Page 30: ...harman kardon HK 980 230 Service Manual Page 30 of 50...
Page 31: ...harman kardon HK 980 230 Service Manual Page 31 of 50...
Page 38: ...harman kardon HK 980 230 Service Manual Page 38 of 50...


