44
5
EN
G
LI
SH
Speaker Placement
Color-Coding System
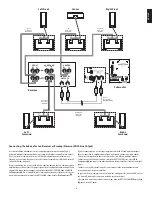
The HKTS 60 use the channel color-coding system established by the CEA to make setting
up your home theater speaker system as easy as possible. The HKTS 60 systems include
speaker wires with color bands on each end.
Speaker Position
Wire Color Band
Front Left
White
Front Right
Red
Center
Green
Surround Left
Blue
Surround Right
Gray
Subwoofer
Purple
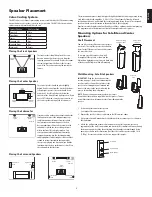
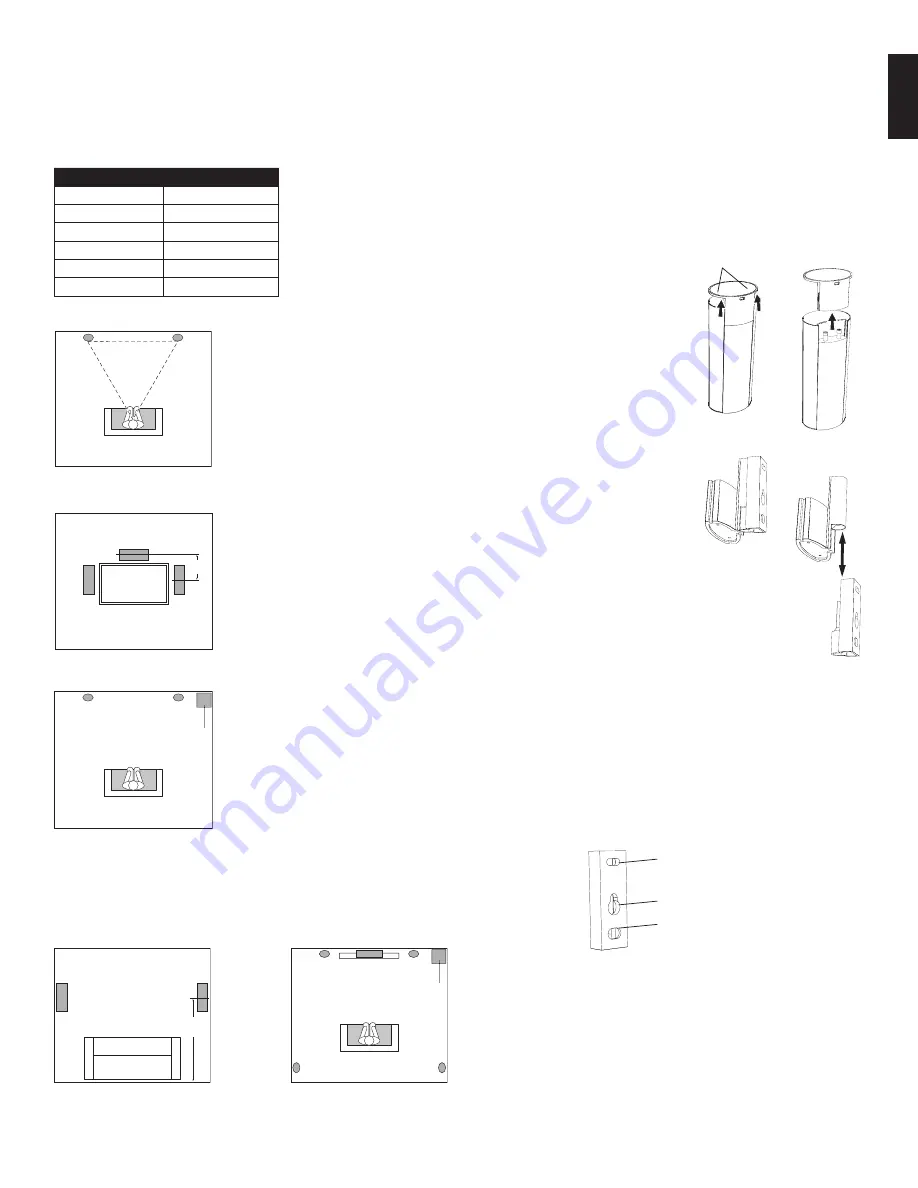
Placing the Front Speakers
The front speakers should be placed the same
distance from each other as they are from the
listening position. They should be placed at about
the same height from the floor as the listener’s
ears will be. They also can be angled toward the
listener.
Left Front
Speaker
Right Front
Speaker
Placing the Center Speaker
The center speaker should be placed slightly
behind (farther away from the listener) the front
left and right speakers. Its center should be no
more than 2 feet (61cm) above or below the
tweeters of the front left and right speakers. If you
have a CRT television, it may be convenient to set
the center speaker on top of the television set.
0 – 2ft
Center
Speaker
Left Front
Speaker
Right Front
Speaker
0 - 2 ft
(0 - 61cm)
Placing the Subwoofer
Since our ears do not hear directional sound at the
low frequencies where the subwoofer operates,
it will have good performance from just about
any location in your room. However, the best
bass reproduction is likely to be heard when the
subwoofer is placed in a corner along the same
wall as the front left and right speakers. You
can experiment with subwoofer placement by
temporarily placing it in the listening position
and playing music with strong bass content. Move
around to various locations in the room while
the system is playing and listen until you find the
location where the bass performance is best. Place
the subwoofer in that location.
Left Front
Speaker
Right Front
Speaker
Subwoofer
Placing the Surround Speakers
Left Surround
Sound
Right Surround
Sound
5 - 6 ft
(1.5m - 1.8m)
Left Front
Speaker
Right Front
Speaker
Subwoofer
Left Surround
Sound
Right Surround
Sound
The two surround speakers should be placed slightly behind the listening position, facing
each other and, ideally, should be 5–6 feet (1.5m–1.8m) from the floor. An alternate
location would be on a wall behind the listening position, facing forward. The surround
speakers should not call attention to themselves while they’re playing.
Experiment with their placement until you hear a diffuse, ambient sound accompanying
the program material heard from the front left and right and center speakers.
Mounting Options for Satellite and Center
Speakers
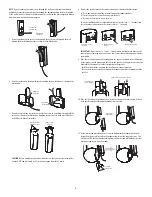
Shelf Placement
You can place the satellite and center speakers
on shelves. The satellite speakers have built-in
bases for shelf placement. You can also remove
the bases if desired.
To remove a satellite speaker’s base, pull
it straight off the speaker, as shown in the
illustration. Applying even pressure to both sides
of the base will allow it to slide off smoothly.
Wall-Mounting: Satellite Speakers
IMPORTANT:
Read the
Speaker Connections
section, on page 7, before wall-mounting the
satellite speakers. You will need to insert the
speaker wires through the wall mounts and
connect the wires to the speakers during the
process of installing the wall-mounts.
NOTE:
If you are using your own speaker wire, it must
be no thicker than the wire supplied with the speakers. Thicker
wire will prevent the wall-mount bracket from sliding onto the
speaker.
Decide on the location for the speaker
1.
(
see Speaker Placemen
t, opposite).
Remove the speaker’s base as explained in
2.
Shelf Placement,
above.
Disassemble the wall-mount bracket by sliding the two sections apart, as shown in
3.
the illustration.
Attach the wall portion of the wall-mount onto the wall using hardware that is
4.
appropriate for the wall’s construction and materials. We recommend first anchoring
the mount using its keyhole, then attaching it with another anchor through its top
opening, as shown in the illustration. Note that the satellite speakers weigh 3.4 lb
(1.55kg). Be sure to use hardware that can support this weight.
Top Opening
Keyhole Opening
Bottom Opening
Apply Pressure Evenly
to Both Sides of Base
Lift Base Straight
off Speaker
Pull Sections
Apart
Center
Speaker
0176CSK - HK HKTS60BQ-230 v2 press.indd 5
13/11/09 11:24:27

