background image

8

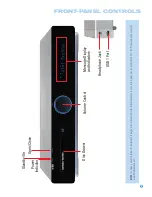
Standby/On Switch:

This is an electrical switch that turns the

HS 300 on for playback, or leaves it in standby mode for quick turn-on
using this switch or the remote control.

Power Indicator:

This LED surrounds the Standby/On Switch. When

the HS 300 is plugged into AC power, the LED turns amber to indicate
that the HS 300 is in Standby mode (ready to be turned on). When the
HS 300 is turned on (by pressing the Standby/On Switch or one of the
Source Selectors on the remote), the LED turns blue. If this LED ever
turns red, immediately unplug the HS 300. Check the speaker-wire 
connections to make sure no wires are shorting out by touching each
other. If the LED remains red, bring the HS 300 to an authorized
Harman Kardon service provider.

Open/Close:

Press this button to open or close the disc drawer.

When the HS 300 is in standby mode, press this button to turn on the
HS 300 and open the drawer. Before pressing this button, always make
sure no objects are blocking the drawer. Remember to close the door 
or turn off the HS 300 when you have finished. The door will only close
automatically when the unit is turned off.

Volume Control:

Turn this knob to raise or lower the volume,

which will be shown on screen as an increasing or decreasing row 
of bars in the Message Display.

Message Display:

Various messages appear in this display 

in response to commands. In addition, a variety of indicators will 
light at various times to display the current source, playback mode 
(if appropriate), video settings or other aspects of the HS 300’s 
status as described throughout this manual.

Disc Drawer:

This drawer holds a disc that is played in the HS 300.

Press the Open/Close button on top of the HS 300 to access it. Be sure
to carefully seat all discs in the recess in the drawer tray. Remember to
close the drawer when you are finished, as it will not close automatically
without turning off the unit.

Headphone Jack:

Insert a 1/8" headphone plug into this jack for 

private listening. An optional adapter is necessary to use 1/4" or other
size headphone plugs.

USB 1 Port:

Gently insert a flash drive, card reader, digital camera 

or other USB device, or a USB standard-A cable connected to a USB
device, in this port. Be certain to orient the plug’s plastic tongue so that
it will insert adjacent to the receptacle’s tongue, and seat the plug fully.
You may insert or remove the device at any time; there is no installation
or ejection procedure. The HS 300 is capable of playing MP3 and
Windows Media

®

WMA audio files, and MPEG 2 and uncompressed 

AVI files that are stored on the device. The HS 300 can also display 
still-image files, but only in the JPEG format.

Do not

connect a PC or

other USB host/controller to this port, or you may damage both the 
HS 300 and your device.

FRONT-PANEL CONTROLS

Summary of Contents for HS 300

Page 1: ...HS 300 INTEGRATED HOME THEATER SYSTEM OWNER S MANUAL...

Page 2: ...tions 17 If an outside antenna or cable system is connected to the product be sure the antenna or cable system is grounded so as to provide some protection against voltage surges and built up static c...

Page 3: ...aterials that may be damaged by heat or heavy objects Some surface finishes may be particularly sensitive to absorbing such marks due to a variety of factors beyond Harman Kardon s control including t...

Page 4: ...4 STAPLE INVOICE HERE...

Page 5: ...ion 34 Tone Controls 35 Headphones 35 Source Selection 36 Using the HS 300 Disc Player 36 Playback Basics 37 Playback Features for DVD and CD Discs 39 DVD Playback 44 CD Playback 46 MP3 Windows Media...

Page 6: ...tion please contact your retailer or customer installer or visit our Web site at www harmankardon com Please register your product on our Web site at www harmankardon com Note You ll need the product...

Page 7: ...kbps 320kbps WMA bit rates 16kbps 192kbps JPEG resolution supported 5 megapixels 5MB file size Still image rotation in 90 degree increments Thumbnail still image menu Internal video test signal Fast P...

Page 8: ...splay Various messages appear in this display in response to commands In addition a variety of indicators will light at various times to display the current source playback mode if appropriate video s...

Page 9: ...tor Standby On Open Close Headphone Jack USB 1 Port NOTE To make it easier to follow the instructions throughout the manual that refer to this illustration a copy of this page may be downloaded from t...

Page 10: ...ideo performance It is recommended that you disable the HDMI audio function of your video display to benefit from the HS 300 s multichannel audio processing Remote Infrared IR Input and Output When th...

Page 11: ...ptical Digital Audio Input TV Analog Audio Inputs Auxiliary Analog Audio Inputs Analog Audio Outputs Coaxial Digital Audio Output Coaxial Digital Audio Input Speaker Outputs AC Power Input NOTE To mak...

Page 12: ...ent IR Transmitter Lens As buttons are pressed on the remote infrared codes are emitted through this lens Make sure it is pointing toward the component being operated In Learning mode the remote recei...

Page 13: ...e it easier to follow the instruc tions throughout the manual that refer to this illustration a copy of this page may be down loaded from the Product Support section at www harmankardon com REMOTE CON...

Page 14: ...o select the starting point A and a second time to select the end of the passage B Press the button again to end repeat play Pre Ch This button has no function with the HS 300 However for many televis...

Page 15: ...corded in Dolby Digital contain a special low frequency effects LFE channel that is directed only to the subwoofer The LFE channel packs the punch of a rumbling train or airplane or the power of an ex...

Page 16: ...ew the cap back into place until the wire is held snugly Figure 2 Binding Post Speaker Terminals With Bare Wires Subwoofer The subwoofer is a specialized type of loudspeaker that is usually connected...

Page 17: ...ox VCR DVR You will need to connect one of the HS 300 s video outputs to your video display Digital Video Connections The HS 300 is equipped with an HDMI High Definition Multimedia Interface output HD...

Page 18: ...output to facilitate use of your system with a remote control in a variety of situations When the HS 300 is placed in such a way that aiming the remote at the front panel IR sensor is difficult such...

Page 19: ...below the left right speakers The side surround speakers should be placed 110 degrees from the center speaker that is slightly behind and angled toward the listener If this isn t feasible place the su...

Page 20: ...ind that the AM terminals are polarized Connect the white lead to the AM terminal and the black lead to the GND terminal Figure 16 Antenna Connections Step Four Optional Connect Any External Source Co...

Page 21: ...to always connect one device s input to the other device s output If you would like to record video from the HS 300 s internal disc player or a USB device connect the recorder s S or composite video...

Page 22: ...the other end of the cord into a working unswitched AC outlet See Figure 24 If you are using any external components with the HS 300 system you may plug those into AC power at this time Figure 24 AC...

Page 23: ...rce Selector again to accept the code and it will flash The remote will exit Program mode b If the device does not turn off try entering another code If you run out of codes you may search through all...

Page 24: ...nal TC 30 activity based remote which is programmed by accessing a large data base of product codes on the Internet The TC 30 is also capable of learning codes from your device s original remote Most...

Page 25: ...ress any one of these buttons TV DISC RADIO D IN USB 1 or USB 2 the HS 300 will select that source See Figure 31 Figure 31 Source Selectors NOTE Any time you press one of the Input Selectors on the re...

Page 26: ...t position Most of the screen contains the various configuration settings with the current setting displayed to the right Use the Navigation buttons to highlight a setting See Figure 34 Figure 34 Sele...

Page 27: ...y off again after either five or 20 seconds When the display is off the blue Power Indicator will remain lit to remind you that the unit is turned on When the Panel Time Out setting is set to Off the...

Page 28: ...es DVD we recommend that the setting be turned ON However with PBC enabled the Repeat Track Repeat Disc and Random functions may not be available for VCDs NOTE The PBC indicator will light in the fron...

Page 29: ...NIMUM applies more compression so that louder passages are much softer Feel free to experiment with the settings at any time DELAY UNIT This setting selects the unit of distance used for calculat ing...

Page 30: ...has a reasonably even level without many dynamic changes If you are using an SPL meter with a disc containing test tones adjust the level of each channel so that the meter reads 75dB If you don t have...

Page 31: ...aterial that was shot on film even though you are viewing it on video via a DVD Video Choose this option for optimal playback of material that was shot directly to video such as concerts and sports pr...

Page 32: ...sible rather than gray but the next gradation must clearly be distinct from it All the bars in the gray scale should be gradually and evenly changing from black to white left to right Contrast Adjustm...

Page 33: ...the buttons to select the input to which you connected your TV s audio output and press the Enter Button You may also select a surround mode for this source at the Audio setting line and you may adjus...

Page 34: ...kers For certain more dynamic audio materials even 0dB may be too high allowing for damage to equipment Figure 52 Volume Controls The HS 300 is designed to reproduce audio with a minimum amount of dis...

Page 35: ...ee Figure 55 Figure 55 Mode Button on Remote When the source is selected the HS 300 will make the following selections as appropriate to the source 1 For the TV and D IN sources the HS 300 will select...

Page 36: ...Loading Discs To load discs in the HS 300 first turn it on by pressing in the Standby On Switch or the Open Close button on the top panel or the DISC button on the remote The Power Indicator is amber...

Page 37: ...n automatically If the disc contains MP3 WMA or JPEG files or if it is a VCD without playback control the Player Information display will appear See Figure 57 To play one of these files use the Naviga...

Page 38: ...ss the Skip Step Previous or Skip Step Next button repeatedly Press the Pause or Play Button to resume normal play Frame by frame movement in reverse is not available NOTE Playback of a disc with 96kH...

Page 39: ...the producers of DVD discs to block the use of certain functions during only some parts of a disc For example many discs prohibit the use of fast play buttons or prohibit access to the Chapter Menu d...

Page 40: ...titles on the disc Select any title and press Enter to expand it and view the chapter list for that title Select a chapter and press the Enter button to begin play of that chapter The arrow s at the...

Page 41: ...hange accordingly For DVD Audio discs the time display options are Group Elapsed Group Remaining Track Elapsed and Track Remaining Time Bar This display is a graphic representation of the time elapsed...

Page 42: ...time during a disc s playback To change the subtitle language or turn the subtitles on or off press the Subtitle Button to display the Subtitle banner and show the current configuration Each press of...

Page 43: ...being played until the disc is manually stopped The Repeat Rep indicator will light in the front panel display A B Repeat Play The Repeat A B function allows you to select any portion of a DVD Video...

Page 44: ...in to make your selection Time Search Function While the disc is in Play mode you may begin playback from a specific time in the track or disc by navigating until the time is highlighted Use the Numer...

Page 45: ...n menu will change Figure 74 Repeat Button A B Repeat Play The Repeat A B function allows you to select any portion of a CD and have it repeat continually until the unit is manually stopped To initiat...

Page 46: ...WMA Disc This screen will display a list of the main folders contained on the disc The elapsed time will appear in the upper right corner of the screen It isn t possible to change the time display and...

Page 47: ...splay The disc will immediately begin displaying the images on the disc in order When viewing JPEG images the Angle Button may be used to rotate the image With the image onscreen press the Angle Butto...

Page 48: ...appear the same as for DVDs see Figure 80 except that the current track number will be shown rather than the title and there is no chapter display You may select the track number and change it to skip...

Page 49: ...will simply play that track See Figure 83 in which the user scrolled to Track 5 in the list pressed the Enter Button to program it and selected the Add option Track 5 was automatically programmed as...

Page 50: ...to a different position in the playlist scroll to the option that shows three dashed lines Use the Numeric Keys to enter the desired order in the playlist and press the Enter button c To delete the tr...

Page 51: ...ocations You may select a preset station to listen to as described above or you may tune a new frequency for that preset using the Frequency column NOTE Changing the frequency so that you may listen t...

Page 52: ...he wrong direction as the preset stations list is numbered in increasing order down the screen 3 With any station highlighted use the Navigation Buttons to scroll through the list of presets and press...

Page 53: ...creen Auxiliary Source When you highlight AUX at the top of the screen the screen shown in Figure 94 will appear Figure 94 AUX Source Screen Press the Enter Button to select AUX as the source input an...

Page 54: ...as programmed play is not available Repeat This setting allows you to repeat play of one track one folder of files or to turn off repeat play Random Random play is not available for USB devices Pictur...

Page 55: ...n the HS 300 press the Mode button Each press cycles through the devices indicated by the LED behind the Source Selector lighting up Macros Macros are used to program sequences of up to nineteen comma...

Page 56: ...el settings and tuner presets After a reset you will need to reenter all of these settings To reset the HS 300 turn it on stop playback and remove any disc or USB device Press the Clear Button to remo...

Page 57: ...ay from computers fluorescent lights motors or other electrical appliances No picture Intermittent connections Check all video connections Wrong input Check input selection of TV or video display Prog...

Page 58: ...cally Press Open Close button or turn off HS 300 to close disc drawer Screen Saver not activated Screen saver will not activate when Move cursor to main disc information or playlist area cursor is on...

Page 59: ...nsions H x W x D 3 3 16 x 17 15 16 x 15 3 4 Weight 10 6 lb Depth measurement includes knobs buttons and terminal connections Height measurement includes feet and chassis All features and specification...

Page 60: ...ble With HDMI the HS 300 is capable of outputting high resolution 720p or 1080i video and 5 1 channel Dolby Digital or DTS digital audio with the convenience of just a single cable connection JPEG Fil...

Page 61: ...ode the Harman Kardon screen will appear and the RESUME message will appear in the Information Display The resume function is not available for WMA files For DVDs CDs MP3 files JPEG files and VCDs wit...

Page 62: ...A2 Audio Setup Menu Settings Setting Default Your Setting Preferred Audio Language English Dynamic Range Maximum Delay Unit Feet Tone Control Off Bass Level 0dB Treble Level 0dB DVD Sound Mode Origina...

Page 63: ...in the center of the graph Setting Your Setting Color Contrast Brightness Tint Black Level Table A6 Source Input Settings Source Audio Mode Your Audio Mode Input Your Input Level Your Level TV Dolby...

Page 64: ...64 Refer to the numbered buttons in this drawing when using the Function List Figure 98 Remote Control Function List Reference APPENDIX...

Page 65: ...ide Disc Info 16 Mute Mute Mute Mute Mute Mute Mute Mute 17 Vol Vol Vol Vol Vol Vol Vol Vol 18 Preset Pic Ch Picture Preset Ch Ch Picture 19 Subtitle Subtitle Subtitle 20 Audio Audio Audio Select Audi...

Page 66: ...Display Slow 54 PIP PIP PIP PIP PIP PIP PIP PIP 55 Source Video Output Video Output Video Output 56 Source Video Format Video Format Video Format 57 Screen Aspect Change Aspect Change Aspect Change As...

Page 67: ...AEWOO 011 022 023 038 045 046 056 068 073 094 098 102 105 108 111 114 116 118 119 127 132 241 DAYTRON 011 132 DIGI LINK 200 DYNASTY 045 DYNATECH 063 ELECTROHOME 074 132 EMERSON 001 008 011 012 033 045...

Page 68: ...3 022 025 030 042 057 121 123 125 NIKEI 045 ONKING 045 ONWA 045 OPTONICA 025 077 ORION 207 208 209 210 211 PANASONIC 038 057 076 081 087 148 169 PENNEY 199 PHILCO 001 003 011 030 045 057 060 061 064 0...

Page 69: ...77 TATUNG 057 063 TECHNICS 080 TECHWOOD 011 TEKNIKA 001 002 003 011 030 033 036 045 069 074 092 094 132 TELEFUNKEN 047 083 142 TELERENT 069 TERA 156 THOMAS 008 THOMSON 190 191 TMK 011 TOSHIBA 013 021...

Page 70: ...027 056 065 087 MCINTOSH 238 MITSUBISHI 242 243 NAD 029 048 NAKAMICHI 025 244 245 ONKYO 002 012 016 017 018 019 115 247 OPTIMUS 026 054 055 PANASONIC 007 010 032 088 195 PHILIPS 027 087 PIONEER 003 03...

Page 71: ...FISHER 003 015 016 017 FUNAI 040 133 GE 037 039 067 076 093 095 124 127 GO VIDEO 113 117 GRAETZ 136 HARMAN KARDON 004 018 024 049 HITACHI 011 040 048 067 118 130 INSTANT REPLAY 037 039 ITT 136 JCL 03...

Page 72: ...026 039 066 067 093 095 124 125 127 157 172 184 REALISTIC 003 015 017 020 037 039 040 045 057 058 087 137 152 159 160 RICOH 062 RUNCO 128 SABA 136 SAISHO 143 SALORA 020 SAMSUNG 038 045 088 090 091 093...

Page 73: ...194 195 TMK 013 TOSHIBA 015 019 047 051 063 085 098 112 155 TOTEVISION 045 087 UNITECH 045 VECTOR RESEARCH 018 VICTOR 052 VIDEO CONCEPTS 018 040 050 VIDEOSONIC 045 WARDS 003 019 023 030 037 039 040 0...

Page 74: ...NSTRUMENT 003 007 011 015 017 093 095 096 097 168 210 GC ELECTRONICS 113 GE 076 GEMINI 015 029 032 060 GOLDEN CHANNEL 037 GOODMIND 112 HAMLIN 055 056 061 099 100 101 117 175 207 208 HITACHI 007 061 18...

Page 75: ...217 218 219 220 221 222 223 224 225 227 228 SEAM 121 SHERITECH 029 SIGNAL 037 SIGNATURE 007 188 SL MARX 037 SONY 229 SPRUCER 053 081 177 189 STARCOM 002 011 015 016 163 STARGATE 015 037 120 SYLVANIA 0...

Page 76: ...4 464 468 JVC 308 KATHREIN 410 LEGEND 453 LUXOR 368 MACOM 317 365 369 370 371 MAGNAVOX 461 473 MEMOREX 453 NEXTWAVE 423 424 NORSAT 373 374 OPTIMUS 466 PANASONIC 366 457 469 PANSAT 420 PERSONAL CABLE 4...

Page 77: ...m 7776 Maltese 7784 Language Code Maori 7773 Marathi 7782 Moldavian 7779 Mongolian 7778 Naru 7865 Nepali 7869 Norwegian 7879 Occitan 7967 Oriya 7982 Oromo Afan 7977 Panjabi 8065 Pashto Pushto 8083 Per...

Page 78: ...78 NOTES...

Page 79: ...79 NOTES...

Page 80: ...250 Crossways Park Drive Woodbury New York 11797 www harmankardon com 2006 Harman International Industries Incorporated All rights reserved Part No 01 00 YS SM1 265...

Reviews: