background image

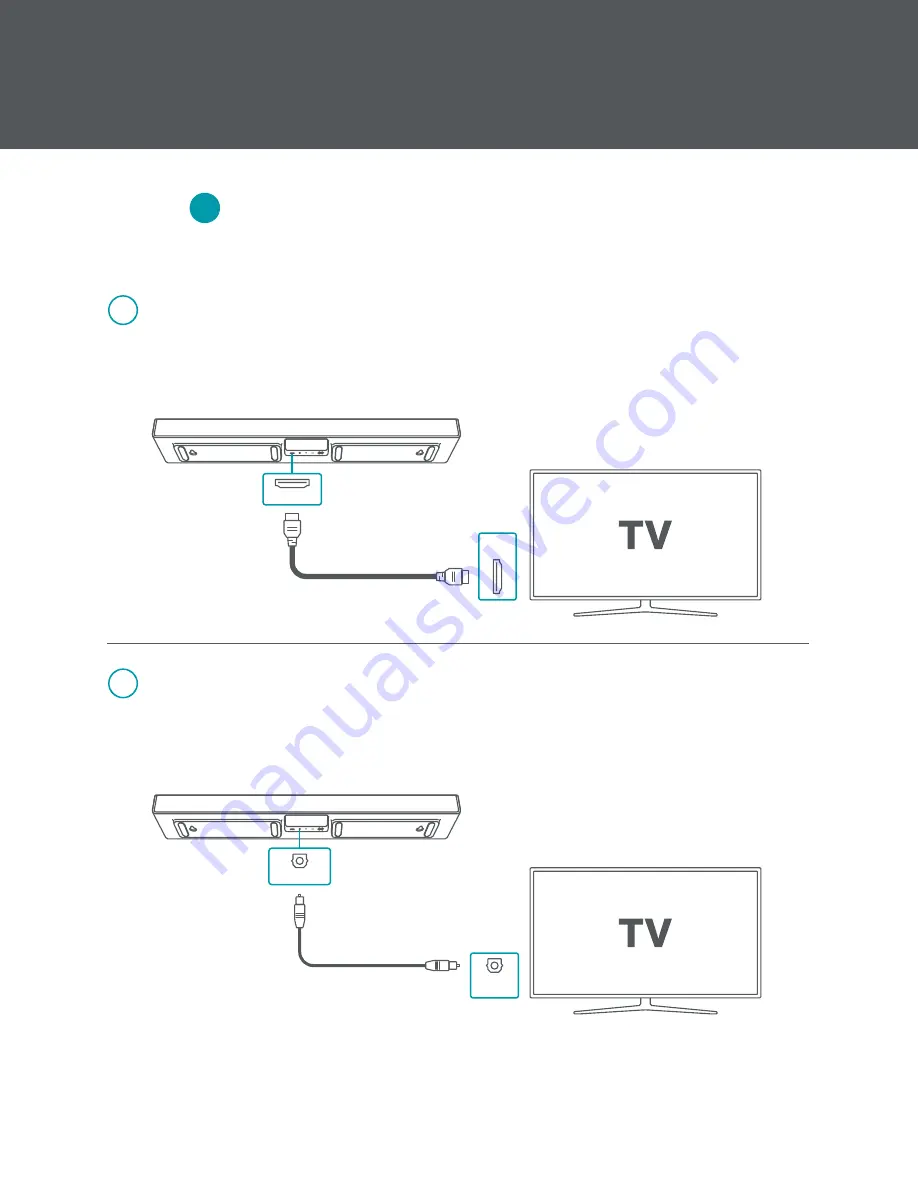
Connect Sound + Charge Center Channel to TV

Step

4

*Note: Some TVs require settings changes to be compatible with external speakers. Consult your TV manual.

Input Connection Option 1: HDMI ARC

a.

  Connect included HDMI cable to 

HDMI ARC 

ports on your Center Channel and TV. If HDMI  

  ARC port is not labeled, consult your TV manual.

4.1

OPTICAL

OUT

OPTICAL IN

Input Connection Option 2: Optical

a.

  Connect included Optical cable to 

Optical 

ports on your Center Channel and TV.

4.2

*Note: It is recommended that you turn the TV speakers off in your TV settings. Also, the TV 
remote will not change your system volume when using Optical.

*Note: With newer TV models, you must turn eARC off in your TV settings.

HDMI ARC

HDMI

ARC

20

Installation

Summary of Contents for StealthTech GA4408

Page 1: ...SETUP GUIDE Models EE4034 EE0362 EW3251 GE2913 GE0177 GE7065 QST015C GA4364 GA4956 GA4408 QST008A 5WN SACTIONALS Sound Charge System...

Page 2: ...Never operate this product if it has a damaged cord or plug if it is not working properly if it has been dropped damaged or dropped into water Contact Lovesac Customer Love When disconnecting the pow...

Page 3: ...ar implants or hearing aids Please consult the manufacturers of the medical devices you are using Do not dismantle or modify the wireless charger or submerge into water or any other liquid Follow the...

Page 4: ...UDED SYSTEM ENHANCEMENTS PLANNING YOUR LAYOUT INSTALLATION SOUND MODES CONNECT TO OTHER DEVICES PRODUCT OVERVIEW LED INDICATORS HELP TROUBLESHOOTING LIMITED WARRANTY SPECIFICATIONS LEGAL COMPLIANCE 2...

Page 5: ...here it s needed most remaining connected is never a problem When it comes to technology invisible is beautiful We encourage you to read through this manual which describes the StealthTech products an...

Page 6: ...acket and Template HDMI Cable Optical Cable Sound Charge Subwoofer Mounting Brackets 4 Thumb Screws Power Cord 2 Stud Screws 1 Driver Bit 4 Screws Drywall Anchors Firmware USB Stick Power Adapter Sact...

Page 7: ...t Audio Cable R L Sound Charge 25ft Audio Cable Satellite This pillow uses a unique foam and fabric with enhanced acoustically transparent properties This allows sound to pass through in high fidelity...

Page 8: ...de Left Placed on left of configuration Optional Sound Charge Satellite Side Left and Right are identical and determined only by placement Satellite Right Satellite Left Sound Charge Subwoofer Placed...

Page 9: ...ft Center Channel TV Center Channel TV Right Left Satellite Right Satellite Left Satellite Left 4 or more Seats Optimal Experience for 3 Seats or Fewer 6 Speaker Immersive Sound Charge System Optimal...

Page 10: ...mal Experience 9 Speaker Immersive Sound Charge System incorporates 3 Satellite Sides 8 Speaker Immersive Sound Charge System incorporates 2 Satellite Sides 7 Speaker Immersive Sound Charge System inc...

Page 11: ...Channel TV Center Channel TV Left Right Satellite Right Left Right 6 Speaker Immersive Sound Charge System Optimal Experience 9 Speaker Immersive Sound Charge System incorporates 3 Satellite Sides 8...

Page 12: ...Satellite Left Satellite Right Right Left Satellite Left Satellite Right Satellite Right Satellite Left C e n t e r C h a n n e l T V C e n t e r C h a n n e l T V 6 Speaker Immersive Sound Charge Sy...

Page 13: ...t Left Right Left Satellite Left Satellite Right Center Channel TV Center Channel TV Optimal Experience 10 Speaker Immersive Sound Charge System incorporates 4 Satellite Sides 8 Speaker Immersive Soun...

Page 14: ...ation R i g h t L e f t R i g h t L e f t S a t e l l i t e R i g h t S a t e l l i t e L e f t 6 Speaker Immersive Sound Charge System Center Channel TV Center Channel TV Optimal Experience 8 Speaker...

Page 15: ...figuration Optional Setup for L U Shapes Center Channel TV Center Channel TV Right Left Right Left Satellite Left Satellite Right Center Channel TV Center Channel TV 6 Speaker Immersive Sound Charge S...

Page 16: ...ype and color which will be used later when creating your tuning profile in the Lovesac StealthTech App This information can be found on your packing slip or on the label located inside your Covers 20...

Page 17: ...or please recycle them 2 2 Cover Inserts and Install Feet a Cover all Sactionals Inserts including Sound Charge Sides and any Satellite Sides 2 1 Notes StealthTech Sides use Standard Sactionals Cover...

Page 18: ...f the wall mount bracket can be stud mounted 2 Using the template identify the 2 top row slots that align with the studs Mark the screw locations through the paper onto the wall Drywall mounted 1 Mark...

Page 19: ...er stud screws Drywall mounted 1 Insert 4 drywall anchors with a drill 2 Attach bracket by inserting the 4 shorter drywall screws into the anchors 3 3 Wall Mount Option Mount Center Channel a Push Cen...

Page 20: ...nd TV If HDMI ARC port is not labeled consult your TV manual 4 1 OPTICAL OUT OPTICAL IN Input Connection Option 2 Optical a Connect included Optical cable to Optical ports on your Center Channel and T...

Page 21: ...Input button on the Center Channel 5 3 Pair Remote Control a With Center Channel on simultaneously hold down the Volume and buttons on the Remote Control for more than 5 seconds Red LED on Remote Cont...

Page 22: ...Brackets with Feet holes Subwoofer speaker will face the floor once fully installed into your configuration c Install 4 Feet through the mounting bracket holes Note Subwoofers are not intended to be i...

Page 23: ...ge setups may require one or more 25ft Audio Cables See page 7 7 2 Optional Connect Satellite Subwoofer Audio Cable and Power Cord a If purchased connect included Auxiliary Cable to Out on one Subwoof...

Page 24: ...nvenience Outlet Power on LED Power on Caution Ensure cables are routed so they are not pinched by Shoes TV Left Sound Charge Sides Right Sound Charge Sides Standard Seat Configuration Deep Seat Confi...

Page 25: ...buttons when the Center Channel front LED starts to flash c A water drop tone will play and the Subwoofer LED will turn off when pairing is successful Pair Subwoofer and Flip Over Step 9 9 2 Flip Seat...

Page 26: ...b Ensure cable ends reach past all Seats 10 1 Place Seat Frame a Place your Seat Frame with Subwoofer into 4 Shoes b Leave Shoes sticking out to connect other Seats or Sides c Straighten Shoes using a...

Page 27: ...to the ports 6 Pin Port on Sides 6 Pin Cable Connector Sound Charge Sides 3 Pin Port on Sides 3 Pin Cable Connector Sound Charge Satellite Sides 11 1 Lay out all Sides a Place all Sides near their fin...

Page 28: ...Frames Install Sides and Finish Sactionals Setup Step 12 Caution Ensure cables are routed so they are not pinched by Shoes 12 2 Add Cushions and Pillows a Add all of your Seat Cushions and Back Pillow...

Page 29: ...rocess c Center Channel enters pairing mode when front LEDs begin to flash d Connect to Center Channel 1 Open the Bluetooth settings on your smart device and select StealthTech Sound Charge to connect...

Page 30: ...res Toggle between Harman Kardon defined sound modes see page 31 Create and save custom sound profiles see page 31 Adjust system volume center volume rear speaker volume bass treble and speaker balanc...

Page 31: ...hrough Dolby ProLogic II to create a simulated 5 1 surround experience 5 1 Surround content plays through intended speakers Stereo content plays through the couch in stereo and mixed to the Center Cha...

Page 32: ...u Ray player directly to your Center Channel with the included Optical cable 1 Analog AUX Connect to a laptop tablet or smartphone with the included 3 5mm Auxiliary Aux cable Note AUX cable does not s...

Page 33: ...ectively and the embedded up firing speaker on top of the Side provides rear audio for an immersive surround sound experience Integrated Wireless Charger Charge your device simply by setting it down o...

Page 34: ...er Channel automatically switches to standby after 20 minutes of inactivity The Center Channel can power on automatically with either HDMI ARC or Bluetooth inputs if the respective input was active wh...

Page 35: ...udes quick access to many features of your Sound Charge System For more advanced controls use the Lovesac StealthTech app Sound Charge Remote Control Remote Control Pairing If the Remote Control is pa...

Page 36: ...eration is subject to ditions 1 This device may not cause harmful his device must accept any interference received that may cause undesired operation 3 B POWER SERVICE SUBWOOFER OUT AUX PAIR OFF ON 1...

Page 37: ...ou are using a pillow with your Sound Charge Sides please ensure you re using an Insert with Acoustic Foam Fill Getting to Know Your System Rear Embedded Up firing Speaker Rear Embedded Up firing Spea...

Page 38: ...StealthTech product to enhance your experience by adding more bass to your Sound Charge System 1 Power Cord port 2 Subwoofer In port Aux In 3 Subwoofer Out port Aux Out 4 Connection LED 5 On Off Swit...

Page 39: ...p On the Center Channel press the Input button to change audio input On the remote control press the Input button display the current input and press again to change audio input Or press the Bluetooth...

Page 40: ...ON CENTER VOLUME In the app slide the Center Volume slider to increase or decrease the Center Channel volume Volume increases from left to right REAR SPEAKER VOLUME In the app slide the Rear Speaker V...

Page 41: ...Cont Getting to Know Your System Pairing Mode CENTER CHANNEL PAIRING WITH SUBWOOFER On the Center Channel hold down the Source and buttons for 3 seconds LED 1 will begin to blink when Center Channel e...

Page 42: ...ON LED BEHAVIOR DESCRIPTION DOLBY PRO LOGIC INDICATOR When Dolby Pro Logic is activated this LED sequence will light up lasting 2 seconds DOLBY DIGITAL INDICATOR When a Dolby Digital signal is detecte...

Page 43: ...e any questions about these products their installation or their operation please contact the Lovesac Customer Love Team at 1 888 636 1223 or customerlove lovesac com You can also visit www lovesac co...

Page 44: ...nzip the Wireless Charge pocket and ensure that the charger is fully plugged in Issue 11 TV audio not playing 5 1 surround sound Check TV audio settings IfusingHDMIsource trytheOpticalsource andviceve...

Page 45: ...esac StealthTech products listed below are covered under a limited warranty for 3 years following the date of purchase Sactionals StealthTech Sound Charge System Sound Charge Subwoofer Sound Charge Ce...

Page 46: ...ut 2 1 Amps 24V DC Speaker power output Max THD 1 50W RMS 100W Peak Speaker driver 1 x 8 Subwoofer Frequency range Down to 33Hz 10dB Operating temperature 0o C 45o C Dimensions 22 x 14 1 x 3 9 560 x 3...

Page 47: ...er Connect the equipment into an outlet on a circuit different from that to which the receiver is connected Consult the dealer or an experienced radio TV technician for help ISED compliance statement...

Page 48: ...rademarks and trade names are those of their respective owners The terms HDMI HDMI High Definition Multimedia Interface and the HDMI logo are trademarks or registered trademarks of HDMI Licensing Admi...

Page 49: ......

Reviews: